Printable Version of Topic
Click here to view this topic in its original format
Unmanned Spaceflight.com _ Cassini general discussion and science results _ Calibrating And Processing Pds Cassini Images
Posted by: Bjorn Jonsson Jul 30 2005, 09:30 PM
This may be a bit specialized to say the least but if anyone can help I'd be grateful. I have now downloaded most of the raw Cassini images from the PDS imaging node plus the coiss_0011 volume from the PDS rings node. Volume coiss_0011 contains calibration stuff like flatfields, masks for removing dust rings and mottling etc.
I have been implementing calibration code which will eventually be added to my IMG2PNG utility, assuming there is interest in this. This utility is mentioned in this thread: http://www.unmannedspaceflight.com/index.php?showtopic=291&st=0 .
My code has been largely based on the CISSCAL source code on volume coiss_0011 but cleaned up a bit and rewritten using C++. This has been very successful despite a wide variety of rather arcane data formats on the coiss_0011 volume (bigendians, littleendians, IEEE and VAX floating point numbers, a weird TIFF file containing floating point data etc.). For example, flatfielding, linearization etc. works very well and in particular, for images of low contrast targets like Saturn and Titan makes a big difference if the images are to be greatly sharpened (no mottling or dustrings).
There is one problem though: Darkcurrent subtraction. This is a problem, the CISSCAL code for this is somewhat complex and may contain some bugs - what it does is to generate 'synthetic' darkcurrent images based on a model taking various factors into account. These 'synthetic' darkcurrent images get written to disk so each of them only has to be generated once. If anyone has 'sample' synthetic darkcurrent images I would greatly appreciate if at least one of these could be emailed to me  since without this it is almost impossible for me to know if the images my code is generating are correct.
These images should (assuming my code is correct !) have names like \calib\darkcurrent\darks04228\n_dark027102410100_04228.img where '\calib' is in my case the calib-directory on the coiss_0011 DVD volume (which is lying on my hard disk).
Bjorn
Posted by: Malmer Aug 22 2005, 11:53 AM
Hi bjorn!
I downloaded IDL and requested a tryout license. after a little poking around I managed to get it to run. I have sent you one of those dark frames you requested.
Hope you get it to work. I would really enjoy playing with your calibration software. (i cant read the files cisscal creates.)
Mattias
Posted by: edstrick Aug 22 2005, 12:00 PM
The US Geologic Survey's Branch of AstroGeology's planetary data system has or used to have the ISIS planetary and remote sensing software available for non-commercial use. Original versions were for Sun Solaris, but there was a version specifically for RedHat Linux <they knew it worked on that> 5.something version about 5 years ago.
It can handle image cubes, like Galileo/Cassini infrared mapping spectometer data and all sorts of stuff and the PDS lables and image formats are normal as jpg to it.
I've been so up to my armpits and sinking the last few years with elderly parents needing more and more help, I've never gotten the time to play with it, but it should be out there and worth trying.
Posted by: um3k Aug 22 2005, 06:42 PM

But I only have windows!

Posted by: scalbers Aug 22 2005, 06:58 PM
FYI, I'm working in IDL if anyone knows of appropriate procedures for reading raw Cassini images 
Posted by: volcanopele Aug 22 2005, 07:01 PM
It can handle image cubes, like Galileo/Cassini infrared mapping spectometer data and all sorts of stuff and the PDS lables and image formats are normal as jpg to it.
I've been so up to my armpits and sinking the last few years with elderly parents needing more and more help, I've never gotten the time to play with it, but it should be out there and worth trying.
I use ISIS for all my processing, except quick mosaics (though the images that go into the mosaics are processed in ISIS first). Definitely a good program to use for spacecraft image processing.
Posted by: elakdawalla Aug 22 2005, 07:41 PM
I sure wish ISIS could run on a PC, or that someone could make someing Java based that would serve a few of the functions that ISIS does. I haven't had access to a Sun station since I was in grad school
I once used ISIS to generate a gi-normous global map of Venus based on the Magellan C-MIDR browse images, which makes it higher resolution (1.8 km/pixel) than the other global maps that had been out there in the past. I gave it to Steve Albers a couple of months ago, he's got it on his site now.--Emily
Posted by: djellison Aug 22 2005, 08:24 PM
The ISIS developers are aware that a Windows version is an almost must - HOWEVER - there's a Mac version of 2 out and about.
Doug
Posted by: Bjorn Jonsson Aug 23 2005, 12:14 PM
The most important parts of my software for calibrating Cassini images now work and will eventually be incorporated into IMG2PNG. Making this work was greatly complicated by the fact that the Cassini calibration files are in all sorts of weird formats, TIFF files containing floating point data, PDS files containing bigendian/littleendian, VAX/IEEE floating point numbers etc. In particular, finding source code to convert VAX floats to IEEE floats took a lot of time - by 'source code' I mean something that actually works .
Using calibrated images makes a big difference for images of low-contrast targets like Titan and Saturn (no dust rings or mottling). Also most of the images have been converted from 12 to 8 bits with a non-linear function aboard the spacecraft before transmitting them to Earth.
I will upload a new version of IMG2PNG once it is complete sometime in (probably) early September. It will not work unless the entire contents of the calib directory on Cassini volume coiss_0011 are available on the machine where it is run. Beware that if you download it by getting the CALIB.TAR.GZ file and use WinZIP to decompress it you *must* turn off the TAR file smart CR/LF conversion.
BTW I have ISIS on my old machine and use it from time to time, especially when working with Voyager images (getting rid of distortion in particular) but it is not very easy to use.
IIRC the images CISSCAL outputs contain 4 byte floating point image data.
Posted by: ugordan Oct 21 2005, 08:12 AM
Can anyone help me on the whole calibration/radiometric correction topic? Is there a guide on the net on how one creates "true" color images from RGB filters (or those similar to them, e.g. in Cassini's case R -> CB1)? I'm basically a n00b when it comes to image processing at the level of calculating radiances and stuff. I'm well aware that the images the spacecraft takes are usually setup so that each exposure maximizes the S/N for that filter combination so, obviously, stacking three channels together doesn't produce the right results.
For starters, I don't want to do all the fancy stuff like flatfielding, de-banding, dark current removal etc, but I do 8to12 bit conversion when necessary as well as bias subtraction.
I've come across a table at the end of Cassini ISS description pdf, it lists values called omega for a given filter combo for both cameras and it's supposed to describe the amount of light each filter passes through. So I've tried compositing images by normalizing exposure_duration * omega for all three filters. The results actually look pretty good when I use this with Titan WAC RGB/RGV frames, I get the same colors as public ISS images turn out. With the NAC, however, things are different - I always end up with an underexposed blue channel and the whole image becomes too orange-reddish. I don't know if there's any more corrections I am missing like quantum efficiencies of the CCD or whether they're already incorporated into omega values.
Like I said, I'm not aiming for very scientifically accurate images, only those that I can say look close to the real thing. Any help would be appreciated... 
Posted by: Bjorn Jonsson Oct 21 2005, 09:22 AM
I have written a program that calibrates Cassini images, including flatfielding which is very important for low-contrast targets like Saturn and Titan. I will probably make it available soon - I have been too swamped in Cassini images recently to do so.
An underexposed blue channel is a familiar problem. Also in many cases it is necessary to use synthetic color, e.g. synthetic green from CB1 and blue or synthetic CB1 from CB2 and green (or even blue).
Posted by: ugordan Oct 21 2005, 09:52 AM
I always thought the following press image was too weird: 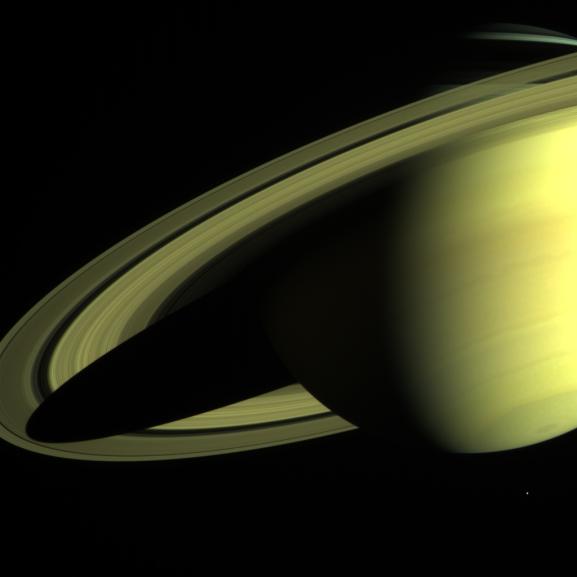
It's said to be taken through a RGB combination, but the colors look all but normal. Even if I try to stretch the blue channel in my composites, that still gives me a weird blue fringe in other areas which are naturally bluer (atmospheric limb, etc.). It's as though some of the filters have a gamma function applied when I compare my images to the CICLOPS ones.
As for the blue channel underexposure, I don't really understand it - it should cancel out by a much longer exposure that the BL1 images are usually taken, but it doesn't.
Does it really come down to mixing various filters (in a sense that the R channel in Photoshop is not just RED/CL2 but a mix of both RED and GRN filters?) in sRGB colorspace to get a "true" color image? I'm lost...
Posted by: Bjorn Jonsson Oct 21 2005, 10:08 AM
Actually "underexposed" is not what's happening in the blue filtered images - when calibrating the final result looks identical regardless of exposure time (at least in theory).
As for synthetic color, yes you do something like R=a x CB2 + (1-a) x G when using CB2 and green to get synthetic red.
Posted by: ugordan Oct 21 2005, 10:59 AM
That would be my reasoning also. I gather the only difference with varying exposures would be in the final calibrated image S/N ratio and whether there would be overexposed areas in the image.
I still don't understand why, then, the BL1 channel turns out too dark when I do the above normalization. Is there an additional factor that needs to be taken into account? Perhaps a correction for the bandpass of the filter combo? IIRC, one of the blue NAC filters has a pretty narrower bandpass than the other.
Is there actually ANY deterministic way to produce a true color image from the RED/GRN/BL1(BL2) images or is it in the end just guesswork and finding out what looks right?
Posted by: ugordan Nov 5 2005, 08:11 PM
I've been experimenting with "deterministic" ways to produce true color images. I've also been playing around with procedures to calibrate the images, adding flatfielding to my rudimentary converter.
My problem is, using NAC RED/GRN/BL1 filters and integrating the trasmittance with QE and solar spectrum, I wind up with composite images that tend to underexpose the blue channel. If I try correcting for the Sun's spectrum, I get results which, for Saturn, give more "natural" looking images, but make the icy moons look too blue.
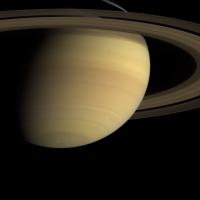
I've attached two sample images (they weren't taken at the same time, but were both taken through CB1/GRN/BL1 filters)
|
|
The left image is the result when the formula cisscal uses is applied. Also it's flatfield-corrected. The right one is using a correction for the fact the Sun emits less in the blue end and it's not corrected for the flatfield (note the dust ring on the rings).
Which of the two would you say looks more like true color?
Posted by: mike Nov 5 2005, 11:20 PM
I would say the second, I suppose because the left one appears to have a uniform yellowish-brown tint. Having never seen Saturn that close myself, however, I have absolutely no idea how it should look.
Posted by: ugordan Nov 6 2005, 12:22 PM
The right one also looks more natural to me. Well, I better put it this way: It looks more like the ones released by the imaging team. The problem is, as I said that with that scheme all moons turn out looking blue. In fact, when looking at CICLOPS images of the planet and the moons being merely specks of light, they are in fact looking bluish as well. So I'm wondering if the imaging team is embellishing those Saturn images just a bit, to make them look more "oooh!".
For example, these are a few shots of Titan and Iapetus I put together using the normal method, which makes Saturn all yellowish.

|

|

|
The two shots of Titan were acquired on Dec 13, 2004 with the wide angle camera at a distance of about 220 000 km and were corrected for the changing distance between respective exposures. The one on the left is a RGB composite, the right one uses violet for the blue channel, enhancing the haze above the moon's limb.
The Iapetus shot is similar to the one the imaging team released, but is a RGB composite (the imaging team used IR/G/UV, IIRC). Color fringing is pretty apparent in this pic because the spacecraft changed the viewing geometry noticeably, especially the green channel. Had I corrected for the blue channel issue here, the fresh snow visible would have turned up blue...
Posted by: Bjorn Jonsson Nov 6 2005, 01:26 PM
Which of the two would you say looks more like true color?
The right one definitely looks more realistic but based on what I've seen through telescopes I'd say the color is too saturated in both cases.
BTW now is a good moment to 'announce' a new version of my IMG2PNG utility:
http://www.mmedia.is/bjj/utils/img2png/
Previous versions were announced/discussed in this thread:
http://www.unmannedspaceflight.com/index.php?showtopic=291
The major change in this new version is that it can calibrate Cassini images. It should be noted that this is not a user friendly utility, neither the 'installation process' nor the user interface. For example it runs in a command prompt window so if you are not comfortable with that don't use it ;-). I plan to release a version with an improved user interface later but it's not a high priority.
Also you will need to download lots of data from the COISS_0011 Cassini DVD volume to be able to calibrate Cassini images.
Any feedback is welcome.
PS I'm attaching an image showing the importance of flatfielding when working with low contrast images. The two images are processed in a similar way (including sharpening with an unsharp mask) with the main difference being that the left one was not flatfielded. This is a section of a BL1 image of Saturn.

|
Posted by: ugordan Nov 6 2005, 01:59 PM
BTW now is a good moment to 'announce' a new version of my IMG2PNG utility:
http://www.mmedia.is/bjj/utils/img2png/
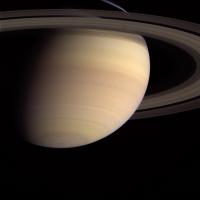
The saturation issue is probably due to the fact the image is too dark. I've kicked up the gamma in Photoshop to 1.33 and the result for the left image is looking better, IMO:

|
Regarding IMG2PNG, I'm curious, why do you need the detached LBL files as well? Isn't all information needed for calibration and regarding instrument states included in the IMG file as is?
Posted by: Bjorn Jonsson Nov 6 2005, 02:22 PM
I do not remember exactly what's in which file but the way IMG2PNG is currently written it needs the LBL files. It will look for an LBL file with the same name as the IMG file (except for LBL instead of IMG in the name) so this shouldn't make it more difficult to use, also the LBL files are very small.
Posted by: Bjorn Jonsson Nov 8 2005, 09:33 AM
My problem is, using NAC RED/GRN/BL1 filters...
I have also been experimenting with calibrated color images using CB1/GRN/BL1 - I assume that by RED you mean the red filter and not CB1?
The color I get looks somewhat different from yours, possibly because I'm using CB1 and not RED. Some time ago when I was processing images of Jupiter I had to add 'fudge factors' to get realistic color (the main problem was the dark BL1 image). Interestingly, after applying these same fudge factors to a color image of Saturn the color becomes very similar to your left image.
Posted by: ugordan Nov 8 2005, 11:00 AM
The color I get looks somewhat different from yours, possibly because I'm using CB1 and not RED. Some time ago when I was processing images of Jupiter I had to add 'fudge factors' to get realistic color (the main problem was the dark BL1 image). Interestingly, after applying these same fudge factors to a color image of Saturn the color becomes very similar to your left image.
You're right, the above image was taken through the CB1 filter. There aren't that many RED images taken by NAC as yo've noticed a while ago. I've found a case where both a RED and CB1 filtered images of Saturn (the same view) exist and compared them, they indeed turn out very similar, the CB1 being only slightly brighter and the "blue cranium" is the only place noticeably brighter in CB1 than in the RED.
As I said before, I have a feeling the imaging team enhances their true color images of Saturn to make them look more bluish. If you take a look at the small moons (Mimas and Enceladus) often visible in those shots, they're colored distinctly blue, while the shots of them alone are obviously predominantly whitish or grayish in Mimas' case.
Perhaps volcanopele could shed some light on the "true" color issue of Saturn?
Posted by: Bjorn Jonsson Nov 8 2005, 11:32 AM
If you haven't done so you should take a look at this HST image of Saturn:
http://heritage.stsci.edu/1998/29/index.html
This is by far the most realistic spacecraft image of Saturn that I have seen, based on what Saturn looks like when seen visually through a telescope but even so this is not a simple problem. The problem is that even though I have seen Saturn through a fairly big telescope I'm not sure exactly what it would look like from a distance of a few million km. The color saturation increases with increasing telescope size with Saturn becoming more yellowish (instead of whitish) when using a big scope.
Posted by: tedstryk Nov 8 2005, 11:39 AM
http://heritage.stsci.edu/1998/29/index.html
This is by far the most realistic spacecraft image of Saturn that I have seen, based on what Saturn looks like when seen visually through a telescope but even so this is not a simple problem. The problem is that even though I have seen Saturn through a fairly big telescope I'm not sure exactly what it would look like from a distance of a few million km. The color saturation increases with increasing telescope size with Saturn becoming more yellowish (instead of whitish) when using a big scope.
Not to mention that the eye can play tricks when looking at something like Saturn in the darm, surrounded by black sky. For example, there is the bright red Mars issue - it sure looks that way in a telescope, but it's color isn't nearly so red.
Posted by: ugordan Nov 8 2005, 12:59 PM
I have a question somewhat related to this issue. I do my color compositing in Photoshop CS and, naturally, the inputs are 3 grayscale images. I usually switch the red filtered image into RGB mode and paste the other grayscale images into their respective channels. However, when changing image mode from grayscale to RGB, I notice that while the composite image stays the same, when I switch to individual channels the dark areas of the image get even darker, while the bright ones don't noticeably change. What I'm saying is that the color components of a grayscale image in RGB mode don't look exactly like the original grayscale.
It's like PS is clamping the darks or applying a nonlinear ramp. This produces weird results, especially with Saturn where the rings are inherently fainter than the planet itself. Note that I have color management switched off, though there is an app in my windows startup called Adobe gamma loader or something like that.
Has anyone else come across this?
Posted by: tfisher Nov 12 2005, 05:40 AM
I am trying to use IMG2PNG to process Titan images, with mixed success. Maybe you can give me some help.
First of all, I have been trying to get away without downloading the entire calibration DVD. Instead, I've only downloaded the files named when img2png pops up a dialog complaining it didn't find them. Maybe you can tell me already that I'm doomed with this strategy.
For some images, it doesn't seem to try to do calibration at all. For instance, I download http://pds-rings.seti.org/volumes/COISS_2007/DATA/1477481470_1477490065/N1477488603_2.IMG and http://pds-rings.seti.org/volumes/COISS_2007/DATA/1477481470_1477490065/N1477488603_2.LBL. But img2png -r applied to this produces a file with only 5 distinct shades of gray, and no complaints about missing calibration files. Adding -s10 or somesuch doesn't increase the number of shades.
On the other hand, for an image like http://pds-rings.seti.org/volumes/COISS_2007/DATA/1477490097_1477517234/N1477490884_2.IMG/http://pds-rings.seti.org/volumes/COISS_2007/DATA/1477490097_1477517234/N1477490884_2.LBL the program requests several calibration files, and after they are present produces an output with 71 distinct shades of gray and partial flatfield correction. (From a 12bpp imager, I would have hoped for more than 71 shades, but at least this result resembles the correct thing!)
Am I doing something wrong?
Posted by: Bjorn Jonsson Nov 12 2005, 07:18 PM
Probably not - I discovered that in a few cases IMG2PNG didn't complain if it didn't find a calibration file so you probably need to download a few additional calibration files.
There is a new IMG2PNG version available that should always complain when calibration files are missing:
http://www.mmedia.is/bjj/utils/img2png/img2png_exe.zip
This file only contains a new version of the executable so it is smaller than the 'full' download you already have.
Another problem is the fact that there really are very few shades of gray in the images you are using although not as few as you are getting. Here are calibrated PNG versions of these files:
http://www.mmedia.is/bjj/utils/img2png/N1477488603_2.png
http://www.mmedia.is/bjj/utils/img2png/N1477490884_2.png
Also it might be a good idea to try http://pdsimg.jpl.nasa.gov/data/cassini/cassini_orbiter/coiss_2007/data/1475025242_1475045793/N1475025469_1.IMG and http://pdsimg.jpl.nasa.gov/data/cassini/cassini_orbiter/coiss_2007/data/1475025242_1475045793/N1475025469_1.LBL. This is a BL1 image of Saturn. It will be obvious whether it gets flatfielded or not if you sharpen it using an unsharp mask after calibrating and compare it to the uncalibrated version.
Let me know if this helps.
Posted by: tfisher Nov 12 2005, 10:32 PM
Thanks. Actually, my major problem turns out I was opening the images as 8-bit instead of 16-bit png files. (Using ImageJ, which supports 16-bit per chanel, but requires a plugin to load 16-bit png files...).
Here's a sample of what I'm playing with; here is the Huygens landing site with a FFT bandpass filter applied and contrast adjustment:

|
Posted by: djellison Nov 12 2005, 11:13 PM
I find it a bit dissapointing that the flatfield/darkfield work etc hasnt already been applied to Cassini imagery as it has with MER imagery that gets on the PDS as RAD's
Doug
Posted by: Bjorn Jonsson Nov 12 2005, 11:30 PM
This is probably because the calibration files may get updated, not only for data that hasn't been released but also for data that has already been released. Still it would be nice if the PDS had calibrated data that would get updated when the calibration files change. IMG2PNG doesn't completely accomplish what CISSCAL can do, for example there's no darkframe subtraction. This is not a big deal - the reason is that it is extremely complicated to do becuase it isn't done using actual darkframe files but by using synthetic darkframes constructed based on a model of the camera's behavior as a function of exposure, gain, compression etc. Also IMG2PNG doesn't remove the 2 Hz noise.
Posted by: tfisher Nov 13 2005, 01:51 AM
...
Let me know if this helps.
I'm getting the same results you are, but I still wonder if something goofy is going on. For the darker of the two sample images we've been discussing, the dust rings and other noise are still pretty overwhelming. Here is the contrast stretched image, so you see what I mean. On other images the results seem much better. Does the calibration just not work well on underexposed images?

|
Posted by: Bjorn Jonsson Nov 13 2005, 08:09 PM
Yes, it is - you should see a big improvement now
. I discovered that 16 bit images didn't get calibrated at all. What confused me were the few intensity levels you were initially getting (lack of ImageJ plugin) and the fact that IMG2PNG's 'big sister' (a much bigger program I use for processing and reprojecting planetery images) worked - it's based on partially the same code.A new version (executable file only) is available here:
http://www.mmedia.is/bjj/utils/img2png/img2png_exe.zip
Updated versions of the calibrated versions of the IMG files you have been using are available here:
http://www.mmedia.is/bjj/utils/img2png/N1477488603_2.png
http://www.mmedia.is/bjj/utils/img2png/N1477490884_2.png
The first one should have changed a lot but the second one hasn't changed.
I'm confident everything works properly now.
Posted by: tfisher Nov 13 2005, 08:38 PM
.Thanks. Unfortunately now I'm seeing a problem with another file. With this
http://pds-rings.seti.org/volumes/COISS_2007/DATA/1477490097_1477517234/N1477491846_2.IMG/http://pds-rings.seti.org/volumes/COISS_2007/DATA/1477490097_1477517234/N1477491846_2.LBL
img2png requests a calibration file bitweight\nacg0p5_bwt.tab which does not exist in the calibration dataset http://pds-rings.seti.org/volumes/COISS_0011/CALIB/BITWEIGHT/. When I click "okay" to proceed without the file, img2png crashes.
Thanks again for making such a useful program; sorry to keep bringing you problems with it.
[edit]
A postscript on that crash; it consistently crashes on that file when I do "img2png *.img -r" in a directory containing that file and several others, but consistently doesn't crash if I just do "img2png n1477491903_2.img -r". Odd.
Posted by: Bjorn Jonsson Nov 14 2005, 12:03 AM
This problem was due to two subtle bugs which were not related to the bitweight correction. One sometimes caused a crash when calibrating 256x256 pixel images and another one caused a crash in very rare cases when reading VICAR files.
A new version is available here:
http://www.mmedia.is/bjj/utils/img2png/img2png_exe.zip
The intensity in 512x512 and 256x256 pixel images also now gets multiplied by 0.25 and 0.0625 respectively to make it identical to the intensity of 1024x1024 images. Before this the small images were brighter; 256x256 sometimes got far too bright.
This new version is much more thoroughly tested than previous versions. As a test I converted a fairly large directory of Cassini IMG files. The directory included 8 and 16 bit images of various sizes.
I really need to rewrite parts of the PDS file handling code from scratch, parts of it are more than 10 years old and have become rather messy.
Posted by: tfisher Nov 14 2005, 01:12 AM
That fixes the crash. There is still the issue of the missing nacg0p5_bwt.tab file. Though maybe that is a problem of the PDS data release, instead of a problem of img2png?
(Again, thanks for the helpful program, and your help with it!)
Posted by: Bjorn Jonsson Nov 14 2005, 10:39 AM
The warning because of nacg0p5_bwt.tab is normal. The 'g0' in the filename means gain state 0 for which no bitweight correction is needed, assuming I'm understanding everything correctly. Messageboxes can pop up in similar cases during the various calibration steps, especially if you are calibrating images from the wide angle camera. Usually nothing is wrong but I decided to use them while getting a 'feel' for the data and to spot anything that looked really weird. In future versions of IMG2PNG the messageboxes will be optional and/or it will be possible to write them to a logfile instead.
Posted by: volcanopele Nov 14 2005, 09:32 PM
Sounds like some of you are joining me in the hell that is calibrating Titan images. The only thing I can tell you is that you will need a secondary flatfield file. The flatfield file that comes with the PDS delivery is not sufficient. In this delivery, and in PDS deliveries to come, look for bland CB3 images with similar camera settings (gain state, exposure time. etc.) as the images you want to flatfield, and sum those to get a secondary flatfield file.
Posted by: ugordan Nov 19 2005, 04:05 PM
Bjorn: concerning the way your app does shutter offset treatment, I'm personally confused with the way cisscal handles this and the 1 ms it adds to the overall offset slope. I don't understand whether the actual exposure is (exp+offset[sample_number]) or (exp-offset[]) and whether we're supposed to add or subtract a fixed value from the offset file.
It's not so much of a point for NAC, but for WAC, which tends to use very short exposures (only a few ms) for the R/G/B filters, the different approaches produce dramatically different results.
Posted by: Bjorn Jonsson Nov 21 2005, 09:28 PM
The true exposure is commanded_exposure-offset[sample_number]-1.0.
The 1.0 constant seems to be a temporary 'quick-and-dirty' way of doing things if I understand the ground calibration report (section 4.3) and the comments in CISSCAL correctly.
However, I now notice that there seems to be a bug in CISSCAL (and consequently also in IMG2PNG), 1.0 should only be subtracted when calibrating NAC data.
I'll need to fix this in IMG2PNG and also make it possible to specify additional flatfielding files as tfisher's processing of Titan data has demonstrated.
Posted by: ugordan Nov 22 2005, 08:04 AM
The 1.0 constant seems to be a temporary 'quick-and-dirty' way of doing things if I understand the ground calibration report (section 4.3) and the comments in CISSCAL correctly.
However, I now notice that there seems to be a bug in CISSCAL (and consequently also in IMG2PNG), 1.0 should only be subtracted when calibrating NAC data.
I only bring this up because my two "testbed" image sets, Jupiter flyby WAC R/G/V and the Dione flyby WAC R/G/B frames both exhibit excessive overexposure in the violet/blue filter after radiometric correction. I might be off, but I'm attributing this to the fact that in both cases the red and green exposures were 5 and 15 ms or so, respectivelly, while the violet/blue exposures were around 150 ms. This would be the reason small variations in the shutter offset (+/- 1 ms) tend to dramatically darken/brighten the red and green channels compared to the blue/violet.
OTOH, the offset read from the file, for the middle sample in the WAC is somewhere around -2.7 ms which is why I got the feeling the actual offsets should be added instead of subtracted. The official document did say the actual exposures were always less than the commanded ones.
Powered by Invision Power Board (http://www.invisionboard.com)
© Invision Power Services (http://www.invisionpower.com)