Printable Version of Topic
Click here to view this topic in its original format
Unmanned Spaceflight.com _ Cometary and Asteroid Missions _ foldable map of Ida
Posted by: chuckclark Oct 27 2008, 12:57 PM
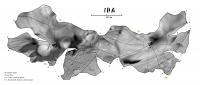
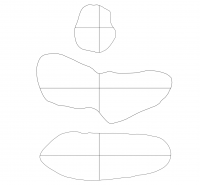
Here is a constant-scale natural boundary map of Ida that folds to a decent replica of the asteroid. Map edges are Ida's major ridges.[attachment=16299:Ida_MaxRidge_post.jpg]
[EDIT] Here it is again with the photomosaic properly credited; apologies to M. Nyrtsov for my oversight.
|
Posted by: jumpjack Nov 6 2008, 08:24 AM

[EDIT] Here it is again with the photomosaic properly credited; apologies to M. Nyrtsov for my oversight.
I can't believe it!

Did anybody build it?!?
Does it exist a pic of it completed?
Posted by: dilo Nov 6 2008, 03:07 PM
I tried with the aid of my son but result was very bad... perhaps, I need to print it on a larger scale (it was A5 size approx).
Posted by: chuckclark Nov 6 2008, 05:31 PM
I've put it together twice -- I'll post a digital pic as soon as I can find a pal with a digital camera -- and the first one went together easier than the other. So it seems that where you start, and which sides you leave the tabs on, makes a difference in the result.
The bigger size definitely helps. I printed it on 11 x 17 (ledger-size) paper.
Posted by: Phil Stooke Nov 6 2008, 06:14 PM
Does my old friend Maxim Nyrtsov read this? Hi Maxim! See you next year!
Yes, Maxim visited me in Ontario in 2000, and helped a lot with the image reprojection work for the global mosaic Chuck has used here. He lives and works in Moscow.
Phil
Posted by: jumpjack Nov 7 2008, 07:26 AM
It was difficult for me even to build a paper Earth globe, without something to glue the paper on... I can't imagine how I could build such an irregular shape..... 
But I guess a 3d model should exist somewhere, if a card model has been prepared: where could I find it? Maybe I could build a model by means of multiple overlapped "slices" of cardstock or wood...
Posted by: Tayfun Öner Nov 7 2008, 11:41 AM
I built the physical models that Chuck is using to create his maps, if anyone is interested I can cut the computer model in slices that you can print on paper to create your own models.
Posted by: djellison Nov 7 2008, 12:13 PM
What format are those models available in?
Posted by: jumpjack Nov 7 2008, 12:52 PM
It was just an idea, I don't know if it is actually feasible to glue the textured paper model over the "sliced carstock model".
Anyway it could be interesting to give it a try.
Are you going to manually "cut" the model in slices, or does it exist (already?
) a program to do it?BTW, I remember several years ago I used this "slice method" to build a model of Mount Etna, and the result was very very good even without textures, as the border lines stressed the shapes of hills and valleys.
Posted by: Tayfun Öner Nov 7 2008, 01:06 PM
I can convert the models to most popular formats.
Cutting the computer models in slices is an automatic process. I think it would be feasible to build such a model, the most difficult part would be cutting the slices from cardstock. If you have access to a laser cutter you will only have to glue them, using guide holes that I can add.
Posted by: jumpjack Nov 7 2008, 01:20 PM
Cutting the computer models in slices is an automatic process. I think it would be feasible to build such a model, the most difficult part would be cutting the slices from cardstock. If you have access to a laser cutter you will only have to glue them, using guide holes that I can add.
Actually I didn't use cardstock for Etna model... but I don't know the english name!
 They were sheets of gum, used to cover floors ("linoleum"?), 1 or 2 mm thick. Quite easy to cut using scissors, as they don't rip like cardstock.
Posted by: chuckclark Nov 7 2008, 02:16 PM
jumpjack:
Here is a link http://www.planetary.org/blog/article/00001348/ that gives tips and pics on assembling these paper models -- Note the link deals with Phobos not Ida, but the assembly tips ought to be transferable. Emily's article also includes (I'll have to confirm this) another link to a post I made here at USF with further tips and alternate method (clear tape) of holding it together -- Emily prefers glue.
Oh, Tayfun, now I see your post about the internal slice-packing -- What a superb idea! If you check out the latest posts (and maps) at the "Map of Eros" thread, you'll see my frustration at getting the Eros folded-up map to hold its shape in the Shoemaker region; an internal mass , even if was a fairly loose fit, would, I think, do the trick.
The problem will be to coordinate the size properly, so that the photomosaic paper will wrap the insides neatly. The "Tayfun slices" (aim for about 3/8 inch thick; keep it extremely coarse -- not many slices will be needed; as well as a bit undersized) will make on object of a certain scale, and if that matches the scale bar included on the csnb (constant-scale natural boundary) map, things ought to work. Or be close enough that a little fiddling will be all that's needed.
When I print the Ida and Eros maps on ledger paper, the assembled (folded-up) objects are about 5.5 inches in longest dimension. They aren't in front of me at the moment, but when I get back to my asteroid lab I'll put the micrometers on them and report.
Posted by: jumpjack Nov 10 2008, 08:12 AM
Here is a link http://www.planetary.org/blog/article/00001348/
Well, the final result is not at all as I thought it was. I think I won't try it, unless Tayfun post his "sliced" models...
Posted by: chuckclark Nov 10 2008, 01:33 PM
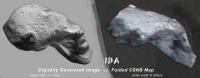
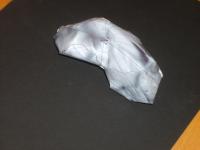
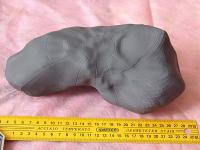
OK, I corralled a photographer, (S. Adkins) to take a pic of the folded map.
Here (on the left, courtesy of T. Oner)) is a digital image of Ida; and (on the right) the Adkins photo, taken from approximately the same point of view as the digital image.
On the other hand, I think jumpjack is best to wait and hope that Tayfun will make a slices-infill. Two reasons:
1) IN GENERAL: These are experimental maps; folding up to make a convenient, holdable model is a nice property, but the maps are far from perfect (the technology at the moment uses -- to make outlines and graticles -- the very latest of Renaissance graphical techniques, and Photoshop to add the photomosaics).
2) IN SPECIFICS: With the exception of a few crania I mapped a while back, Ida is the most complicated form yet attempted in constant-scale natural boundary mapping, certainly the most extravagantly shaped asteroid. Something (on the back side of this view!) is a little amiss -- to kinked or cramped -- around point "n.". It's easy for the geometry to slip a bit, and the edge get a little out of alignment or true constant-scale; this is probably the problem. Printers can also be a bit out of relative proportional accuracy.
So best to take this all with a grain of salt.
|
Posted by: Tayfun Öner Nov 10 2008, 03:13 PM
Chuck the comparison photo is really impressive.
Due to Ida's irregular shape slices will not be contiguous and I suggest first we try it with Phobos. I will post the slices in DXF and CDR formats in a few days.
Posted by: jumpjack Nov 10 2008, 06:52 PM
Due to Ida's irregular shape slices will not be contiguous and I suggest first we try it with Phobos. I will post the slices in DXF and CDR formats in a few days.
How do you make the slices? By hand?
Don't know if I have a suitable freeware SW to read DXF or CDR, would it be possible to export to the old WMF/EMF format?
Where can I download an asetrodi model in 3ds format? (or any other compatible with Google Sketchup)
Ok, questions are finished.
Posted by: chuckclark Nov 10 2008, 08:42 PM
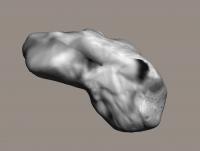
Thanks, Tayfun. Like I say, the view from the other direction is not so perfect -- I have an Adkins digital pic of that side, can you send me a digital image of the shape model from the same view? I'll make another comparison plate. Here, I'll post what I have . . .
Due to Ida's irregular shape slices will not be contiguous and I suggest first we try it with Phobos. I will post the slices in DXF and CDR formats in a few days.
[/quote] I agree. Especially as Ida is the most complex shape, best to work up to it.
Have you tried to assemble the Phobos map-model yet? Phobos model hold their shape fairly well without an infill, but they'll be much stronger with it.
Note that the slices will have to be truncated, primarily at the "blunt" end, where the map precis (the choice of boundary tree) leaves the largest lobe, or flattened facet. We'll probably have to work this out ad hoc, by trial and error. At the DPS meeting, some education experts were excited about the possibilities -- tactile, hands-on activity, etc. -- but immediately asked about some kind of solid fill. So I think it's worth the effort. We have stuff here called foam-core board; I'll probably use that to cut the slices. It comes in 1/8 inch thickness increments.
|
Posted by: Tayfun Öner Nov 10 2008, 08:43 PM
By hand I presume you mean manually, no I will make them automatically.
I can probably convert them to WMF but DXF or CDR are more suitable if you are planning to cut them by laser.
You can download the models from the PDS Small Bodies Node. Celestia keeps some of them in a more friendly 3DS format.
Posted by: chuckclark Nov 10 2008, 08:46 PM
this may surprise you but I don't have much familiarity with those programs. DXF is the only acronym I recognize, and VectorWorks is the cad system i use for architectural drawing.
Posted by: Tayfun Öner Nov 11 2008, 05:20 PM
Here is a rendering from a similar angle.
|
Posted by: Tayfun Öner Nov 11 2008, 06:00 PM
Here are the Phobos slices. As I don't know how they will be used, I left them in 3D space. They are 0.3 km's apart.

Posted by: chuckclark Nov 11 2008, 08:14 PM
Well, so far so good. I downloaded and unzipped the file, then imported it into VectorWorks, where it appears to be all there.
I can probably figure out how to core an alignment hole or two through them, but I'm not sure I have the strength to print out each layer (must be thirty or so, right) on stock (how thick)?
Maybe someone else has a laser cutter?
Let me sleep on this. Maybe I'll think of something . . .
Great shot, by the way, Tayfun of the Northerly view of Ida. I'll work up a plate on that while I ponder this slices business.
Posted by: chuckclark Nov 15 2008, 06:54 PM
Well, here's what I think: cutting all those slices out of something looks like a real pain in the old asteroid, so to speak; and even if I had a laser cutter and matched sheet thickness to the appropriate scale, I'm sure I have the technical wherewithal to glue them all together evenly.
Surely that's not how you made (I'll stick with Ida as topic, but same applies to Phobos) this model, right? However this got made is the way to go, for good solid 3D models.
Even the original Eros models (the NEAR team had) used the assembled-slice method only to make a master object, then it was in turn used to make a mold, from which the production run was cast.
And yet all these methods leave us wanting the photomosaic imagery in real space, not just in the computer where we can't get our hands on it. Whence the advantage of foldable constant-scale natural boundary maps, with the disadvantage they're so easy to dent, if not crush.
So see next post for the rest of what I've come up with.
|
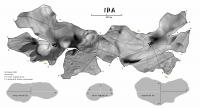
Posted by: chuckclark Nov 15 2008, 07:17 PM
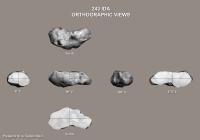
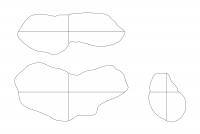
Okay, so borrowing a little from both systems, here is the csnb map of Ida along with a set of three (only three!) interlocking ribs, one rib for each major axis. The ribs' white lines indicate where slots are to be cut, black lines to remain as assembling guides. (Note that the short rib will go in as two separate pieces.)
DON'T, anyone, at the risk of extreme frustration!, take this plate for anything but a suggestion. I made the rib shapes from Tayfun's ORTHO VIEWS plate, and Ida is so extremely concave that the "short vertical rib" is only a guess for accurate, because its perfect shape is hidden from both directions. It needs some uncertain amount of trimming near point z. Plus, I haven't tried assembling this yet to see if in fact I've got the ribs and the map at the same scale.
BUT, with this as a guide, Tayfun will be able to generate these three ribs easily and accurately; and thickness of slice won't be an issue.
Just to lessen confusion, the ribs shown in Ortho Views are flipped from what is shown in the map plate.
Tayfun, if you'll make them for our asteroid set so far (Eros Ida, Phobos, Deimos), I'll set each in scale with the csnb maps, and trim them in where the folded csnb-form deviates from true shape. (Eros in particular is the troublesome one to hold up shape in hollow folded paper, and probably will need another "short" rib, parallel to the main short rib and centered on shoemaker.)
The assembled result will still be a bit susceptible to dents, but the overall skills required won't be at the level of a professional model builder to get it done.
|
|
Posted by: Tayfun Öner Nov 15 2008, 07:58 PM
Chuck, that is brilliant. Here are your cuts both in vectoral and bitmap form.
|
Posted by: djellison Nov 15 2008, 09:26 PM
GENIUS
Posted by: chuckclark Nov 17 2008, 02:01 PM
Well, assuming you mean the ability to look at problems from outside the usual box, I plead guilty, and cravenly point the blame at having when back in grammar school specialized in play.
Or perhaps you mean the lucky magic that constant-scale natural boundary maps fold to replicate their originating object. I trace that idea to Albrecht Durer c1519, although that's a coincidental trace I owe entirely to the insights of the art historian Erwin Panofsky and his pal Marston Morse. I didn't uncover that connection to Durer's "prototopological" mappings until well into this project. Tell the truth, I had the good fortune as a first-grader to be challenged to "fix the problem with all these world maps"; problem being, "they're all stretchy at the edges."
And as for genius, I think it goes in greater measure to the slow-witted, like me. It took a good nine years of making these maps before it dawned on me that their essential characteristic is to rigorously put "constant-scale" (the equator on a Mercator or simple cylindrical map) at the edge -- edge no more stretchy, just what my challenger asked for! The "natural boundary" requirement is merely gravy, ensuring that the map's various and sundry lobes are composed of districts that make sense -- in this case valleys (aka basins or dales) -- rather than and abstract (pragmatic . . . objective) triangles or gores.
The general trick, seems to me, is to be able without prejudice to name something new. (For more info, see M. Faraday's confessions on his discovery of electromotive force.)
Here is the foldable Ida with the Tayfun-corrected ribs:
I haven't yet had time to try putting it together, so the caveat still holds about the ribs need shaving where the folded object differs from Ida's true shape. Also the caveat that I may have failed to maintain constant-scale at map edge, probably near point "n."

|
Posted by: Phil Stooke Nov 17 2008, 04:10 PM
Very interesting and entertaining stuff. I think Chuck's approach opens up possibilities for all sorts of outreach and educational opportunities, built around 'make your own asteroid' kits for school or hobby uses.
Phil
Posted by: chuckclark Nov 21 2008, 10:02 PM
Wonderful, Tayfun, and I know you are busy at the moment, but would you have time to add an extra short rib (parallel to the "main" short rib) at the quarterpoint to the left (as we look at your image) of the main short rib? Reference lines for this new short rib on the two long ribs will be helpful too.
Hope that's not too much to ask. Having assembled several of the maps, I think this extra rib will be a great help in getting the Shoemaker region to hold its shape.
Thanks
Posted by: Tayfun Öner Nov 22 2008, 10:56 AM
Eros ribs updated, please note that north is up for the small ribs.

|
Posted by: jumpjack Dec 29 2008, 10:00 PM
I just discovered that Google Sketchup can easily create sections of any 3d model and that it can import .3ds files.
Are .3ds files of any asteroid available around?
Here it is an asteroid in sketchup format for your tests:
http://sketchup.google.com/3dwarehouse/download?mid=ffed8c05ad3a2af6e4406b3bf37e6ffe&rtyp=s6&fn=Untitled&ctyp=other&prevstart=0&ts=1225385251000
Look for menu item "tools/sections" (I guess: I have italian version of Sketchup...)
Once selected the section plane, select MOVE and then move the plane around.
Posted by: paxdan Jan 6 2009, 06:08 PM
Here is a link to SliceModeler http://blog.makezine.com/archive/2009/01/slicemodeler_fantasy_to_physical.html
Posted by: jumpjack Jan 6 2009, 06:58 PM
thanks, I just found this script too.

Now I just need some asteroid models!
Powered by Invision Power Board (http://www.invisionboard.com)
© Invision Power Services (http://www.invisionpower.com)