Printable Version of Topic
Click here to view this topic in its original format
Unmanned Spaceflight.com _ Mars _ mer photos
Posted by: scooterlord Sep 2 2006, 05:01 PM
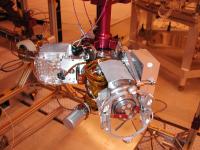
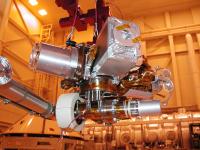
hello.. i am trying to model in 3d the mars rover and can't find the correct material, so I was wondering whether anyone in here has access to more information than I do and cares to help.
I am looking for detailed pictures of rover parts from all sides (top, left, right and bottom). I am attaching a few pics for the members to see the progress of my work. Trying to be as accurate as possible. Process is really slow since I have to make stuff out of bad reference pics I've tried collecting material from the nasa site, from raw images coming from the rover, from roobtics' sites etc, but couldn't come up with the correct reference i am seeking.
if anyone cares to help, please do so 


Posted by: dilo Sep 2 2006, 07:44 PM
scooterlord, I do not have the documentation you're asking for, but I want to express my enthusiasm: the work you did up to now is simply breathtaking! 
Did you estimated how many polygons should approximately contain the complete model? (I suspect my poor PC will never be able to visualize it  )
)
Posted by: djellison Sep 2 2006, 08:25 PM
There are a LOT of high res images at the KSC website
Use the advances search option here
http://mediaarchive.ksc.nasa.gov/index.cfm
And search for images, in reverse date order, having selected Mars Exploration Rovers under the Expend. LV drop box.
This is the first image that includes a rover
http://mediaarchive.ksc.nasa.gov/detail.cfm?mediaid=18623
There are a LOT of images in there.
Doug
Posted by: scooterlord Sep 2 2006, 08:28 PM
thanks dilo.. as for the polys, I have no idea, they can end up as many as they want as long as I am happy 
djelisson, thanks for the sites, i'll look into it. for the time being, just in any case anyone happens to have what i want, i need hi-res photos of the high gain antenna, microscopic imager and especially the mossbauer spectroscoper.
Posted by: djellison Sep 2 2006, 08:45 PM
I've had a look through for HGA and other deck details.
I share your frustration at IDD detail - there's not a lot out there - so all the more kudos for you for doing a great job on the APXS and RAT.....
Here's some of the best I've found.
http://mediaarchive.ksc.nasa.gov/detail.cfm?mediaid=19010
http://mediaarchive.ksc.nasa.gov/detail.cfm?mediaid=19006
http://mediaarchive.ksc.nasa.gov/detail.cfm?mediaid=19003
http://mediaarchive.ksc.nasa.gov/detail.cfm?mediaid=19001
http://mediaarchive.ksc.nasa.gov/detail.cfm?mediaid=19002
http://mediaarchive.ksc.nasa.gov/detail.cfm?mediaid=19039
http://mediaarchive.ksc.nasa.gov/detail.cfm?mediaid=19216
http://mediaarchive.ksc.nasa.gov/detail.cfm?mediaid=19459
http://mediaarchive.ksc.nasa.gov/detail.cfm?mediaid=19458
http://mediaarchive.ksc.nasa.gov/detail.cfm?mediaid=19456
http://mediaarchive.ksc.nasa.gov/detail.cfm?mediaid=21566
http://mediaarchive.ksc.nasa.gov/detail.cfm?mediaid=21561
Doug
Posted by: scooterlord Sep 2 2006, 08:49 PM
thanks for the help! currently looking to the site myself.. i hope i find helpful reference in there. i'll keep u guys posted for every work-in-progress i do..
Posted by: dilo Sep 2 2006, 09:39 PM

Great!
Posted by: scooterlord Sep 8 2006, 08:09 PM
hey there guys... sorry it took me a while to get back to you, but I've been really busy lately (and I don't mean with 3d  )
)
temp render of the hga. i actually spent 3 days modeling just this. modeling and re-modeling that is in order to achieve accuracy. but how am I supposed to do that without the correct reference? I spend more hours trying to figure out the shapes and measuring ratios between this line and that line than actually modeling. i'll keep you guys posted for new stuff..
let me know what you think, and PLEASE if you have clear photos other than the ones suggested previously in this thread please share!
Posted by: remcook Sep 8 2006, 08:16 PM
Sorry, I can't help you. I will just say: wow! You have done these kind of things before haven't you? Amazing!
Posted by: scooterlord Sep 8 2006, 08:23 PM
thnx remcook! well, i've done it before, I can do it again. 3d takes a LOT of patience and I have it; the recognition along with the personal satisfaction that comes afterwards is worth it. you can visit other samples of my work at http://sc3ddesigns.f2g.net just to have an idea on what results are to come from this mer project
Posted by: djellison Sep 8 2006, 09:17 PM
Loving the work - I'm wondering what the end goal is - are you intending to animate it - put the model on Turbosquid, or is it a work of passion
Doug
Posted by: scooterlord Sep 8 2006, 09:46 PM
well, reason I started this project is because I was all excited with the new 'trasnformers: the movie' -coming up on 2007- trailer, which features the mars rover. i was looking for a new 3d project to fill my free time, so here it was. i usually start such projects for fun, and personal satisfaction - it's like me having it, designing it, really cool feeling. especially when you end up creating a model from crappy reference etc, increases your perception abilities. very important. IRL i finished a radiologist/actinologist. I take x-rays, CTs, etc. perception is really important especially in surgeries, knowing how the object will look like from different angles, what result i will take on my screen if i point my emmiter here or there..
..but after countless hours of work why not get advantage of it? so it's going to end up in turbosquid, probably in a price too high for people to get, but you never know
but most importantly it gives you the opportunity to meet new interesting people and get some interesting offers from time to time. let alone adds up to my personal portfolio, which if in need i'll be able to use to get some work
Posted by: djellison Sep 8 2006, 10:04 PM
Something of an overlap... I'm involved in medical E-learning stuff at work and have done 3d reconstructions of the upper airway from MRI imaging to produce rapid prototyped models of the airway for simulation of aerosol and nebulised drug delivery air flow
I'm also going the other way with a MER model - very low res with simple textures which might end up being of use for people like Indian3000 and his interactive software ( he doesn't know yet )
There's a couple of fairly expensive MER models on Turbosquid already - but they're not good on accuracy
Doug
Posted by: jaredGalen Sep 9 2006, 09:20 AM
Hi scooterlord, quick question, what plugins, if any do I need to view your site? Using firefox in Linux, and I can't get anything up. No worries.
Posted by: scooterlord Sep 9 2006, 10:12 AM
well, have no idea about linux, but you should be able to view it properly. all it requires is the shockwave plugin.. but firefox should have it installed already. first time I hear about anyone having problems accessing my site.
people interested can also view my old site: http://sc3ddesigns.f2g.net/index2.html
samples of my work can also be found over at www.cgtalk.com -> search for 'Nick Sotiriadis'
looks like it became an ad topic :>
Posted by: scooterlord Sep 14 2006, 08:36 PM
well, here i am again with a difficult update...

it was all i could make out of the photos, generally i am very happy with the results. many thing seem to be 'connecting right'. it's a way to verify the model is coming out nicely since i model this part by part and then 'combine' them into the scene. so seeing that from different angles they 'connect' it just verifies it's accuracy (ahem, as much as you can get out of crappy reference).
i am stuck now at the part begind the hgag, on its left side looking at it from the back, where the film (or small cables?) enter the hga. if anyone happens to come across clear pictures of what i want please send them over. what i need most is dimensions. ratios. angles. clear pictures from exact lefts, rights, tops, bottoms. to finish this i only need to model the part i just mentioned, the cables at the rear of the anntena, one small part that i guess is used to steady the antena at that position and then detailing, nuts, bolts, cables, and stuff. i circle the main part that troubles me and would LOVE to have clearer reference of, especially how it connects to the mer.
did anyone happen to notice that the part that rotates the actual antenna and the one that rotates the whole system vertically are exactly the same part? I spent a lot of time staring at photos before i ended up to this conclusion. looks like nasa didn't pay enough to design different parts.
Posted by: scooterlord Sep 20 2006, 08:45 PM
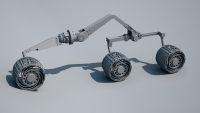
new update guys...
decided to drop the hga for a while since i can't come up with new better reference and turned to the rocker-bogie system where I can work quite fast since many parts are yet to be modeled and are quite clear in the reference photos i have. most of the time (again) is spent to make stuff out of the references. the mer is very tricky, many differences between sides of the same part. i keep measuring from funny angles ratios and angles between parts and so on. ratios most of the times are straight numbers and angles are in differences of x multiplied by 5, so i guess i am doing it all right. here are the results so far after a couple of days modeling:

any comments are welcome, especially ones pointing out errors
ps I accidenataly came across this strange thing in my references. notice in the above renders that the main axle that rotated the whole front part of the rocker-bogie has 2 bolts from the inside than the outside. the better you look the better the results!
Posted by: Nix Sep 23 2006, 08:05 AM
woaw, all I can say is, what a cool job you're doing!!
Looking forward to more..
Nico
Posted by: climber Sep 23 2006, 08:48 AM
Soon, you'll be able to better describe the rovers than the one that actually built them. I love what you're doing. I'll try to hav a close look to hunt for errors. Thought job tho!
Posted by: scooterlord Sep 23 2006, 02:18 PM
error hunt sounds great! try this for the hga, rocker-bogie and the rat and apxs because everything else is incomplete.. this would help a lot. even hand drawn sketches of difficult parts, like the one i circled above in the hga, or the rear part of the rocker-bogie..
thanks for the support guys!
Posted by: scooterlord Oct 4 2006, 08:36 PM
hello again. sorry it took me so long but i've been busy lately with a new job and trying to settle things up. this is a good update though. i progressed a lot with the rocker-bogie suspension which was damn difficult to make out, especially the rear part of it. some things are missing but thought it'd show you this just in case anyone has any clearer reference photos from the ones i have (parts not done are probably shown there). i leave most nuts and bolts and ALL wires for the end of the detailing procedure. here we go:


...and a wire
guys, notice the top view. wheels are not aligned on a straight line, this came out by itself and AFTERWARDS i verified this from references. this means i actually did a very good job measuring widths and heights and angles and ratios and comparing things from strange-angled reference material. i actually surprised myself looks very accurate to me so far.
expecting your comments and as always... any good reference except the ones mentioned above (or in any case material that you KNOW is rare and diffuclt to come across) let me know...
Posted by: Nix Oct 4 2006, 08:55 PM
Tremendously good work I'd say!
I look forward to the complete model, it should be awesome to say the least.
Nico
Posted by: dilo Oct 4 2006, 09:47 PM
Very impressive, scooterlord!
I'm not so expert of MER mechanics, but about these beautiful CG images, I suggest you to slightly expand the poor contrast/brightness because is more easy to see the incredible details you reproduced.
Look at this and compare with original, for example:
|
(EDIT: wow, 1500 posts!)
Posted by: scooterlord Oct 5 2006, 04:41 AM
thanks!
as for dilo, I didn't play with contrast because these are just temporary renders, after model is finished will be textured, etc and then i'll take care of retouching. let alone i posted the renders late at night and was tired i'll keep you guys updated as soon as i have something new!
Posted by: scooterlord Nov 3 2006, 01:51 PM
hello with a new update... not that bigof an update, but very difficult though; really tough (once again) to make out from references. this time i realized that "in-vitro" photographs of the equipment are far more different that the ones actually used on the actual mers. let alone, opportunity and the spirit have waaay too many differences themselves.
anyway, this is the micro-imager. as always if someone comes across any differences from the actual micro-imager i'd like to know. no rear-view though for now, not modeled some details i want to in the back, i'll post as soon as i am done.

this last one is to show the bottom view, base seems to have this strange shape:
..next task is the moessbauer which is very difficult once more. i found a couple of nice photos of the actual piece of equipment but not very clear references of the base that holds in on the rat arm. i'd be grateful if someone can also help out with this one
i've been VERY busy lately but expect an update REALLY soon (hopefully)
Posted by: ustrax Nov 3 2006, 02:11 PM
Incredible detailed work scooterlord!

Following this way it won't be long untill UMSF has it own spacecraft...

Posted by: Airbag Nov 3 2006, 02:17 PM
I am just in awe at your efforts. I can't even imagine how much time it must take to generate these models.
Seeing the various components in such excruciating detail is just amazing; I find it even better like this than to look at the hi-res photos with their dark shadows, distracting textures and obstructions. It provides a real insight into the design of those components.
Airbag
PS If you use a Mars dust color instead of gray for the renderings, your final complete model will probably match the actual state of the MERs at that time 
Posted by: scooterlord Nov 3 2006, 02:23 PM
thanks ustrax
airbag.. there's still a LOT of work to be done; many parts i haven't even started modeling, all parts so far need thorough detailing - there are no cables anywhere yet - and it will be a very difficult task, i try not to think about it because i'll just become nervous and it's still not time for that.
...after the modeling is done... exporting the model to import in 3ds. part by part. this needs to be done because the program i am using to model (rhino3d) doesn't help a lot in uv mapping for textures so i need to export in 3ds...
...and last but not least, texturing. VERY difficult, needs optimizing, needs masking, needs testing - renders takes a lot of time. I want to have all details on, the mer seems not to have that many different materials so I hope i don't encounter any problems.
so, hm.. that's a lot of work, huh? 
Posted by: Airbag Nov 3 2006, 04:02 PM
I was looking for the mechanism on the MI rendering for flipping the dust cover/filter out of the way of the main lens. Is that small cylinder the stepper motor that drives that movement? I don't see any linkage though, or a clear sign of that cover?
Airbag
Posted by: scooterlord Nov 3 2006, 04:24 PM
hm, i am not sure what you are talking about airbag. do be honest, i don't quite know what all these things i am modeling actually do, meaning, i don't know it's use. if I knew, maybe i could 'guess' some parts and the modeling would be easier but unfortunately i don't. if you have any photos to show me with what you mean, please put a simple circle around it and post. I haven't seen anything like the thing u mention, EXCEPT some other mechanism on top of the lens, which I only came across a couple of photos, but like i said "in vitro" and actual photos from the panoramic camera of the mer show different equipment.
Posted by: PhilCo126 Nov 3 2006, 04:57 PM
Quote: Wooow that's really too much ... that's really too much !
Amazing work scooterlord
Posted by: djellison Nov 3 2006, 04:58 PM
http://nssdc.gsfc.nasa.gov/planetary/image/mer_mars_micro.jpg
http://nssdc.gsfc.nasa.gov/planetary/image/mer_mi_diagram.jpg
http://astrogeology.usgs.gov/Projects/MER-AthenaMI/images/MI_Barrel1.jpg
http://astrogeology.usgs.gov/Projects/MER-AthenaMI/images/MI_Barrel3.jpg
About all I could come up with.
Doug
Posted by: Airbag Nov 3 2006, 06:20 PM
I couldn't really find any more useful links than the ones Doug already posted above. But, you can see that there is a "horizontal" cylinder next to the lens, and a square cover over it - I believe these are part of the dust cover mechanism. Many of the photos I came across show the MI without this cover installed, presumably for early testing purposes.
The Athena site has a small picture (rendered too!) of the front of the MI:
http://athena.cornell.edu/the_mission/ins_micro.html
The 4th picture down on the right shows a (simulated) frontal view of that dust cover.
Airbag
Posted by: scooterlord Nov 3 2006, 10:59 PM
thanks doug. that mi diagram is very useful. wish i could come across it earlier because as it seems i have to remodel a few things. got me a view of the back side though. thanks!
airbag, a horizontal cylinder i have already modeled, there's nothing more i saw in any of the other photos that i did not model. please find a picture of it and post. in the meantime i'll try to find some time to model a bit more of the other stuff
thanks for the support guys!
Posted by: scooterlord Nov 4 2006, 12:20 AM
here is the...uhm... 'rear view' of the micro imager.
in a couple of reference pics i've got, i see many differences between them concerning the 'contact sensor housing' this is the best i can make out.
airbag, as for this cap you are talking about maybe it's something i came across in a photo, but since i have 10 without it and 1 with it, i choose NOT to model it
Posted by: scooterlord Dec 26 2006, 10:09 PM
hello everyone and merry christmas! it's not that i abandoned the project, I Was just too busy with work and redesigning my new site (so re-visit for new stuff)...
anyway, i did a small progress modeling-wise, but was a great step for the final model. I composited the most of the rat's arm. I have just one render for you guys for now, your support is a great help for me to go on, so I hope you enjoy this one. the next few days i'll try to make the whole arm and finish the moessbauer modeling. hope to hear your comments!
Posted by: djellison Dec 26 2006, 10:25 PM
Not sure if the MI is spot on - I think the optic design is a little 'short' - as a reference, the backend and electronics box for each camera ( Pancam, MI, Navcam, Hazcam ) is the same...it's just the optical assemb. that changes...and obviously the MI has the dust cover and contact sensor..but I think these might be a bit too far 'forward'..
http://nssdc.gsfc.nasa.gov/planetary/image/mer_mi_diagram.jpg
from
http://nssdc.gsfc.nasa.gov/database/MasterCatalog?sc=2003-027A&ex=2
Great work though
Doug
Posted by: scooterlord Dec 27 2006, 11:10 PM
hello there... new update. first time to post the moessbauer spectrometer. there's still details to be added but I wanted you to take notice of the progress..
doug, I guess you are wrong on this one, I spent way too many hours analyzing stuff out. I had already checked the reference image you posted but I have to show you the following reference which is one of the crappy ones I used to model. At first I thought you pointed out that the lens was too forward thats why i post the following reference pic, but reading again I realized you meant it is too short compared to the electronics box. it must be the angle though, here is another angle (i know the moessbauers position is totally wrong, currently working on this one)
Moreover as you can see there's no dust cover in the following reference as well. in 8 out of 10 pics there's no dust cover depicted thats why I chose not to model it.
your comments are welcome though, thanks doug, I hope everyone else also helps, I am doing my best here, there are many things that I have remodeled already more than once keep checking things out guys!
Posted by: Airbag Dec 29 2006, 02:28 AM
Here is a very nice picture of the instruments, with a particularly good view of the MI's "flip up" dust cover:
(Photo Credit: NASA/JPL; from http://marswatch.astro.cornell.edu/astro.html)
Airbag
Posted by: djellison Dec 29 2006, 06:03 PM
You had it right all along....you've trumped my 'MER-in-my-head' knowledge Bloody accurate - further kudos.
Doug
Posted by: scooterlord Dec 31 2006, 03:07 AM
well, great news today! I am done with the moessbauer. I had to remodel the metal parts that hold it to its base several times in order for it to be in place (like i did with the micro imager) but not everything seems to be in place! I am also done with the device using all the information I could find in the references I have. the base that holds everything on it seems kinda empty now but I hope after i am done with the cables and stuff (leaving this for the end of the whole modeling process) it will look fine.
enjoy the moessbauer spectrometer in all its glory, although it's a bit out of focus :/
I'll continue with the rest of the arm next, it will be some time before i start it though, very busy lately :/
Posted by: scooterlord Jan 26 2007, 12:29 AM
hello there! long time no see... I hope some of you guys are still patiently waiting to see the progress of the model. here is some progress. I am taking baby steps because my reference material is narrowing my amount of work plus busy with my life :/
anyway, I modeled parts of the arm that holds the rat-moessbauer-mi-apxs system. I am looking for a good SIDE view of the arm, haven't came across any better reference than the one I am posting and this is not at all helpful. I think that the part that is exactly above the bottom round cylinder (one in the circle) is not round and the bolts seem to be held at pairs. in the rear side of the cylindric part (where red arrow points in the circle) I made there's some sort of film held on it - managed to realize that it gets underneath the cylindric part and into the rear part of the right red arrow (shown in the 2nd reference pic I am posting), clear pictures of the rear side -meaning they can provide me with visual info - will be really helpful as well. it is very tiring staring at pictures for hours and not getting any results. Expecting your support guys.


Posted by: helvick Jan 26 2007, 01:40 AM
I wish I could help but you are so far ahead of me I just can't even begin to make suggestions on how to help out. For now let me just say - WOW! I wish I could help but this isn't my area of expertise - however I really do hope you get the help you need and you end up giving us some cool shots of your model of our dear lil rovers.
Posted by: AndyG Jan 26 2007, 08:33 AM
I'm never very keen on "me too" postings, but I have to agree with Helvick. This is a stunning piece of work. I'm sure I speak for all of us when I say we're all eager to see this project develop. It's fantastic.
Andy
Posted by: Bob Shaw Jan 26 2007, 11:57 AM
It's textbook stuff - and needs to find a home in a textbook!
Most impressive!
Bob Shaw
Posted by: Tesheiner Jan 26 2007, 12:41 PM
One more <clinck> to the swearbox.
It should be a very hard work, but the results are impressive!
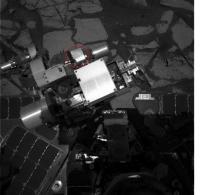
I was wondering if an image of Opportunity's IDD during those times at Olympia, while driving with the arm unstowed, would help...
Here is one of those, taken by the navcam on sol 717: (click on the image to see the full-res)
http://marsrovers.jpl.nasa.gov/gallery/all/1/n/717/1N191833731EFF64KSP1938L0M1.JPG
|
If I understood you right, I think that area within the red circle is squared and seems to be the base part where a connector is plugged.
Posted by: scooterlord Jan 26 2007, 02:00 PM
teshneier thanks, but I need MUCH more clearer reference to do what I am doing :/ I am mostly interested in the part of the arm shown on the left on this picture where the equipment connects to the arm. that white roundy thing. I browsed most of the online photos of both mers in order to get reference.. very tiring work. even browsing them on my disk is tough to get the information i need. Anyway I need front and rear sides of that white roundy thing (previous image I posted on the right where the arrow points). It would help a lot!
thanks for the support so far guys really need it hope i get some new work done soon enough to keep you interested!
Posted by: mars_armer Jan 26 2007, 09:25 PM
A couple of pictures that may be helpful...
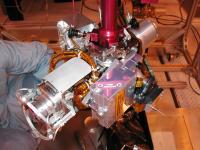
|
|
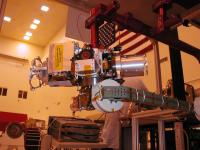
Posted by: mars_armer Jan 26 2007, 09:26 PM
...and a couple more.
|
|
Posted by: scooterlord Jan 26 2007, 10:16 PM
mars armer!! where the hell did you get these??? I only had the first one! great! that's wonderful news guys! I'm really excited, I'll get back to work as soon as possible! thanks again! btw, wish I had these photos a bit earlier, I was struggling to make things out expecially for the moessbauer from reference you wouldn't imagine you could get information out of. good news is that my model came really nicely and seems quite accurate judging by a quick glance at these photos.
hmm, looks like I was right, by studying the last reference pic there's a strange shape where I circled in my last render, I can make it out now, cool! and the back of the arm is ultra clear! my imagination will continue from then on but this stuff is really helpful!
just in case you guys come up with an reference found in strange sites, what i need are:
pics of the whole arm, especially where it binds with the body
the body (i have quite good reference, hi-res photos, but the more the better)
*****i need the high gain antennae's part that holds the film that connects to the body (check eariler in this thread)
Posted by: scooterlord Jan 28 2007, 05:02 PM
hey there! based on the new reference I got you this!
I added the strange shape in the circle- I was right, it was not round at all - and fixed the whole in the white plastic on the right. i'll try to work a bit more the next few days to give you a big update 
Posted by: scooterlord Jun 8 2007, 08:13 AM
hello guys. how have you been doing? I gave it a lot of thinking before I posted this, I wanted to show an update that you'd be absolutely amazed, but I decided to post this just to let you people know that I am still working on the project, these past few days many hours a day... so here it is. I spent hunderds of hours studying just to get to this point and tens of hours modeling. As for my current progress I am almost done with detailing the body (everything except cables - which I will start modeling soon) and I'll continue with REMODELING the whole 'head' because I got new details and mine seem to be a lot off as far as accuracy is concerned.
Waiting for your comments!
Posted by: Toma B Jun 8 2007, 08:41 AM
WOW!!!
You are doing great...BTW, when do you think this model will be finished?
Posted by: scooterlord Jun 8 2007, 08:43 AM
to have it done with the level of detail I want, hmm.. modeling maybe like in 5-6 months. I am still lacking reference for the base of the IDD and some other parts though. so if anyone has them.. let me have them too
Posted by: PhilCo126 Jun 8 2007, 02:54 PM
This is too much...
Superb detail!
Posted by: lyford Jun 8 2007, 05:17 PM
I need a swear jar for this thread as well.....
Posted by: scooterlord Jun 8 2007, 05:21 PM
lol! i am not sure why you would need a swear jar for this! into 3d?
Posted by: lyford Jun 8 2007, 08:15 PM
I am blown away by the detail... it seems more visible even with the monochromatic renders.
Posted by: scooterlord Jun 15 2007, 09:34 AM
guys, i am in need of your help again... if anyone has any idea (or better reference) of what the hell is going on in there, please provide me with material:

this thing is on the rear of the mer. I have no idea what's going on below the cables I circled. I have the fantastic reference someone in here provided me with but I still need to see what it looks like, if it's angled or anything. any pictures you might have, even messy as this one, let me have it. it's what I do. i study several hours to make out whats going on from different angles.
and this one. what the hell the base of the idd looks like. any good pics (apart from the ones found in the creators' site - they have a big one, but still difficult to make out) are welcome. even simple written explanations of how the thing works might still help. eg, it has a rotor there, a weight there, etc.
and here's a wip i took quite some time ago (it's FAAAR more detailed now, but will post later) to keep you coming back!
Posted by: Nix Jun 15 2007, 06:14 PM
Woaw. The web looks spectacular! Can I have one of them 3d swear jars?
Nico
Posted by: djellison Jun 15 2007, 07:43 PM
Just drop the cash straight into it.
Wish I could help more with ref. material - but with the KSC website you've got all there is really.
These may help - images taken by the rovers themselves :
http://qt.exploratorium.edu/mars/opportunity/forward_hazcam/2007-06-15/1F235156449EFF85HEP1152L0M1.JPG
http://pancam.astro.cornell.edu/pancam_instrument/false_color6.html ( left column, half way down)
Doug
Posted by: scooterlord Jun 15 2007, 09:59 PM
djellison, first pic doesn't help at all. shows the bottom part of the mer arm which I have already modeled. what I am having trouble sorting out is the base of the instrument deployment device (idd - I sometimes surprise myself because of the things I learned researching stuff), which is the part that keeps the idd attached on the mer's body.
2nd link also provides same info. these photos would have helped me a lot earlier when I was studying crappy material to make things out. I'll keep them anyway a great THANKS!
if anyone is able to get the rear of the mer or the base of idd, please do so for the idd I even emailed the original designers of the thing (alliance spacesystems) to provide me with material but didn't even reply. I guess they were afraid I might steal their patent!
Posted by: Ant103 Jun 27 2007, 08:50 AM
Gargle
The 3D model looks very spectacular. I'm amazed
I have a question : is it possible that one day we can acceed to the model files (.3ds, .WRL or more for me : .blend (Blender files))
And I have an other question : how do you proceed to make the model : object by object or...?
Posted by: scooterlord Jun 27 2007, 08:54 AM
well, as for you ppl accessing the files, prolly not sorry!
as for the modeling process, yes, part by part (like exporting/texturing) and if i am tired and have no reference for one part i proceed to the next till i get reference! more pics to come soon!
Posted by: ElkGroveDan Jun 27 2007, 02:52 PM
sorry!I must say that comes as a bit of a disappointment Scooterlord. I've been watching your project all along was envisioning all the creative things that could be accomplished with the final product. Is this being created for commercial purposes?
You have obviously put in many dozens of hours of hard work and certainly have earned the right to do whatever you want with your product. If you've spent much time browsing UMSF however, you may have noticed the fantastic things the people here have accomplished through collaboration. Have you considered perhaps sharing a smaller dataset of lesser quality so that you are the one retaining the best part of your hard work? That's what I do with some of the photographic products I spend hours creating.
Posted by: scooterlord Jun 27 2007, 03:01 PM
well, sorry if some of you guys are dissapointed, but can't promise you anything till the model is finished. I am doing it mainly for challenging my modeling and perception skills but I wouldn't mind earning some money for it maybe from a company interested in using this for commercial use :/
but, hey, hm.. maybe i could provide you guys with a less detailed model of the mer. just wait the estimated 6motnhs to have it done (modeling ONLY that is) and then we'll see
I just rendered this test (head of mer remodeled from scratch) and thought I'd share 
Posted by: djellison Jun 27 2007, 03:06 PM
Realistically, any and all commercial requirement for such a model has been well and truely covered by Dan Maas's work for the pre-launch Animation, the two Nova documentaries (for which he was Emmy nominated) and the Imax movie.
Your model is just stunning - but I can't imagine a 'market' for it.
Doug
Posted by: scooterlord Jun 27 2007, 03:09 PM
well, thought it would be nice didn't say it would happen anyway, I am not negative with the whole story, we'll see. just be patient till I am done!
Posted by: remcook Jun 27 2007, 03:48 PM
How detailed is the Dan Maas model anyway?
Posted by: djellison Jun 27 2007, 03:58 PM
Not as good as Scooters, lots of it is done with good texturing, but it's good enough to stand up to the 4k res of Imax. The Imax version is a step up from the version in the usual EDL anim - for instance the arrays are 'glassy' only on the cells themselves, not on the whole panel.
Doug
Posted by: hendric Jun 27 2007, 08:54 PM
Well, Scooter's work I would put in the semi-pro/pro category, so I kinda expected he would want some money for it. Scooter, would you be willing to release your model for sale for a time period, and after that time let us pass the hat around for a UMSF license?
Posted by: scooterlord Jun 28 2007, 08:02 AM
as I said, once I am done anything is possible it's still a long way ahead and am already lacking important pieces of reference! wait and see!
Posted by: Leither Jul 15 2007, 06:48 AM
Scooterlord these images clearly show the MI transparent dust cover in action.
Closed/Open:
http://qt.exploratorium.edu/mars/spirit/na...CMP1936L0M1.JPG
http://qt.exploratorium.edu/mars/spirit/na...CMP1936L0M1.JPG
I think your model is only missing the arm bit of the cover which connects it to the motor. Your model is ultra impressive. Great work.
Posted by: scooterlord Aug 3 2007, 10:14 PM
hey there...
I have a new render for ppl interested in the project, this was the most difficult part to do - the connectors between the top part of the mer. at first look they might all look the same, but in closer inspection they are far from being the same. anyway, here it is, hope you enjoy it, I still have a lot of things to do, but it's coming out really nicely and I have studied thoroughly the reference I have and looks like I have enough material to finish a few important stuff.
enough said, here it is:
comments welcome as always!
Posted by: Ant103 Aug 3 2007, 10:45 PM
Incredible! Absolutely incredible! I'm always fascinating about the high detailled-level of your model. Very good job.
Posted by: lyford Aug 3 2007, 11:07 PM
wonderful work!
Posted by: jamescanvin Aug 4 2007, 07:30 AM
Great work, as usual.
I'm sure you know this and it's on your long 'to do' list, but note that the forward hinges connecting the central triangle to the wings are missing.
James
PS - I see it's Spirit your modeling
Posted by: scooterlord Aug 4 2007, 09:05 AM
yup, i know the front connectors are missing, they are my primary modeling target for today thanks for pointing it out though
Posted by: scooterlord Aug 22 2007, 01:56 PM
hello again!
this might not seem like a big update compared to the previous render I posted, but trust me.. IT IS. most connections were remodeled, found more differences, surfaces needed optimizing for fillets to work. low gain antenna mostly modeled, a couple more object were modeled (ones that keep the pma connected to the mer's surface), front part also modeled. 'installed' and placed correct dimensions on the hga, that's my main goal to complete in the following days, it has a couple of parts missing and problem is I don't have all that good of reference photos, so don't expect a BIG update any time soon.
then I am off to model the pma's base, I need a clear photo of it's base, anyone has one PLEASE point me to it. I need CLEAR reference of the following thing there. there seems to be some kind of mechanism, all I can make out is 3 bolts, that's it. I need reference.
..and finally as a reminder, i need reference of the hga's part that holds the film that is connected to the mer, the rear part of the body of the mer without the cables and last but not least, the idd's holding base. i am getting really close to finishing (ahem, a few more months that is) so I need all the help I can get from you guys.
comments expected as always!
Posted by: scooterlord Oct 31 2007, 09:53 PM
hey there.. it's me again I am almost done with modeling most stuff of the mer, reached the tough parts and that's why it's taking me so long to post. anyway, here I am with the most difficult update so far. It's been many days (even months) trying to model this thing and actually come out right. most dimensions and stuff seem to come out nicely so I assume it's quite accurate. This was a quick render though, a few stuff might be mirrored (like the base of the idd) so don't take serious notice of them. Of course little details are missing, but that's the easy part and will be added last. anyway, enjoy, comments are always welcome!
the few things that are left to model: finish the idd base, a few details at the top and the bottom of the pancam mast, bottom sides of the 'wings', and a few other minor details (like bolts, nuts, etc) and finally... the cables... :/ not in a very good mood to model lately anyway, outta job this period, fights with gf, difficult parts to model -take all my good mood of modeling away...
..Anyway I will render this in a new renderer (maxwell) that I just started using, I have been using brazil r/s so far, so it will take me some time until I learn how to texture with it!
Posted by: john_s Nov 1 2007, 04:28 AM
Fantastic work as usual! Your patience is amazing...
John.
Posted by: dilo Nov 1 2007, 07:24 AM
Nick, each time I see your fantastic progresses I experience enthusiasm and frustration, because I think to final, assembled version and cannot see it, for the moment! Happy to hear ymodeling is almost complete, less happy to know you have some troubles and not much time to finish...
I would like to help but I'm not able and, at the end, this is your work for your amusement. So, I said to myself, enjoy these progressive, great releases and don't stress this guy!
Thanks again.
PS: I do not see any mention of this MER project on your linked page.
Posted by: scooterlord Nov 1 2007, 07:43 AM
thanks for the support already guys people interested in this project will have to be patient in order to see it finished. it will take some time and maybe some effort from you guys in order to help me find some reference. hopefully a few people from NASA were kind enough to help me with reference not found on the internet (one of them sent me reference for the idd base. someone else also helped me, kind find his name atm in my emails).
anyway, good to know some people enjoy this, I am not enjoying this YET, I will get all the enjoyment I want when I am done; that's what I am working for anyway . When I am done I am seriously thinking of giving this away to the public - will see what will happen.
..and I know there's no mention of the MER project on my site. Probably I will make a new site just for the mer once I am done with it. people interested in my project can just google them.
Posted by: Ant103 Nov 1 2007, 05:35 PM
Incredible, just an incredible work .
Posted by: djellison Dec 21 2007, 07:32 PM
I was just re-texturing my low-res MER for project I'm working on, trying to find MER references...and I ended up back here
Doug
Posted by: scooterlord Jan 7 2008, 10:37 PM
happy new year everyone!
doug! LOL!
haven't at all abandoned the project, reaching tough parts now though, even more and more difficult to progress. not much time/mood to model these days anyway.
plus.. the model has become so big that I tried to do test renders to half of the model and my pc chokes! and that's without textures! :/
Posted by: scooterlord Jan 31 2008, 12:27 PM
hello. well, I have a bit of bad news (not all that bad though) but thought I'd share. Although I started the optimizing process of the whole model and the model so far ended up using 2/3 of its original size I am having major trouble rendering it as it is. the file is way too big, consumes 1,2gb if ram just when I open it and I still haven't started small-detail-modeling cables, nor did I put any textures on yet. :/ looks like I am going to need an upgrade in order to have this done properly.
by using alpha channels, I will miss reflections/shadows so that's not an option :/
Posted by: dilo Jan 31 2008, 03:30 PM
Well, it seems you need a sponsor to finish this great work...
Posted by: scooterlord Jan 31 2008, 09:59 PM
hmm... looks like I won't have to. there seemed to be an error of some kind with a specific surface in the model. Let alone the memory run out errors, I managed to locate this surface that caused the program to just exit without an error message. anyway, it took some time even before it started rendering but results are quite promising. sorry, there's a thing that seems to float in front of the left rocker-bogie, it was supposed to be under the warm box. anyway...
moreover I came across useful reference that i've been looking for over a year! i found reference of the pancam mast base AND a little help for the hga cable mounting bracket. however, the only thing so far I am not happy with is the hga cable mounting bracket, so if anyone has any sort of reference, let me know.
enough said, here it is...
comments welcome as always..
Posted by: djellison Jan 31 2008, 10:24 PM
THe sandwich material of the arrays is probably the only feature making it look odd at the moment ( i.e. there isn't one ) - that, and the tiny little covers for the Pancam lenses on the end of the stalks. It's a bit hard to see some of the details with the background being the same colour as the default rover material - but having done some radiosity rendering, I know that's basically what you start with.
Doug
Posted by: scooterlord Jan 31 2008, 10:57 PM
...sandwich material of the arrays, I assume you mean the sunlight absorbing surface (?). as for the pancam lenses, you mean the ones located in the front and rear of the mer? I know they seem a bit odd because they are capped with glass which, in this situation, because there are no transparent materials it actually looks odd. anyway, good thing is I am almost done with 'difficult' parts, except maybe the hga cable mounting bracket I mentioned earlier. looks like the cad drawings I came across inside a .pdf file I found are different than the actual final part holding the cable.
besides that, everything else I know how it's done and then it's just cables and stuff before I enter the texturing process
Posted by: dilo Feb 1 2008, 05:04 AM
Simply brillant, happy to see you solved the issue.
I think that most of us will say "stunning" and "bravo!", at least. This work is a great example of patience and love and the result clearly show that was worth to dedicate so much resources to it. We had the privilege to see it growing up and now that is almost finished I feel emotionally involved, even though my personal contribution was only in terms of encouraging words...
Congrats again!
PS: any idea about possible applications when model will be completed with textures? Perhaps, the most immediate one is to do some rendering using real MER panoramas as background or even detailed digital terrain models, if available... (an UMSF "Roving Mars"?
)
Posted by: djellison Feb 1 2008, 08:41 AM
I mean the gold coloured honeycomb inbetween the top of the arrays and the bottom of the arrays -
(actually - looking at KSC, there is nowhere near as much of it as I thought there was - it's mainly a channel, pehaps a cm or two deep, to carry cables - but at the key parts for structure - it's a honeycomb)
|
|
Posted by: scooterlord Feb 1 2008, 09:41 AM
dilo, thanks for your kind words! well, you know, I try being patient for almost a couple of years, work bit-by-bit every day, get frustrated, angry, model, remodel mainly to enjoy people's recognition when you are done. I am really glad that there are supportive people out there that keep me going!
djellison, the model might seem complete, but there are a million of things that still have to be modeled. I still need about a month's work of modeling to start really analyzing the hi-res reference I have and start writing a 'to-model list' for the really little things needed to do. Currently, eg, the ones I can think of are: back part of the hga, the damn hga cable mounting bracket - I hope I get reference for this, the cable film on the whole idd, still missing a million nuts and bolts, the honeycomb you mentioned, bottom part of the azimuth drive of the mast, the 'ears' of the mast that keep it attached to the main mer surface, bottom part of the low gain antenna, rear of the mer, that fat thing on the right (can't remember what it is ... and a lot more!
anyway, once I am done, trust me, you people should expect to see life-like renders, and I won't dissapoint you. I will try to make HUGE renders so that every little detail can be seen. plus, I am thinking of fish-eye renders from all of the cameras of the mer
Posted by: Ant103 Feb 1 2008, 10:15 AM
Amazing
Happy to see that you finally succeed to render this big project. I can't wait to see how it will be look with texturing, materials, reflections and other things like that.
Keep up your excellent work .
PS : I made this last image my wallpaper, it's great .
Posted by: PhilCo126 Feb 1 2008, 05:42 PM
Very nice work, first impression made me believe that the PanCam Mast Assembly looks a bit too high, but that's because of its perspective seen slightly from above. Truly an amazing job!
Posted by: scooterlord Feb 1 2008, 06:01 PM
so, here's another render.. enjoy!
I'll post when some serious progress takes place which will be quite some time from now... still expecting your comments!
Posted by: hendric Feb 4 2008, 04:50 PM
With models like this, I can wish to see a UMSF Roving Mars 2.0, with updates to present day.
Posted by: scooterlord Aug 20 2008, 11:09 PM
hello there.. I know, long time no see, started my new perm job (FINALLY!) and a lot of things going on with my life so I kinda abandoned the project a bit, and am just some time away from progressing; IF I manage to gain some strength to study the model again to model stuff I am missing then it will be done soon! Just cables and minor stuff to go. However as I keep modeling I encounter new details here and there... can't say I am dissapointed, just haven't been in the mood to progress.
Anyway, here is a new render with the cabling and almost-full-detail. I would love to hear your comments. Just compare to the first render I posted of this and see the MILLIONS of differences
http://imageshack.us
http://g.imageshack.us/g.php?h=359&i=mernewtu0.jpg
Posted by: hendric Aug 21 2008, 07:38 PM
*thump*
ah ca na tal, mai jaw ia on da flora
Posted by: scooterlord Sep 17 2008, 11:00 PM
hello again... I am almost done with the cam mast.. it's almost full detailed now, only things missing are the tide-ups that hold the cable... here is a new render I did while testing...
http://imageshack.us
http://g.imageshack.us/img241/mernewbp6.jpg/1/
Posted by: jumpjack Sep 30 2008, 11:51 AM
I remembered I saw this project somewhere, but having not stored any link, I looked long for it... around, in 3d modelling forums! I couldn't remember I found it into an astronomy forum!
It would be really nice to see a textured render, now that most part of the hard work is eventually over!
Posted by: scooterlord Sep 30 2008, 11:57 AM
well, its good to know that many of you support my work and are patient enough to wait for the project to end. Truth is I've been tired with it from times to times but now that it's almost done I feel like modeling all the time...
..however I am in the middle of many things - redecorating my home, work, second job, etc - so I model whenever I have time. Soon I will settle down and have more than enough time. Trying to take it slow - one step at a time because I know that if I happen to abandon a session of modeling and am not happy with it I'll be thinking about it all day. Too much anxiety huh? :/
Keep visiting back though
Posted by: OKB001 Dec 17 2008, 05:19 PM
Lovely work scooterlord! A real labour of love! wow!
Posted by: scooterlord Dec 23 2009, 09:55 PM
Hello everyone, I know it's been quite some time that anyone has heard from me, but in case anyone cares I am still alive. A lot of stuff going on, and I am not that excited to work on 3d. I take it really slow, because it has been painstakingly hard. Anyway, here is a new render, I am trying to sort out the cables from the reference photos, unfortunately the 2 mers are different one from another and it's kinda tough to make out what is going where. Here is my progress so far, I keep doing stuff and deleting, it's a bit difficult to have everything like you want it; cables look a bit thin, but I will sort this out during the rendering process. Enjoy!
Top cables will be remodeled; their path is completely off.. probably many of these will be remodeled till I am done with them..
Once the model is done, I will immediately start rendering; rendering is a beautiful process and although it takes quite some time, I really enjoy creating textures, etc and most importantly I enjoy the fruit of my labour... Would love to hear some comments
Posted by: mcaplinger Dec 23 2009, 10:15 PM
I am in total awe of the amount of work this is and how well you have done it. I've never seen anyone try to render cable bundles in this much detail. Even those of us building the hardware rarely try to model them in any but the most schematic terms. For example, if you look at the external harnessing on MAHLI -- http://www.msss.com/msl/mahli/index.html -- we never tried to model any of that.
That said, and this is not a criticism at all, I note that you don't seem to have modeled the flex that connects the navcam/hazcam optical head to the main body of the electronics. http://marswatch.astro.cornell.edu/pancam_instrument/building_testing.html has some pictures of the Pancam that may be of use (the electronics are the same between Pancam, navcam, and hazcam.)
Posted by: scooterlord Dec 23 2009, 10:21 PM
gee! that was quick!
thanks for your kind words first of all. Cable harnesses are b*tches to model and that is why the program I am working on doesn't utilize any physics - I don't know if any of 3ds, or maya do now, but anyway mine doesn't. Which means that you have to individually model each cable and they end up one going through the other, etc, their paths cross in other words. Let alone I don't have clear reference, or even reference photos of the same mer. Besides the 2 mers, the photos I collected have the harnesses tied up in different parts of the actual building process of the mer, so I have to decide which fits me best...
..as for the flexes, I leave them for the end. I know a lof of things are missing, but, I take it one step at a time. I am also lacking hga cabling, cables on the top side of the mer (I finished modeling the reflecting surface though) and lots and lots of other stuff. I thought I was almost done but since my eye is familiarized with the mer from all those hours of just gazing at them, I keep finding new details... oh, well... :/
Posted by: hendric Dec 28 2009, 09:15 PM
Scooterlord,
Your work is awe-inspiring. I've downloaded Blender and messed around a bit for fun, but this is just amazing. Thanks for the time you are spending on this!
Posted by: scooterlord Jun 23 2010, 11:14 PM
Hello there..
long time no see, I know, but the modeling process is not dead! It seems like I found my way out of the dead-end concerning the cables. I *roughly* sorted them out and thought I'd share a double-render, just for the people still interested in this. I still have the rear part of the mer cables to model, but I think I have reference I can walk-through easily (I HOPE) and after the rough modeling of the cables, I will detail model, detail the rest few details I am missing of the whole model and start texturing!
I am a bit concerned about the rendering process, since I only load part of the model every now and then, but my pc struggles already (Quad Core Q9550, 3Gb Ram).. oh, well, I'll deal with that when the time comes!
one more render...
Posted by: hendric Jun 24 2010, 02:42 PM
Scooter,
Glad to see you're still working on it! I can't wait for the finished product.
Posted by: scooterlord Jun 24 2010, 06:11 PM
Well, after all this time, I can't wait to see it finished myself! I've been having this at the back of my mind all this time, even when I wasn't working on it. Last part I'll be having trouble with is seeing where the cables meet at the end, and the detailing of the cables. Everything else is done! I haven't posted any renders of the top side of the mer, but is finished, all polygoned, I won't have it textured after all, to keep the details. It looks awesome, but it's just too big a file even to quick-render it...
...and last but not least, I am also glad that some of you are still interested in the project.
Posted by: djellison Jun 24 2010, 06:29 PM
Interested? Astonished. That IDD is just superb.
Posted by: James Sorenson Jun 25 2010, 08:28 AM
That thing is amazing! Great Work Scooterlord! Cant wait to see the finished product
Posted by: scooterlord Jun 25 2010, 11:40 AM
Heh, looks nice, doesn't it? It just some random render using a random material. Trust me, when I'm done with it it will look a lot better. I did some test renders on the cables' material as well, and looks damn well...
I am between 3 renderers now... one is SUPER EXTRA WOW quality, but is really slow... I mean so slow you can't even test-render with it (maxwell) but has full material library, then there's brazil, which I know inside-out, but still takes a lot of time to render and create materials and then there's keyshot that's ULTRA FAST (the idd render was done using keyshot and took like just a minute (!!) to render) but I need to learn the material editor, which doesn't look very versatile...
I hope I find some time later tonight to sort-out the rest of the cables and hopefully model some..
Posted by: Ant103 Jun 25 2010, 05:24 PM
It's AMAZING, just AMAZING !!!
Posted by: ElkGroveDan Jun 25 2010, 05:51 PM
Scooterlord you should probably check in on the http://www.unmannedspaceflight.com/index.php?showtopic=6650&view=findpost&p=161288 discussion before you finish. Apparently there's no avoiding depicting your model as distinctly Spirit or Opportunity. Unless of course you decide to choose an intermediate configuration for the magnet that represents neither completed rover.
Posted by: scooterlord Jun 25 2010, 05:57 PM
Hm, although I think I have done the model by using as much accuracy I could get by the photos, such small details might be overlooked. One has to see and compare pic with render to sort out details, and that would probably be people from this forum. Others will be excited by the level of detail no matter if it compares well to the true thing.. as I said, a lot STILL to be done, I'll be really happy once I am done with the cables. The cable configuration I am using will probably correspond to one of the two mers, so I'll use those pics for reference to finish the rest of the model..
Posted by: scooterlord Jun 25 2010, 09:59 PM
So.. now I have these stuff to sort out.. anyone care to help? :PPpp Let a marathon of loooooong hours of study of sorting out begin...
I just noticed and wonder if anyone in here knows where the cables going at the bottom end. Do they go under the mer? :/ I have the next photo:
..and see BILLIONS of cables under there, but do they stay there? They seem to be connected to the outer shell, do they disconnect later and come with the mer? There seems to be some kind of net holding them..
...and this is what I have from the rear pancam:
..where do these cables go? :S
Last but not least, I just found some photos that show the rover in testing conditions:
..no cables here either. Well, this specific one might be naked because it's a test-mer or something. but it still makes me wonder. They have all of the mer's equipment connected, so why not have everything? :/
Hm.. just came across this:
...this picture shows the underbelly of the mars rover that is on mars. It shows NOTHING under it. No cables at all. So, where do the cables go? Do they disconnect after th landing? Any help is welcome!
Posted by: jamescanvin Jun 27 2010, 08:36 AM
I'm pretty sure there are no cables that run along the underside of the WEB, we didn't hear anything about cable hazards during the extraction at Troy (where the underside MI pan you posted was taken).
I'm not sure which cables you are worried about in the first image. The ones in the bottom-centre that go up, across then back down again, are part of the lander rather than part of the rover. It's worth comparing that image with the http://photojournal.jpl.nasa.gov/catalog/PIA05117 the same cables are sticking up on the left.
James
Posted by: scooterlord Jun 27 2010, 01:53 PM
I am mostly worried about the cables on the back right side of the mer, the ones that are also shown in the third image (from the pancam view) and the 5-6 others that are tied perpendicular one to another...they seem to go downwards. Then what? Do they 'disconnect' in some way from the lander and be with no ends?
From the photos it looks like they are using that harness for remote controlling the mer :/ James, if you happen to know any more info, I would be glad to hear it. If I knew what was going on, I would have finished the project like a year ago..
Posted by: scooterlord Oct 31 2010, 10:56 PM
Heya! Anyone still around here?
Long time no see once more, looks like it's been almost a year since a good update of the project. Well, here it is. After hundreds of hours of studying here is a quick render of the progress concerning the cables. I am done with the front cables of the mer *minus the details*. Detailing is the easy part. Once I gain psyc strength I am off to start the rear part. Photos of the rear of the mer are very sparse and very messy but since I made it this far seems like nothing is impossible. I sorted out a few cables already.
Anyway, awaiting your feedback..
Posted by: James Sorenson Nov 1 2010, 12:21 AM
Look's Very Nice! . Just one question, will you eventually add surfaces to the IDD arm cutouts as well as add a bottom to the web?
Posted by: scooterlord Nov 1 2010, 01:33 AM
...uhm... "bottom to the web"? what do you mean?
and I cant understand whether you mean add textures to the idd arm or something else? of course I will... the result is meant to be... the mer as in a photo... unless you mean something different :/
Posted by: nprev Nov 1 2010, 02:54 AM
Really stunning work, Scoot. You're one of the most patient people I've ever seen!
Posted by: scooterlord Nov 1 2010, 06:55 AM
..well, I am fresh out of patience, that's why this is taking forver
Posted by: dilo Nov 1 2010, 07:57 AM
Hi scooterlord, congratulations for your last piece of work, I would like to go back to the missing cables question (I discovered the posts only now!).
If you look carefully to the pictures from rear hazcam and to the 'empty nest' pan (from James post), you will notice that the cables were going down from MER to the lander and are cut; the cut is near the retention mechanism and is probably made with a pyro system after landing (any further detail from someone more expert than me?)... I hope this can help you!
Posted by: scooterlord Nov 1 2010, 09:34 AM
dilo, cool, that's what I was thinking myself, because in the "roving mars" documentary I saw no cables underneath the mer. I would take a look at the reference I have later to see the cuts - haven't studied them yet, I take things one step at a time, but if you happen to have any handy reference photos, please upload them Any rear reference photos are welcome..
Posted by: James Sorenson Nov 1 2010, 12:21 PM
After going back to post #97 in this thread, I can see that you had what I was talking about rendered fully . What I was talking about were those cutout spaces in the WEB that the IDD stows into. Also, what I meant by the "bottom to the web", I could see from looking through the arm cutouts in the WEB, that you had no surfaces to the bottom of the rover's WEB. But yeah, it looks like you just didn't render the area's I was talking about in your latest update .
Posted by: scooterlord Nov 1 2010, 03:40 PM
@James:
Feels good to see that people are still interested in this and thevthread is still alive. I can promise you that when it is done you'll struggle to make out if it's the real thing or not
Posted by: hendric Nov 1 2010, 06:01 PM
Scooterlord,
We are still very interested, believe me!
Posted by: eoincampbell Nov 1 2010, 10:56 PM
Yes, I've been a-gasp since the first post all those years ago !
Posted by: scooterlord Nov 2 2010, 06:28 AM
...and here is one better quality render of the left side...
Posted by: hendric Nov 2 2010, 05:09 PM
Scooterlord,
Have you looked at Mars Science Lab at all yet? Might want to get in requests for pictures of key areas now before they close her up!
Posted by: scooterlord Nov 2 2010, 07:42 PM
hendric: uhm... what? what am I looking for? Are we talking about the old rovers? where? url?
Posted by: Ant103 Nov 2 2010, 08:07 PM
This is
EPIC !!
Thanks for all your hard working, this is very amazing !
Posted by: hendric Nov 2 2010, 08:49 PM
Sorry! I mean Curiosity, the follow up to MER. It's currently being put together at JPL:
http://marsprogram.jpl.nasa.gov/msl/
Posted by: djellison Nov 2 2010, 09:05 PM
Don't distract the guy, for goodness sake
Posted by: scooterlord Nov 2 2010, 09:50 PM
Lol! Damn I was so excited for a moment... Thats ok though :/ I ll find my way through all this
Posted by: Pando Nov 19 2010, 07:05 AM
Awesome work, scooterlord. I've done 3d modeling in the past - oh my gosh, what you're doing is incredibly detailed and tedious labor...
To illustrate Dilo's point, here is an animation of the cable cutting process. There are several stages; some cables are cut when the rover gets up on its wheels. Others are cut after.
You can see 4 frames here - between frames 1 and 2 the rover gets up, and you can see that the cables on the right side are cut at this point. Between frames 3 and 4 the bundle is cut on the left side.

After the rover rises, you can see the pyro mechanisms where the cables used to connect to:


Here you can see some of the cable bundles going from the rover down to the lander. The big loop of cables that goes up and down is actually part of the lander.
http://photojournal.jpl.nasa.gov/jpeg/PIA04848.jpg
Posted by: scooterlord Nov 19 2010, 01:11 PM
Very helpful post indeed!
But I also need a little guidance here. So, the pyro mechanism that cuts the cables is the thing on the left side on the animated gif with the holes? How exactly does it cut it? Since it's called pyro I suppose it burns it, but I need this info for modeling issues.
I mean are the cables cut INSIDE those holes? Meaning that no cables come under it after the rover leaves its lander?
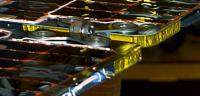
Moreover I am having SERIOUS trouble making out stuff in the following image, if anyone knows what's going on, please draw a couple of lines and repost, I am staring at the 3 reference photos for a few days now and I can't gather enough information to start.. :/
Facts:
a) I know that from the front left side of the mer comes a 'fat' set of multiple cables, that connect somewhere at the rear. I think its the cable that goes round right in the middle of the red circle. From other reference photos I can make out that to that white box at the left of the circle connect 3 cables, which I don't know where they come from. Plus, there is a cable wrapped arround it.
c) I suppose (but can't tell for sure) that all the cables from the HGA are joined into the fat set of cables that go towards the bottom-right side of the red circle and then are wrapped in foil and go to the right side of the mer.
What I am missing is information about the actual parts of the rover. For instance if I knew that this white box there is the 'HGA Controller' I would try to follow the cables routes from the HGA to this box. However I have no idea what that is!
Last, although I am working on this rover I also study reference from the other rover just to make-out the starts-ends of the cables, making it easier to predict their routes. Supposingly, in both mers the parts are the same, cables are connected to the same slots, and I assume that ONLY the routes are changed...
Looks like I am going to need an anxious month of studying before starting to actually model anything.
Posted by: MahFL Nov 19 2010, 05:27 PM
The pyro is a small explosive, it pushes a sharp shear edge to cut the cables. Remember if they were not cut the rover would have been a lander, so the system have to be very very reliable.
http://exploration.nasa.gov/documents/reports/comvehicleworkshop_9-18-2006/Control_Blow-By_From_Pyros.pdf
I had never seen that before....boom !
Posted by: scooterlord Nov 19 2010, 07:20 PM
So, hm, cool
So, it is safe to assume that the holes are used for allowance to oxygen for the explosion to take place. Can someone please verify this?
If so, I'll get away with not modeling a few stuff
Posted by: Floyd Nov 19 2010, 09:34 PM
Most explosive compounds (other than gas or hydrocarbons) do not need external oxygen. They often have NO2 groups in them that rearrange to give N2, CO2 and other components. Think of nitroglycerin. I don't actually know what type compounds are used for pyros, but sure they do not need external O2.
Posted by: Pando Nov 19 2010, 09:49 PM
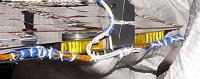
Speaking about pyros, I've marked up your image:
The metal piece in the yellow circle is the pyro assembly.
The cables going through the pyros are indicated by two pink lines (same ones that are on the right hand side in the animation being cut).
The red circle shows the trigger connections to the pyros, and they go where the red arrows are pointing. This picture shows them disconnected during assembly for obvious reasons - they are most likely connected at the very last stage of the assembly process.
Posted by: scooterlord Nov 19 2010, 10:20 PM
Cool! So i understood correctly! If any of you happens to know anything about the cables at the rear side, please share!
Posted by: scooterlord Feb 21 2011, 11:22 PM
Hello again,
I'm back and working on the rover with great excitement! Probably due to the fact I got a new pc and I can FINALLY open the rover file without any problems; I got an i7-960 with 6gb 1600Mhz Ram, so, work is getting done quite fluidly. It's the first time that I can merge the seperate files into one and actually SEE the whole model. 2gb of ram are consumed just to open the file. I started detailing the whole thing, progress looks really nice - as expected. Here are a couple of renders just to take a peek of what kind of detail you should expect in the final model. The shown models are modeling-wise finalized and only need texturing.
With the current pace of progress I might be done by the end of this year (hopefully!). It's a lot more work than I could possibly have imagined. About 5% of my brain will be released since I dedicate it to think of this project no matter what I am doing.
Posted by: hendric Feb 22 2011, 06:27 AM
Let me be the first to say: Wow.
Posted by: monty python Feb 22 2011, 07:50 AM
Just plain great!!
I think you'll finish about the time oppy makes it's first great discovery at endeavour crater.
Posted by: scooterlord Mar 5 2011, 03:00 PM
Well, here I am, working at full speed providing with one more new render of the model-wise finalized mer idd. I will continue working to finalize each part step-by-step with full details before texturing. Here it is, comments welcome as always 
Posted by: Phil Stooke Mar 5 2011, 03:23 PM
Those ITAR agents are gonna be banging on your door any time now!
Phil
Posted by: scooterlord Mar 23 2011, 02:14 AM
Hello, have been working a lot lately, here is my latest progress. Rocker-bogie full modeled with finalized details - which means it only needs texturing; however I will proceed with texturing when I am done with all the modeling. With the current pace I am very hopeful I might be done sooner than I thought.
Sometimes I even amaze myself about how I reached this level of detail by looking at crappy reference photos. I try measure angles and find proportions in photoshop, and when I compare details later on with other reference they almost match - and I can't describe how great that feels. 
Comments welcome as always.
edit: in the top render I forgot to put some nuts on the wheels which are added in the second render.
Posted by: eoincampbell Mar 23 2011, 04:34 AM
A gasp again! You really a Lord?
Posted by: Poolio Mar 23 2011, 12:01 PM
Am I seeing internal structure through the holes in the wheels? Wow. Your attention to detail is truly incredible. I always look forward to seeing your latest renderings.
Posted by: scooterlord Mar 23 2011, 01:39 PM
Poolio -> You must have a lot of patience waiting for my renders to be posted!
Anyway, I am glad that people actually DO notice and recognise the amount of work, and although I have previously posted a render of the inside of wheels, here is a new one. Next step to finalize the camera mast - a loooot of small details to be added; doing those threads that hold the cables are a real pain!
Posted by: hendric Mar 23 2011, 04:18 PM
Man, I just got a vision of that rocker-boogie as some kind of awesome Steampunk vehicle.
Scooterlord, your work is always awe-inspiring.
Posted by: AndyG Mar 23 2011, 09:02 PM
Fabulous stuff, scooterlord.
But it does make me wonder ... in my working life I deal with Flash and a pile of vector goodness, Dreamweaver and pixel exactitude: all accuracy and exactness. With my hobby-hat on, I make models - boats usually - and http://www.thefreckledfish.com/racundra/rac-wbf2.jpg is a scaled up copy of scans of dubious plans of a 90 year old sailing vessel. Here, accuracy is "near enough" - aided by my wayward knife and wood butchery skills. The end result is "reasonably scale"; but that's ok from a distance. Do you find the clinical perfection of renders an intellectual problem or potential barrier with the photo-based source materials?
I'm curious! I have to firmly separate one versus the other.
Andy
Posted by: scooterlord Mar 23 2011, 09:16 PM
Andy, its both. But since I am a perfectionist I spend long hours with the crappy photo references. I pick a standard object for which I have almost an orthogonal view, so that I can assume its dimensions are right and based on that I do the rest; I draw a linein photoshop, change its size and compare it to my fixed object. Logic also helps, perception as well. I also study the reflections, the shadows.. I should work in FBI sometime
Good feeling I get though when after designing partby part you reach to a point that you have to do something that exists in a blind spot but when comparing it to two fixed parts its size according to both ratio comparisons comes even.
So, There is a barrier that can be overcome though; determination, patience, imagination, logic, thoroughness, perception. Thats it. And loooooads of time of frustration and unavoidable remodeling.
Posted by: scooterlord Mar 28 2011, 10:34 PM
Top cameras finalized. Here is a render for the followers' pleasure..
Posted by: scooterlord Apr 10 2011, 12:45 AM
Hello, a new render of the finalized hga. I had posted a few renders very early in this thread, but I was not happy with it so I kinda remodeled the whole thing; a few surfaces didn't match, parts didn't fit, etc. Countless hours staring at the reference to make out the details, I hope I got them spot on; couldn't see the cables on the top part and the film holder on the far right, but from what I can make out, they seem to be fine. Enough with the talk, here we go...
Comments welcome as always.
I am pleased so far with the modeling process, so I'll take a break, I've been working straight 6-8 hours/day, stealing time from my other interests. Will come back as soon as I get results.
Posted by: eoincampbell Apr 10 2011, 03:07 AM
Beautiful renderings, I hope you have a red carpet for the finished article
Posted by: nprev Apr 10 2011, 08:40 AM
Scoot, all I can say is that every time you post one of these my jaw hits the floor. Just plain stunning.
Posted by: Leither Apr 10 2011, 04:39 PM
Stunning, just absolutely stunning! The detail is incredible, right down to the cable ties - how long does it take to render one of those!! Clearly a labour of love. Looking forward to your next instalment.
Posted by: scooterlord Apr 10 2011, 06:24 PM
Hey, glad you people enjoy seeing my work as much as I enjoy working on it! this render 1920x989 took about 35 mins to render on an i7 960 /w 6gb ram @1600mhz. Global illumination at medium sampling, antialiasing set at 3x3.
Posted by: ilbasso Apr 11 2011, 12:23 AM
With the amount of detail you've achieved and the countless measurements you've taken, I don't doubt that you know every detail of the exterior of the MER better than any other individual.
Posted by: ElkGroveDan Apr 11 2011, 12:49 AM
I was looking for a detailed, straight-on image of the Pancam and mast last week that was higher resolution than what I was finding on the Internet, and I almost came here to ask Scooterlord to render one for me from his model. Fortunately I eventually found an image acceptable forhttp://www.planetary.org/blog/article/00002994/ I was working on.
Posted by: hendric Apr 11 2011, 02:42 PM
Speaking of a "red carpet", there should be some detailed 3D maps of some locations, taken from the stereo cameras.
Posted by: scooterlord Apr 12 2011, 08:53 AM
Once I am done with the mer model, I am thinking of modeling two locations; one is the mer test room at jpl with draft details blurred out though, and the other is on mars. I haven't decided if I am to used real 3d maps as mentioned above, but I can assure you that you will all be pleased with the results.
Posted by: scooterlord May 3 2011, 11:24 PM
Hello again... anyone care to see a couple of new renders? I've been working on these details for the past 2 weeks, almost 5-6 hours/day. It's a LOT of work, almost nothing can be copy/pasted -let alone I don't want to see any repetitions on the model. It's no news that I've been obsessed with this for quite some time now, but as the time to the finish approaches I can't wait to see it done.
Enough said, here we go:
The above render is ALMOST finished, but not completely done.. It has just a few minor details missing and of course not taking into consideration the top part of the web.
...I assume some of you watching this thread are familiar with parts of the mer I a modeling. I'd rather you compared the renders to the real thing -if anyone cares to do so that is- and provide me with feedback. More than a pair of eyes is better than just one. Comments welcome as always.
Posted by: nprev May 4 2011, 12:24 AM
Uh... ...well... ...I'm not wise in the ways of MER architecture, but I will refrain from my customary heartfelt praising profanity to honor such brilliant work, Scoot. You're a wizard, plain & simple; Harry Potter ain't fit to trim your toenails. The final product will be a treasure for the ages.
Posted by: djellison May 4 2011, 01:39 AM
At this point, the level of detail is enough to differentiate which rover you're actually modelling
Posted by: eoincampbell May 4 2011, 01:40 AM
Belated congrats to Dan for that nouveaux-iconic image and to scooterlord once again
Posted by: jamescanvin May 4 2011, 07:26 AM
You could tell 4 years ago!
I think I was referring to the magnet next to the PCT. However I suspect it is actually a blend of the two rovers based on whichever rover photograph was being used for reference each time.
As always scooterlord, my jaw hits the floor every time you post.
James
Posted by: scooterlord Jul 30 2011, 03:16 PM
Hey all,
I've been detailing quite a bit lately, it's a tougher process than it looks and it's very time consuming. I am leaving on vacation tomorrow, but I will still have the mer on my mind, so I thought I'd share a temp wip of the progress on the front cables I reached today. I haven't done all the tie-ups yet and the knots are missing. Other than that it's taking its final form. Comments welcome as always.
Posted by: Pando Aug 3 2011, 08:29 PM
I'd like to reiterate what's being said already:
OMG!!
(Please excuse me while I pick my jaw off the floor.)
Are you planning to put textures on all of the objects as well??
Posted by: scooterlord Aug 4 2011, 06:26 AM
...of course I will add textures on... Thats the fun part...
Posted by: HughFromAlice Aug 8 2011, 04:31 AM
MER = Magnificent Engineering Representation .... by Scooter Lord. Wild!!! Will you be sending it off to be 3D printed?
Posted by: scooterlord Aug 8 2011, 03:44 PM
Thanks... 3d printing probably not... It requires all parts to be solids and they are not in ordrr to save polygons.. I wish though...!
Posted by: scooterlord Sep 14 2011, 08:20 PM
Hello. I am progressing rapidly as I have said in previous posts and looks like I am currently on schedule to finish modeling before the end of this year. I have *completely* finished the front part with the cables and underneath of the wings with full detail, have moved at the top side; I have finished almost everything except the cables at the rear and the cables -for which I am almost about to sort out their guidelines- that connect to the hga along with a lot of minor little details all over the mer. I have already started a few tough materials - like the cables and they are coming out quite nicely
Here is a test render of what I've been working on the past few days and at the bottom -since I had it sitting there - a quite old render of the front cables when they were still not fully detailed but with a few knots on the left side:

Comments welcome as always...
Posted by: scooterlord Dec 5 2011, 01:07 AM
Hello again. Anyone missing posts in this thread? I wanted to let you guys know that I am on schedule to finish this by the end of the year -the modeling part that is and hopefully most of the texturing/rendering. I have about a week's time of modeling before I am completely (and finally!) done! After hundreds of hours of studying and tens of hours of modeling I give you the final rear cabling and I assure you it was TOUGH. Thank god for that national geographic documentary about the death of the mars rover (as unfortunate as the fact may be) that showed a few frames of the rear camera that gave me a few details that led me to the result below. I compared this to a few references and it matches
Now, in other news for the ones into 3d, I switched renderer again and will stick with it. I did a few test renders with materials and OH MY GOD! I can't even believe how awesome it's becoming. I won't share anything at this point, but trust me people following this will be excited! Also I found some 64-bit beta software of my modeling program and for the first time I can render HALF the file successfully and without materials. It might not sound like a big deal, but trust me, it is, since this half file (cables only) consumes 1.5gb of ram just to open the file. The render below took 11 mins to render without materials on an i7-960 @ 3.2Ghz with 6gb of triple channel fast memory.
Enough said, here is the render of the rear cables; I post the render side-by-side to the best reference I had for this. Many details are missing since this is a test render, but don't worry, the final model will have every little thing on. I am just missing a few knots before I am completely done and a few details here and there (like the silicon that hold the small cables of the photovoltaics at the top):
Commens welcome as always!
Last but not least for today, just letting people know that I am going to use this as an opportunity to change professions. Anyone knowing of any sources that can offer me a job in 3d, please pm - I hope this is ok with the admins.
Posted by: hendric Dec 5 2011, 05:30 AM
Wow, more and more impressive every time I see it Scooterlord. Maybe it's time to start passing around the UMSF hat to get a copy of this for our use.
Posted by: dilo Dec 5 2011, 06:30 AM
Amazing result, tough but it was worth yhe effort, scooterlord! When you will finish this, you'll be ready for MSL rendering...
I wish the best for you and your future work!
Posted by: scooterlord Dec 5 2011, 09:37 AM
Thanks for the support everyone! Really hope this project helps me out. Rendering process should take place (hopefully) before the end of this year.
edit: just realized that you mentioned MSL rendering... well I have enough reference to model the lab as well but the first renders will be on mars' surface. Just a bit more patience..
Posted by: scooterlord Dec 17 2011, 11:32 AM
Well, people... this is it. I am finally done modeling the mer. For the first time I can show you a full render of the mer, although untextured yet, but judging from the fact that even I surprised myself, I guess you people will be pleased.
The project turned out to be 29.000 (!!) objects and just to open the whole file it consumes 4.7gb of Ram. I have serious trouble rendering this, since my 6gb of ram is not enough for this (it's swapping on the disk) so I ordered another 6gb this morning and hopefully will stay out of trouble. It only needs for a few bad objects to be fixed and off I start texturing. I can promise you a perfect result from what I've seen on my material test renders.
Give it some time to load, the image is 3400x1998px:
Now is the time that everyone should start commenting!
Posted by: dilo Dec 17 2011, 01:49 PM
Cannot belive I'm the first one... well, this was an amazing project, a tremendous effort and, I think, a great emotion for all UMSF memebers to see it completed! Is like to see a newborn baby...
Lot of considerations and proposal in my mind, for the moments congrats again and thanks a lot, s.lord!
And, please, give us more views!!!
PS: how many polygons?
Posted by: dilo Dec 17 2011, 02:02 PM
I am recycling this wrong post (instead to write a new one) only to attach a wallpaper I made from this beautiful rendering...
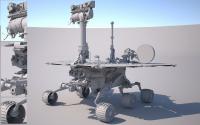
|
Posted by: Floyd Dec 17 2011, 02:17 PM
Congratulation on an amazing amount of work and an fantastic result. Wow!!!!
Posted by: scooterlord Dec 17 2011, 03:47 PM
Thanks! Just wait till you see it done! I am just holding myself not to post a few material renders I have, I am keeping them for when the time is right, hehe.. I can guarantee that everyone will drool all over this
@dilo: have no idea how many polys are produced, since it is constructed out of nurbs. I am guessing... A WHOLE LOT! If anyone happened to see any of my other 3d models in my site, the suzuki hayabusa that had the most polygons, was almost 600k when optimized, while its rhino file size was 100mb. The rover has reached more than 800mb in size and there are like 5.000 instances of same objects (like bolts, nuts, knots, etc) which are not added extra to the file size.
Many views will start popping up the next few days (hopefully) including materials. Prepare your desktops for many wallpapers, hehe. Since I worked so hard to detail EVERYTHING I might as well make renders from all possible angles so that everything can be seen. My aim is 12mpx size renders (as long as my pc will be able to handle them) - twice the size of the above render.
Glad you enjoy it as much!
Posted by: ilbasso Dec 17 2011, 03:49 PM
Time to bring out the Swear Jar again! *clink clink*
Absolutely beautiful. You have my admiration! As I said in a previous post, I have no doubt that you know every square centimeter of the MER better than any person involved in her design!
Posted by: ElkGroveDan Dec 17 2011, 03:58 PM
It's kind of fun looking at it in the neutral color - almost like this is is the battleship model. I can't wait to see the textures. Are you going to create one with and without dust on the solar panels?
Posted by: scooterlord Dec 17 2011, 06:25 PM
I dont know about the dust, its very tough to add it and look as it should, considering that there are more than 50 textures on the surface. For the time being i am only considering the clean version but time will tell. Texturing alone is a very difficult and time consuming process...
Posted by: Leither Dec 17 2011, 08:53 PM
Simply stunning - even more impressive than I thought it would be from the partial posts. A truly excellent piece of work. I find the neutral colour makes the individual components stand out so much more. Ive already had to look up several bits I didnt initially recognize.
Many thanks for this superb Christmas present!
PS. Very very minor point, youve modeled the right hand Pancam filter housing as a mirror image of the left hand Pancam housing when it is actually the same housing rotated thro 180 - so on the LH Pancam the little wire connection bulge is above the lens and on the RH Pancam it should be below the lens. I think! 
Posted by: scooterlord Dec 17 2011, 10:58 PM
Thank you all for your kind words.
@Leither... these 'several bits' you didn't recognize at once, I didn't even know what they were! I suppose you can check the details in my model and THEN make them out in the reference photos. Just imagine the other way around which I had to do to model them. Tens of hours staring, minutes of modeling...
As for the pancam, it's exactly as it should be - I used for reference the documentary 'roving mars'. You are welcome to double-check it.
So, here is a new render, due to a small error I didn't fix before I started the render, the body of the mer isn't shown, sorry for this, but you can make out most the details at the top - some are not seen because of the image's contrast, I have even modeled the silicons that keep the small cables in place. I know it could be texured, but I wanted it to look as real as possible in close-up renders.
I have to admit that I am surprised about how many details you people see. I am almost certain that many of you have worked on the actual mer itself, but I find it very pleasant that you loved the project so much and you remember about the details - I was surprised that you could make out which one of the two mers I was making from minor details seen in my renders. I am also happy that I lived up to YOUR expectations. CG artists will see the amount of work in this project, but will not be in position to appreciate the detailing and accuracy.
Posted by: PDP8E Dec 17 2011, 11:32 PM
WOW - this labor of love and CGI tour-de-force is amazing...
Will it rove about in a little CGI movie about someday??
Posted by: nprev Dec 18 2011, 01:38 AM
There is no other word to use short of "incredible", in the best possible sense. Such remarkable work, and I'm sure that many if not most people on the MER team will soon see it (if they haven't already!)
Congratulations, man. We (UMSFers) love your labor of love!
Posted by: Stu Dec 18 2011, 01:53 AM
Incredible, and beautiful too... I admire and respect your dedication. Can't wait to see what you do with your creation next...
Posted by: Tesheiner Dec 18 2011, 09:48 AM
Hats off, man! It's a beautiful piece of art, congrats!
And knowing about all the details you put on the model, I'm wondering if it may be perhaps the most detailed one ever done in the world...
Posted by: scooterlord Dec 18 2011, 12:10 PM
Well, it IS the most detailed model, I can assure you
Posted by: Toma B Dec 18 2011, 06:30 PM
WOW!!!
I have just went through all your posts from the first one, and calculated that this MER 3D model was at least 1932 days in the making, although even in your very first post there were some parts finished.
You can rarely see that kind of determination these days. Well, I would REALLY like to say something to describe what I think about this AWESOME piece of ART but my knowledge of English is just not enough good for that, so I will just settle for fantastic, beautiful, inspiring and wonderful.
I can't wait to see what would it look like when finished.
P.S.
On the funny side......did you heard there is another even more complex rover currently en route to Mars? 
Posted by: eoincampbell Dec 18 2011, 07:02 PM
I had a retrospective read through your posts too, it's great dedication to a goal, looking forward to the finishing touches....
Posted by: ilbasso Dec 18 2011, 07:28 PM
I suggest that for an even more complete rendition, you should model each atom of 57Co in the Mossbauer spectrometer and be able to watch them decay!
Posted by: Leither Dec 18 2011, 07:51 PM
Scooterlord the new rear view render is stunning - even more things to ogle at!
As to the Pancam, you've modelled it superbly
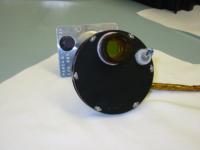
|
it's how it is shown mounted on Mer's RH side which is not quite right; the wiring connection should be below the lens on the RH. The LH side is perfect.
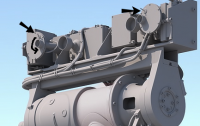
|
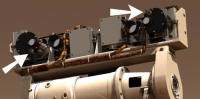
|
Keep the Christmas presents coming!!
[I should get out more!]
Posted by: Nix Dec 18 2011, 09:22 PM
Woaw man, that's just
congratulations ! A lot of work paying off !
Posted by: scooterlord Dec 19 2011, 12:03 AM
As to the Pancam, you've modelled it superbly ...it's how it is shown mounted on Mer's RH side which is not quite right; the wiring connection should be below the lens on the RH. The LH side is perfect..
Keep the Christmas presents coming!!
[I should get out more!]
That's just AMAZING! Isn't this some vision! Are you using x-rays?
Well done, minor detail but you were right, I though you meant about the lens being on the same side, I'll have this fixed. I am glad that you people spent quite some time studying my model and I guess you will be amazed by the amount of detail I made out of the reference found on the web... Today I spent most of the day fixing 'bad surfaces' on the model, there were quite a few, had them all fixed though
Currently I am doing test renders on the environment, it's very difficult to get a nice surface at the high resolutions I am aiming at, will post later to get some opinions..edit: @Toma B... Yes, I saw the curiosity rover, but.. I don't think so! LOL. I don't have enough 'life' to model this as well... Unless NASA hires me to do so that is.. hehe
This for me started as a fun modeling challenge to myself and it ended up eating up most of my brain thinking about every single day. Now, as I have already said, it will become the most important asset in my portfolio in order to get a job. I want to change professions, working at a hospital just isn't enough for me, and I am certain that you can see I am being wasted in there. Hopefully someone will notice and care to help..
edit2: Here are the render of the environment. They are big res files (3400x1996). What do you guys think?
http://img577.imageshack.us/img577/4678/env2.jpg
http://img403.imageshack.us/img403/5442/env3.jpg
Posted by: dilo Dec 19 2011, 06:30 AM
Not bad, especially 1st one; hard to judge without a scale refer... in my opinion, in the 2nd image there is too much terrain glare!
Posted by: hendric Dec 19 2011, 05:33 PM
Scooterlord, I stand in awe of your 3D abilities. I shall never open Blender again!
Posted by: scooterlord Dec 19 2011, 09:17 PM
Well... you should! You should set this as your standard and get started! Everyone starts from nothing...
Posted by: scooterlord Dec 20 2011, 10:45 AM
Good morning! New render with right-side view details:
http://img859.imageshack.us/img859/5401/merright.jpg
Sorry I didn't have enough time to fix the pancam thingie, but will do so, I keep that in mind.
For people into technical 3d stuff. This render, although is 5400x3173 (that is TWICE the size of the previous render), it only took half the time and this time consumed 5.5gb of ram. I had forgotten to turn export instances; for people that don't know (and care to know an instance is an object multiplied many times that is the same, like the photoboltaic mirrors, or the bolts, etc. It saved me a lot of time!
I didn't mention it so far, but the most difficult and time-consuming part of the rover was making the cables and the threads that hold them together. I was bored a million of times and just pushed myself to making them... finally, you can even see the knots on the underside of the wings if you pay attention. Only in this size of renders can they be clearly seen.
Expecting your comments, the next render might probably show up textured
Posted by: hendric Dec 20 2011, 03:00 PM
Look absolutely beautiful. At some point, you will need to do a render with the camera moved a few inches to the left or right so someone here can create a 3D view.
Posted by: dilo Dec 20 2011, 03:24 PM
I see the knots and lot of other amazing details, what a marvel!  This vision recall me the high-res MER movie I saw in Paris years ago...
You say this rendering took half the time of previous one but... how much time, exactly? (well, I know this question should be coupled to "which kind of hardware/software?" but I know also the risk of going OT here, so pls don't be too technical on this side! ).
Good suggestion from Hendric about 3D view...
Posted by: scooterlord Dec 20 2011, 03:46 PM
As soon as I am done, I can make a 3d view out of it. Damn it's just two renders..
This HUGE render took about 6 hours, I am using rhinoceros 3d beta 5 x64, maxwell render, and am on an Intel i7 960 @3.2Ghz (that is 4 core-8 hyperthreaded -considered like 8-core) with 6gb of ram dd3 triple channel (expecting 12gb soon). However, because I want the pc to be silent, I am using a program to limit the core usage to 75%, makes it run cool and silent However with materials it's another story, good thing I don't mind having the pc on and another good thing is that the renderer allows you to stop and resume the render whenever you want!
Currently I am at work but checking on a material render of just the RAT (includes displacement) and it has run 6 hours so far at about 1200x6??. Looks a bit hazy, but I was in a rush when I started the render, so I might not have focused the camera correctly. Looks absolutely S T U N N I N G If I finish this later on tonight I'll post the render.
Posted by: dilo Dec 20 2011, 05:19 PM
Thanks for the info, S.Lord!
Cannot wait for material render of the RAT !
I'm posting different size versions of a new wallpaper, now focalizing on details of last two renderings:

|
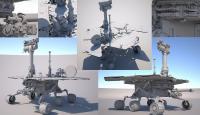
|
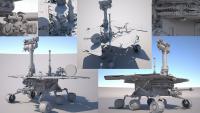
|
I have also an higher resolution version (2365x1440) if someone is interested...
Posted by: scooterlord Dec 21 2011, 02:04 PM
Hello again.. I guess this is what you've all been waiting for. This is just a sample of what you should expect of the quality of the final model.
..The program I am using is at its beta stage, so I have some trouble with the texture mapping. Previous version of the program seems to be working fine, but it's waaay slower, so I'll have to wait for the final version. So far, I've managed to do it properly but the textures on the rat are relatively easy.
The above render took 16 hours (!) to complete, that's way too slow, but I am using displacement for the cables that literally kills the performance to almost less than half. For the time being I wanted to show you a full quality render, although a bit grainy, but will have to find a workaround for the final renders. I can't imagine how much time it will need for the final thing to be render. I HOPE for a render/week (at 3400x2000px).
Comments expected and welcome as always
Posted by: dilo Dec 21 2011, 03:54 PM
Well, definitely is what we've all been waiting for!
Result is above my expecations, with impressive realism of brushes and foreground cables. Steel parts seems too shiny and gold wires jacket in background isn't well defined like other parts... but these are minor issues. What worries me is the rendering time, considering this is only a small part; however, I see you're confident so I'm not really scared about!
Edit: only now I noticed the scratches on steel parts contacting the rocks... fantastic detail!!!
Posted by: scooterlord Dec 21 2011, 07:42 PM
Hey,
Well, the shininess is something very difficult to realize. The picture below is an unedited screenshot from the documentary 'Roving mars' that shows the mer BRAND new and shot indoors. As you can see it can't get any shinier than this.
And this one:
I had a lot of trouble picking the materials, that's why I spend a whole day (which is too long for this), but if you notice carefully enough, the render above has 16 textures - with 6-7 different chrome shininess levels, etc. I am doing my best to reproduce the best results, provided the reference I have helps me.
Moreover the cables can't be more defined than they already are, I spend like 5 days sorting them out from the reference I have The camera angle doesnt help as well, the next render I am doing atm from the other side will give you a better opinion of what's going on.
..and glad you noticed the small things! That's the whole purpose of good texturing. If only I had a render farm and could let this reach its best sampling level. To reach 25 sampling (which is the best) it would need 150 hours more... but that's normal with this specific renderer. Awesome quality in expense of time..
edit: forgot to say, that the materials seem SO different depending on the lighting you'd be surprised, in outdoors lighting, it seems completely different. In most reference pictures for example the cables seem yellowish, but in some others redish.. I just have to pick what I think is the most accurate by experience with lighting..
edit2: here is a brand new render from the other side. This one took 5 hours to render, lower sampling level than the previous image (17 instead of 20):
I was so excited to start rendering that I forgot to texture the metal end of the cable :/
Posted by: Dominik Dec 22 2011, 07:33 AM
Hey scooterlord, absolutely stunning work! Very impressive!
I've never created a rendering on my own, so I've no idea how this works. I don't know if it's possible but, if you outsource some of the render calculations to other workstations, may be some of the users here are able to spend some of their CPU time for this project ;-).
I've got a VMware ESXi test machine with an AMD Phenom II x6 @ 4,2GHz and 16 GB RAM, which is currently not in use. If possible and needed, I would like to donate the calculation power of this machine for test renders.
I can't wait to see the final texturized version of this model! Keep up to good work!
Posted by: scooterlord Dec 22 2011, 09:33 AM
Thanks! That would be awesome but not now. Now i test render all the time and huge amount of data has to be sent. Once I am finished we'll see
Posted by: Juramike Dec 22 2011, 02:48 PM
Wow! That is absolutely beautiful work!
Posted by: dilo Dec 22 2011, 04:49 PM
I see "MER@home" project on the horizon!
Seriously, is a nice idea and I would like to offer my CPU time too (however, I suspect that my poor PC, a Phenom with only 3GB Ram, isn't useful...)
Posted by: scooterlord Dec 23 2011, 06:21 AM
Good morning...
..and here is the moessbauer spectrometer:
..I hope you aren't getting bored with me posting! I will try to texture (and post) one item per day... This way the community will have detailed renders of each part
Posted by: djellison Dec 23 2011, 06:54 AM
I literally giggle at the quality of these - it's breathtaking.
Posted by: scooterlord Dec 23 2011, 07:00 AM
Thanks! Lets just hope that some company will giggle as well and give me a job! thanks again for the support people. I knew what the quality was going to be like when I first started, it was tiring, but the idea of what would come -comments and people's giggles- was what kept me going..
Posted by: remcook Dec 23 2011, 08:19 AM
Really amazing indeed! Looking forward to the final result.
Posted by: Astro0 Dec 23 2011, 09:46 AM
I love the touch of the 'SCLORD2011' text on the ribbon cable.
That's excellent!!
Posted by: scooterlord Dec 23 2011, 11:50 AM
I have to admit that many of you are really observant!
Posted by: scooterlord Dec 24 2011, 10:20 AM
Good morning everyone,
here is the apxs.. I must have started the render about 20 times, I always made silly errors and I had to wait until the render cleared... grrr.. I think now it's all done and as it should be:
Posted by: lyford Dec 24 2011, 04:55 PM
This may sound odd, but I had grown quite fond of the untextured model - white and perfect. But these new renders look so gorgeous! It's like the mother of all clean rooms, pristine parts up close and we don't even have to wear bunny suits.
Posted by: scooterlord Dec 24 2011, 05:02 PM
Thanks! Well, I know that you people didn't know what to expect, texturing needs a lot of work as well, if you had previously seen my site then you should have known what quality to expect. Let alone that during the 5 years in the making I learned a lot of stuff, especially modeling-wise, but also texturing and rendering techniques. Now that I am finalizing everything as I go on texturing I see so many errors and things I would have done differently if I had started now. I can see that my experience is +10 levels
I am glad I live up to your expectations and even exceed them!
Posted by: scooterlord Dec 27 2011, 05:49 AM
Hello everyone and happy holidays! New render for your pleasure.. the micro-imager..
Next render will take a while, I will post when I am done with the whole idd.
Comments welcome as always!
Posted by: nprev Dec 27 2011, 06:28 AM
Any comments I would make would only be obscene in a good way, and hardly productive (though redoubtedly complementary in intent).
Astonishing.
Posted by: scooterlord Dec 27 2011, 08:00 AM
Thanks, I am flattered as always!
Posted by: Greg Hullender Dec 27 2011, 04:15 PM
Did you ever get any help from someone at NASA, or is it all still what you've deduced from looking at official photos?
--Greg
Posted by: scooterlord Dec 27 2011, 09:17 PM
I sent emails to any company I could find that took part in the rover (eg honeybee robotics, etc), but I only got reference not found online (at least I couldn't find it) just for the idd, everything else can be found online. I mainly used the jpl library, the documentaries (martian robots, roving mars, death of mars rover, etc), the sol photos, pdfs and manuals found online for various mechanisms (eg how the idd is held on the belly of the rover, the rocker-bogie extenders, etc), small cad references for various parts. It was really exhausting, as I have already said in many parts of this thread, it was hundreds of hours of staring-comparing-measuring and a few hours of modeling. It was really painful but the result is rewarding, I was obsessed with it. Most people would be happy with just scarce details but I wanted this project to be as accurate as it could.
In my opinion people should be more excited and awed by my perception, patience and ability to measure and compare rather than my modeling skills in this particular project.
Posted by: ElkGroveDan Dec 27 2011, 10:22 PM
Trust me, many people are.
Posted by: Bjorn Jonsson Dec 28 2011, 12:12 AM
Yes, this looks awesome and extremely detailed (and I thought the POV-Ray model of Cassini I did roughly 10 years ago was detailed - compared to this it isn't). Must be a *huge* amount of work.
Posted by: scooterlord Dec 28 2011, 01:05 AM
I have both good and bad news today.. good news is that my new ram has arrived, now on 12gb It's not needed at this point but it will be needed soon...
Bad news is that I am having serious problems with current versions of software, the textures on my items keep failing every now and then and I can't pinpoint why this happens. Very frustrating along with the texture mapping problems. Can't go back to previous versions because I have a lot of work in this particular file version that can't be read in previous versions of the program. Better than not being able to handle the file at all I guess. :/ Anyway, new renders probably tomorrow..
Posted by: hendric Jan 4 2012, 10:14 PM
Scooterlord,
Have you tried contacting the company? I know I'd drop everything I was working on to help out someone doing something this awesome.
Posted by: scooterlord Jan 4 2012, 10:22 PM
Hey...
well, it's beta, problems are supposed to occur, and corruption is supposed to happen now and then. Luckily I have hundreds of backups so everything is well!
I know I promised you a new render a few days back.. it's coming soon, rendering at the background atm. I hope you'll like it! Patience until tomorrow...
Posted by: Nix Jan 4 2012, 10:51 PM
I seriously doubt we won't like it
Posted by: scooterlord Jan 5 2012, 10:21 AM
First of all, happy new year! Forgot to mention it earlier!
Well, people, here is the new render! Excuse the bug with the flag on the rat.. 
Comments always welcome!
Posted by: Astro0 Jan 5 2012, 11:15 AM
Brilliant!
Posted by: dilo Jan 5 2012, 12:03 PM
This is stunning! MER becomes alive...
Posted by: pospa Jan 5 2012, 12:57 PM
Rally wonderful, SLord !
If I may just two notes:
- the whole picture seems to be a little bit grainy or fuzzy on my screen compare to previous sharp renderings
- the USA flag on RAT cable cover is out of scale - bigger then suppose to be -> only stripes are visible
Otherwise, as I said - marvelous job !
Thanks for your patience and skils, it is real joy to watch your outputs.
Edit: please ignore my second note, when I read your comments more carefully I realized you know it already - sorry
Posted by: scooterlord Jan 5 2012, 01:35 PM
@pospa... The render is a bit grainy because it needed many more hours to clear up. A render is considered to be grainy clear after its sampling rate reaches 20. This render's rate is 17.5 after 20 hours of rendering. These are just test renders, when it is finalized I will let it render all the way.. Hopefully it will take less than a week for one render.
In this render besides the flag, a few more things went wrong, like the white caps of the turning motors, they were supposed to be reflective, now fixed. I also corrected a few other minor things. Rendering atm the other side of the base of the idd.. Coming soon...
Posted by: ElkGroveDan Jan 5 2012, 02:22 PM
Breathtaking.
Posted by: Pertinax Jan 5 2012, 06:21 PM
Continued stunning work. I admire your patience and attention to detail.
Thank you for bringing us along for the ride! You honor well the Spirit of the MER project.
-- Pertinax
Posted by: Leither Jan 5 2012, 08:14 PM
Just when you think it can't get better - another stunning render to drool over!!
Absolutely amazed at the detail to be seen. I especially like the view into the alpha/x-ray spectrometer (APXS) - so pleased you left the dust doors open!!
Posted by: James Sorenson Jan 5 2012, 08:29 PM
You went to Mars and swiped Oppys arm...You must have!!
That is just really amazing work Scooter. Amazing job
I always look forward to seeing your work.
Posted by: stevesliva Jan 5 2012, 08:49 PM
Just incredible.
Posted by: scooterlord Jan 6 2012, 10:36 AM
Good morning again, with a new render...
There a few artifacts again, the film of the moessbauer, a dark ring at the back of the base of the idd, a few non-reflective surfaces on the rat, the small film of the microimager... I know.. unfortunately I messed with the camera view and didn't save the file so I couldn't fix the errors for this particular render, they are fixed for future renders though...
I will probably start texturing the wheels-rocker bogie next, probably starting tomorrow. I'll let it render another angle in the meantime to post, a smaller render this time to have it ready today...
Posted by: PFK Jan 6 2012, 01:17 PM
One look at it and bang went my "no swearing" New Year's resolution 
Amazing.
Posted by: pospa Jan 6 2012, 02:04 PM
Scooterlord, its lovely anyway, as always . I love those scratches and surface roughness from manufacturing.
Would be possible to try softer light source by next test renders in order to prevent overburn of some shiny surfaces?
Strings holding RAT cables are kind of transparent whereas by other places they seems to be white. Is it on purpose or by mistake?
Thanks
Posted by: scooterlord Jan 6 2012, 02:39 PM
hey there.. yes, I will try to tone down the light source (the sun in this case). It's just a box with holes in the sides... doing a render again atm, so from the next one. I encountered a strange artifact (again!) but I think I know now why corruption occurs, will have to do a few tests again..
...as for the strings, yes, I noticed it myself, it's probably the angle that shows them this way, other than that I prefer the slight transparent view than the other... good observation though..
edit: as for the strings, if you notice closer, for example the moessbauer, the bottom string is transparent, the material seems to be ok, so it's definately the angle. Let alone that on the rat, the light source falls directly on it and the surface below the string is very reflective and it reflects through it. Currently I have the transparency of the strings set to 70% - considering it's double sided.
so, here is the close-up of the base of the idd. hope you like it as well..
next render will be of the rocker-bogie.. once I am done with it that is..
Posted by: ilbasso Jan 6 2012, 04:53 PM
Now try it with a patina of iron-oxide dust...
Simply incredible! I remember back in the early 1970's when computer graphics were just starting to move out of the "overstruck line printer" mode. (Does anyone here remember the http://sturgeon.css.psu.edu/~mloewen/Oldtech/ASCII/Mona.jpg rendered by a PDP-8 on a line printer?) How far we've come!
Posted by: hendric Jan 6 2012, 05:02 PM
Scooter,
Are you saving the camera orientations when you do these awesome renders? It would be awesome to take one of the older untextured renders, and fade in the exact same scene with textures (even partial).
Thank you for this work!
Posted by: scooterlord Jan 6 2012, 06:28 PM
Unforunately not, but many of my backup saves consist of the exact render views. I say again, these are just test renders, haven't played with lighting, with camera dof, nothing yet. As soon as I finalize the whole thing, I'll do 3d renders (red-blue that is), part textured, part not, whatever you want. I'll see if I have a good camera view of the above renders to photoshop textured/not textured ver...
edit: well, uhm, here it is, FULL HD wallpaper size (1920x1080)...
Posted by: scooterlord Jan 8 2012, 10:52 PM
Hey everyone!
I've got a new render for you...
The whole process is very slow, because even though I thought that I had finalized the mer modeling-wise, a lot of things have to be fixed, instanced, and a few things even need to be modeled because I didn't notice them in the first place. I spent an entire day just finishing up the wheel of the mer, I am very happy with the results. Hopefully everything else besides the rocker-bogie is finalized and only needs to be textured.
Once again, expecting your comments...
edit: since the forum switched pages, maybe some of you weren't notified for my last post edit with the wallpaper..
Posted by: pospa Jan 9 2012, 08:40 AM
Very nice, indeed !
< pedant mode ON >
The orange-coloured material in between springs should be some kind of foam (if I remember well it prevents pebbles from jamming between springs)
Even if its really small detail, could be the orange surfaces roughness modified to simulate such a material better?
< pedant mode OFF >
Those delicate colour tone changes (orange) are excelent though.
Posted by: jamescanvin Jan 9 2012, 08:48 AM
Amazing as usual, not that I expected anything less.
The diagonal part of the tread pointing toward the hold down point looks curved in your render, is that right? I could have sworn it was straight and looking at a few images it looks to me like should be.
James
Posted by: scooterlord Jan 9 2012, 09:52 AM
...as for the foamy part, I thought it would be foamy myself, didnt know for sure, However in many reference photos I have it seems like it is coated with something so it has this shininess. It's not a big deal to change this to a more matte look if it would make you feel better!
As for the treading, yes it should be curvy. I have a lot of material that shows its curved. It would be great to know these things from start but keep in mind that all of this is made from observation, let alone I would have to spend my entire life making it accurate. Its simpler to create it at first rather than replicating it!
I hope its curved anyway, it would need many hours to be fixed..
Edit:
Phewwww.. Looks curvy to me! Glad I avoided a lot of extra work, especially now that I am finalizing stuff..
http://fab.cba.mit.edu/classes/MIT/863.10/people/phil.salesses/wp-content/gallery/output-devices/img_0082.jpg
Posted by: jamescanvin Jan 9 2012, 11:52 AM
Are we looking at the same thing? Maybe its a perspective thing but these parts look curved across the surface of the imaginary sphere of the wheel surface in your render but straight in the photo.
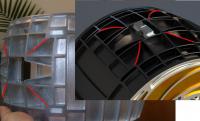
|
Posted by: Astro0 Jan 9 2012, 12:05 PM
Scooterlord
Not sure if this would help you. It's something done for a project from some time ago.
It's the best I have based on photos and fullscale references.
I had a rover wheel on my head once...but that's another story
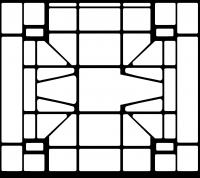
|
There are some differences in the render you posted and the photo reference you gave above.
I've seen the rover wheels in several configurations as well.
The version used for flight might be a little different to some of the photo references available.
I don't think that at this stage that we can get too picky on small details when the entire thing looks so magnificent!!
Posted by: scooterlord Jan 9 2012, 12:54 PM
Well, I see your point now, this is not of great importance and don't forget that I didn't have any of this reference when I started the model (not even the image I posted that I could have great use of it when I first started).
Doing shapes on curves surfaces is extremely difficult and I don't think going into a process of remodeling at this point would help the whole representation.
Maybe many of you weren't expecting the model to turn up so good, maybe you didn't watch the thread back then, but this is material I wish I had in the beginning. I contacted several companies that helped produced the mer, I begged for reference, I contacted everyone related to the project that I could get contact info. Only a few helped me out.
..but well, you couldn't have known Anyway, at this point, I am only fixing and finalizing surfaces and would remodel something that is wrong and very OBVIOUSLY wrong. I admire your observations and the love for the project (I wonder how many of you actually WORKED on the mers - I would like to know who of you did). Only now can I see how inspiring your job on something this big can be, and would love to take part in something like this, would be a life's dream come true.
Last but not least, I hope you are not dissapointed and don't feel let down if I don't get into the process of fixing things like straight or curved lines on a wheel, which is a GREAT observation (would love to use such pairs of eyes while looking at reference photos), but not that important to invest an extra couple of hours to fix (yes, it needs that long because it's one surface, it will have to be uncut, and re-cut, and re-filleted, etc...). I may try to see if its easily fixed to please you people but can't promise it. This also rises my spirit that I did everything else good enough for you NOT to notice So, sorry James, but please keep pointing out my mistakes, calms my mind actually knowing what I did wrong...
Would also really love to know about rover wheel on head Astro0??
Posted by: jamescanvin Jan 9 2012, 01:33 PM
No worries. I am in no way disappointed, your work is beyond amazing.
You've always requested feedback and errors to be pointed out, this is close as I've come to finding anything at all and it is so tiny it's staggering.
It's only because the tread of the front wheels appears in hazcam images that I have looked at nearly every day for the last eight years(!) that this one jumped out at me.
James
Posted by: scooterlord Jan 9 2012, 01:35 PM
Will try to have it fixed later, because I am planning on making 'hazcam view' renders, so I don't want it to bother you..
Posted by: pospa Jan 9 2012, 03:59 PM
You are right, its glossy, but not perfectly plain ... it has some wrinkles or waves on the surface.
RR wheel in http://photojournal.jpl.nasa.gov/jpeg/PIA04849.jpg may help. But its absolutelly up to you
Posted by: scooterlord Jan 9 2012, 04:02 PM
It's the lighting that makes it look this way. You mean it's bumpy? From many other photos, I made out it's smooth and shiny. From the above photo you can see that there's a variation in color, but I have already did that...
edit: watching the picture again, I just realized what you meant, I saw the rear wheel reflections, yes, I will do this...
Posted by: Astro0 Jan 9 2012, 09:14 PM
You've gotten us all excited with this project which we have seen developing since your first post about it in http://www.unmannedspaceflight.com/index.php?showtopic=3143&view=findpost&p=66479
In that post you actually showed us an image of the wheel tread and back then it had those curved sections and none of us said anything.
So, don't go changing it now.
It's your rover and as we've already seen it has your personal touches (eg: your name on the ribbon cable)
As your renders keep coming, I just think how great it is that we can see a nice new bright and shiny rover again
Posted by: PDP8E Jan 9 2012, 11:39 PM
Scooter,
Here is a post from July 10, 2010 about the MER Wheels (and a picture from the manufacturer)
http://www.unmannedspaceflight.com/index.php?s=&showtopic=6623&view=findpost&p=162219
Maybe you can get the CAD file from them?
Posted by: scooterlord Jan 10 2012, 12:04 AM
PDP8E.... thanks for the reference photo (had it already though but... uhm.. not going to happen...
...because as Astro0 suggested, no-one compained about it back in 2006 (nor provided me with as much useful reference as I could get) and I am finalizing stuff, so.... mean you know I don't get paid for doing this right? It's just my ticket to get hired somewhere. HOPEFULLY. Just looking to please a few people making it...
..that's why I was happy while I was reading Astro0's last post, I was also rendering this at the background...
...WOW! Look at that, no more bent lines! I hope James is pleased... along with pospa, I made a thin coating layer on top of the foamy stuff, so that it's mostly visible when seen from big angles..
edit: sorry, messed up with the image code
Posted by: djellison Jan 10 2012, 12:34 AM
That actually nails it - it's like an orange foam, but with a sort of clear plastic cover over it. On the test-bed rover, the plastic started to peel off - and I'd expect it to have done the same on Mars.
D
Posted by: scooterlord Jan 10 2012, 12:55 AM
D
Posted by: Astro0 Jan 10 2012, 03:59 AM
Excellent work as we've come to expect
Can't wait to see the final render of the entire rover!
Posted by: dilo Jan 10 2012, 06:13 AM
Same for me. The wheel renderings are simply superb... I was always amazed by self-amortized spiral structure, I wonder if someone already used it somewhere else...
Posted by: pospa Jan 10 2012, 07:59 AM
One version of LER chariot (2008 ?) has wheels with spirals, maybe inspired by MER design. http://collectspace.com/review/chariot01.jpg
(hopefully I didn't brake 1.6 rule with the link above  , but since it can be controlled remotely I thing its also considered as unmanned robotic rover platform )
Posted by: jamescanvin Jan 10 2012, 08:27 AM
Perfect.
Posted by: pospa Jan 10 2012, 08:55 AM
Smile and satisfaction on my face as well.
Thank you slord !
Posted by: James Sorenson Jan 10 2012, 10:35 AM
This is a simular design for a small robot, and same principle for flexible wheel suspension.
http://www.youtube.com/watch?v=ebwofhAT4Ps
I have also designed a 4.5 inch wheel derived on the MER wheel design for a personal robot project of mine. This will be CNC machined on my small 4 axis milling machine I am also building.
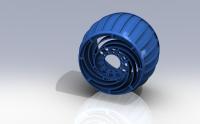
|
Posted by: scooterlord Jan 10 2012, 02:09 PM
uhm.. someone said that he had good reference of the room the rovers were built in? I would like to give them a look if that's possible... Is is the same room the curiosity was built in? I saw a couple of AWESOME photos online. It's just that I want to make indoor renders but don't want to spend more than 15 days modeling the thing...
...I am at work atm, was working on the rocker-bogie before, left it in the middle and my mind is there... I saw a few things that I need to model because I didn't see them before and some things are wrong.. other than that I will probably have it all done by tomorrow..
Posted by: scooterlord Jan 17 2012, 05:06 PM
Hello...
I've got a new render for you. It took me so long because there were so many things that needed to be remodeled, instanced, modeled from scratch and took me more than I imagined. These parts were the first to be 'finalized' so the progress will be faster from now on because I progresses with great thoroughness..
I know there's something wrong with the rear part of the rocker's texture and I definately don't like the cables. They may have been seen good until now, but now I see the need to be re-textured, so probably in the next render they will be corrected - will deal with it a bit later on tonight.
I want to note that I have finally added the 'mars rover project' in my site (as seen in the signature http://www.nicksotiriadis.gr). I have almost every render found in here gathered in one place, along with a small story, so you are welcome to come visit (and show your friends)! So, if you haven't visited the site so far, now is a good opportunity to do so!
Any comments for either the new render or the site's post is welcome!
Posted by: Airbag Jan 18 2012, 03:13 AM
Hi Nick,
Fabulous renders as always; just a minor comment on your web site - you mention both rovers 'died' after 6 years on Mars, but Curiosity is still very much alive!
Airbag
Posted by: ElkGroveDan Jan 18 2012, 03:24 AM
??
Opportunity is still alive.
Posted by: scooterlord Jan 18 2012, 09:56 AM
That's why I needed your help, looks like I messed up I've been looking for info everywhere, off I go to restore the good news
Posted by: scooterlord Jan 19 2012, 10:22 AM
Hello everyone, new render for your eyes.. here with morning lighting..
I spent almost a full day making the cables look right, I double checked them and this is the best result. It may look a bit too shiny in a few parts, but trust me, it's as good as it can get.
Already started the HGA, expect results soon..
edit: for people interested two HUGE (5400x3038) renders on my site in black and white backgrounds respectively:
http://www.nicksotiriadis.gr/mer-white.png
http://www.nicksotiriadis.gr/mer-white-2.png
Posted by: Quaxo76 Jan 20 2012, 01:17 PM
Hi Scooterlord, like everyone else here I love all the details like the manufacturing scratches on the metal surfaces. But I think I saw those scratches also on the flexible flat cables, on some renders... I don't know what flats NASA uses, but in my experience those cables are smooth and shiny even after quite some use... Maybe it would be better to make them smooth? What do you think?
Cristian
Posted by: scooterlord Jan 20 2012, 01:49 PM
Well... first of all it's not the same scratch texture, looks like it's the same but it's not Let's discuss the following image..
Left to right, top to bottom we have, ribbon in the idd, hga, mossbauer's ribbon, idd ribbon on mars and extreme close-up of the idd's base.
All of them being great examples (and I am grateful I found images of THIS quality) but the last one is the best. As you can see they are not smooth at all. The renders that show 'scratched' cables are extreme closeups, if it was a bit further away you wouldn't be able to tell there's something there, it will make the surface seem 'strangely' reflective as it shows in most of the mars rover reference pictures.
In the specific render that the scratches are shown (the idd closeup I posted before) You see 3 parts of the ribbon, left, center and right side. They all have the same texture on, but look how different they show according to the light source reflected on them. Just notice the right part of the cable, isn't this what you were looking for? Let alone these are TEMP renders, not lighted properly, just a sun source with too much intensity.
Last but not least, I have too much trouble making out the colors in different reference photos I have. Some reference is washed out, some is indoor lighted, some outdoor lighted. Sometimes is seems red-ish, sometimes yellow-ish, other times brown-ish. I still am not sure about the ribbon color, that's why I ended up in something in between all of the above.
Moreover, the cables. In most photos they seem yellow. In others orange to red. In 99% photos you can't make out that they are actually transparent and more than one cables are inside of them, but I tried to replicate this as well.
I want to hear about everyone's opinion but, trust me, I am way too thorough to leave such mistakes occur
Posted by: ElkGroveDan Jan 20 2012, 03:21 PM
It seems pretty clear that this is due to different light sources and light temperatures. The color in the ribbon ribbon cables should respond to varying light sources in a similar way to other polymers of a similar color. Use the Kapton tape as a color reference since that is a known constant and made of a polymer of a similar color to the ribbons -- and it is everywhere. Re-balance the reference photos so that the tape appears the same in each one. I think that will give you a truer idea of how the ribbon cables' colors are changing in the reference photos due to things like texture, reflections and translucence.
Posted by: scooterlord Jan 20 2012, 03:30 PM
kapton tape in google images gives pictures with a hundred different hues... :/
Posted by: ElkGroveDan Jan 20 2012, 06:34 PM
Yes. What I meant was to ADJUST the color balance in the Google pictures you are using until all the Kapton tape is the SAME. Then look at the ribbon wires. Pick one example where the whole picture looks good and use that to start with.
Posted by: scooterlord Jan 20 2012, 06:52 PM
uhm... thats what I did in the first place...
Posted by: Quaxo76 Jan 21 2012, 04:36 AM
Hi Scooterlord, first of all, thank you for your reply.
Of course I have never seen "live" NASA cables, so my experience was with everyday cables - the ones that you can find in almost every electronic device these days.
Let's discuss the following image..Left to right, top to bottom we have, ribbon in the idd, hga, mossbauer's ribbon, idd ribbon on mars and extreme close-up of the idd's base.
[...] As you can see they are not smooth at all. [...]
I hadn't seen those pictures before, and I agree the cables don't look absolutely "flat"... but I'd say what I see are the "bumps" due to the dozens of parallel copper tracks running under the lamination, and not "random" manufacturing scratches...
That said, I trust your eyes and judgement, and I fully also appreciate the fact that the only way to be sure either way would be to hold the actual piece in our hands!
Cristian
Posted by: scooterlord Jan 21 2012, 10:09 AM
Sooo... I did a few tests and here is what I came up with... luckily I was a perfectionist about my surfaces and every film is just ONE surface so it helps the texture mapping..
HOWEVER, currently, I CANNOT UV map properly, meaning that with the current beta I can only map only ONE channel on each surface which means I cannot have letters on, etc. So we all have to wait until the final version comes out. I will be progressing with everything else and leave films and some cables for the end.
Cristian, as you may realize, both straight grooves AND random 'scratches' (bumps I'd say) can be seen in the pictures, and the final version will have both.
Posted by: scooterlord Jan 23 2012, 12:52 PM
Hello everyone!
New renders... Finally done with the high gain antenna. Tough task, a lot of stuff were missing so I had to model them, plus I had trouble with my program that corrupted my file multiple times :/ Anyway, all done. Here are two renders, a studio one and a 'natural lighting one'..

...Although the HGA's film texture is a bit different than all the rest of the mars rover, I think I will replace the previous ones (when the program finally allows multiple uv channels) with a version somewhere in between the two.
Aditionally, for the ones interested in the 'white' mere, here is another mammoth render at 5400x3038:
http://www.nicksotiriadis.gr/mer-white-final.png
Comments always welcome, and don't forget that all this material can be found gathered in my site.
Posted by: dilo Jan 23 2012, 02:30 PM
Still without words, waiting for gran finale!
Posted by: scooterlord Jan 31 2012, 09:58 PM
Hello,
took me some time (actually a lot) to finalize this thing here, but I am finally done! I hope you really enjoy the details...
Click on the link for ULTRA render 3298x3293. Once you get used to the full details it's hard to go back EDIT: Sorry, ops, could not get it to recognize link with thumbnail :/
I know a few things are wrong, already fixed them, but I should mention them before you eagle-eyes find them
a) in the front render, a small film is missing from the right NavCam. in the front render, a small tie-up goes 'inside' the cabling (glitch) which I fixed.
c) the black texture on the PanCams shows an ugly repeating texture - which is fixed.
d) repeating white texture WILL be fixed in future renders so that the scratches don't repeat so often.
e) I fixed that 'lever' on the PanCams after the eagle-eyed member that found that. Actually it's not a lever, it's something different, modeled it as close as I could
For anything else, I am here for your comments and as always my site is updated with the new renders!
Posted by: James Sorenson Feb 1 2012, 01:39 AM
OMG WOW I nearly fell out of my chair!!
EXCELLENT WORK Scooter!
You continue to surprise. I'm just in amazement every time!
Posted by: dilo Feb 1 2012, 04:53 AM
Fantastic! This stunning render clearly show details hard to explain for me, for example the two tiny grey disks in front/below of miniature thermal emission spectrometer... perhaps temporary PanCam lens covers for cruise phase?
Posted by: scooterlord Feb 1 2012, 09:00 AM
Exactly.. Took me a while to figure out what they were. Once you know it's easier to model. Tens of hours spent wisely... Hehe.. They are black actually, not grey, just reflecting the sky..
Posted by: Nix Feb 1 2012, 10:32 AM
You are a sick man. The detail is amazing.. these last renders, again, and in particular the mast, gave me a big smile
Posted by: Leither Feb 1 2012, 10:17 PM
Words fail me
.. absolutely beautiful. I never realised the Navcam electronic box covers were so mirror like!! The reflection of that cable on the RH box cover is just magic!!!!
Posted by: Leither Feb 1 2012, 11:32 PM
...but not just cruise, mainly EDL.
Taken from Bell et al: MER Athena Pancam Investigation, Jnl Geophysical Research Vol 108 No E12
"During the cruise and EDL phases of the mission, flexible metallic dust covers are held between the two outer baffles in the sunshade to guard against dust contamination of the sapphire window during airbag impact, roll, and deflation. These EDL dust covers are designed to pop out permanently (and gracefully) the first time the camera bar is deployed on the PMA. After they pop out they remain attached by a short lanyard to the camera bar, but out of the field of view of any of the PMA cameras."
Powered by Invision Power Board (http://www.invisionboard.com)
© Invision Power Services (http://www.invisionpower.com)