Endeavour Drive - Drivability analysis |

  |
Endeavour Drive - Drivability analysis |
 Oct 20 2008, 10:35 PM Oct 20 2008, 10:35 PM
Post
#646
|
||
 Member  Group: Members Posts: 257 Joined: 18-December 04 Member No.: 123 |
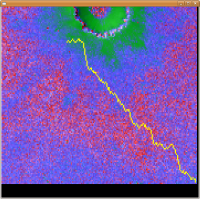
I didn't get a chance to do anything this evening except for trying to use James Canvin's terrain map briefly. Posted the result below.
Cost function of (bad*bad + 3*medium + good) and grid dimension of 15x20 (not square I know  ) )-Ed
Attached thumbnail(s)
-------------------- Turn the middle side topwise....TOPWISE!!
|
|
 |
 
|
|
|
Oct 21 2008, 03:07 AM
Post
#647
|
|
|
Member Group: Members Posts: 139 Joined: 14-October 05 From: Toronto, Canada Member No.: 529 |
QUOTE (Shaka @ Oct 19 2008, 11:52 PM)  It's starting to look like an argument is imminent such as: "What do you want to do? Get to Endeavour or do science? I wonder who will win?  Science wins! Always does. -------------------- -- Robin
|
|
|
|
|
Oct 21 2008, 04:02 AM
Post
#648
|
|
|
Member Group: Members Posts: 139 Joined: 14-October 05 From: Toronto, Canada Member No.: 529 |
QUOTE (Juramike @ Oct 19 2008, 10:50 PM) Note that the S end of the passage has a darker zone that could be a small dust trap. Switching to the rock pavement area immediately to the E 30% of the way though the "180 S-heading zone" might be a better move. -Mike Nice work Mike. You have done some tremendous work in narrowing down the choice of routes. Once we get to this point, it is here is where 'eye balling the route' pays off. However, if I may be able to express an opinion, I think a better refinement of this route is to trend more SW from the N end of your proposed route. This will put us are directly North of the pavement just W of the marked route. This will give a nice bedrock highway to drive on, as well as an opportunity for science on any rocks or cobbles that we should happen upon. 
-------------------- -- Robin
|
|
|
|
|
Oct 21 2008, 05:21 AM
Post
#649
|
|
 Senior Member Group: Moderator Posts: 2785 Joined: 10-November 06 From: Pasadena, CA Member No.: 1345 |
Now everyone can play "Choose your own path"
I've put together coordinated terrain models in a Powerpoint presentation (both as .ppt 97-2003 and .pptx 2007 files). I've also included little scale 50 m boxes drawn to cut/copy/paste to your hearts delight onto your favorite terrain model. Then group/copy/paste onto all the other models and the HiRise image as well. Easy step-by-step instructions on Slide 2. Scoring function table is included (Slide 10). Powerpoint 97 (.ppt 25.7 Mb): http://www.speedyshare.com/371972901.html Powerpoint 2007 (.pptx 25.2 Mb): http://www.speedyshare.com/666678727.html Y'all have fun! -Mike (BTW: I'm really lovin' that cute little 50 m crater. It makes a great centerpoint for coordinating the images, too!) -------------------- Some higher resolution images available at my photostream: http://www.flickr.com/photos/31678681@N07/
|
|
|
|
|
Oct 21 2008, 06:21 AM
Post
#650
|
|
 Senior Member Group: Members Posts: 1229 Joined: 24-December 05 From: The blue one in between the yellow and red ones. Member No.: 618 |
Don't forget, JM, I was her first love! But I'm not the jealous type where craters are concerned.
The important thing is: Now the whole family can play along with the rocket scientists! (We'll never know how many marriages you saved today, Mike.) Regarding scientific 'points of interest', many cobbles of interest may be too small to resolve in HiRISE, but others can be detected: i.e. 1) Bigger cobbles - boulders, really. 2) Rubble fields left from the secondary impacts of local ejecta. (Some were seen on the trip south to Victoria.) 3) Areas of bedrock that are uplifted or undermined to expose fractured edges. (This often occurs around small craters.) 4) Any other abrupt visible transitions in the terrain that may reflect underlying geological discontinuities. I expect that a spirit of compromise will resolve any dilemmas between geologists and NASCAR drivers.
-------------------- My Grandpa goes to Mars every day and all I get are these lousy T-shirts!
|
|
|
|
|
Oct 21 2008, 04:30 PM
Post
#651
|
|
 Member Group: Members Posts: 236 Joined: 5-June 08 From: Udon Thani Member No.: 4185 |
QUOTE (jaredGalen @ Oct 21 2008, 12:49 AM) I'm using the Euclidean distance as the estimator right now. Be careful with distances taken from HiRISE images, as a lot depends on the projection which was used (if the image is map aligned), basically you can't just take pixel-distances and multiply it with the scale. Scales might vary with the latitude of the image, depending on the projection type, and directions might also not be continuous across the image. Every projection-method has its own peculiarities. In fact it is nice that oppy landed quite close to the equator, which make chart projections a bit easier and the resulting distance-errors smaller, at the Phoenix latitude you would have far more problems calculating distances. This is one of the reasons why I try to relate everything to latitude/longitude coordinates only. |
|
|
|
|
Oct 21 2008, 05:03 PM
Post
#652
|
|
|
Solar System Cartographer Group: Members Posts: 10172 Joined: 5-April 05 From: Canada Member No.: 227 |
It's quite true that scale and direction will vary across a map depending on the projection used, but for the minute area covered by one HiRISE image the variations are insignificant. The problem only really arises for images or mosaics covering a larger region.
Phil -------------------- ... because the Solar System ain't gonna map itself.
Also to be found posting similar content on https://mastodon.social/@PhilStooke Maps for download (free PD: https://upload.wikimedia.org/wikipedia/comm...Cartography.pdf NOTE: everything created by me which I post on UMSF is considered to be in the public domain (NOT CC, public domain) |
|
|
|
|
Oct 21 2008, 05:48 PM
Post
#653
|
|
|
Member Group: Members Posts: 236 Joined: 5-June 08 From: Udon Thani Member No.: 4185 |
QUOTE (Phil Stooke @ Oct 22 2008, 12:03 AM) It's quite true that scale and direction will vary across a map depending on the projection used, but for the minute area covered by one HiRISE image the variations are insignificant. The problem only really arises for images or mosaics covering a larger region. Fully agree with you that with most projections the variations are very very small, but you never know with these rovers, by the time we start mapping the 100 km drive after Endeavour we have to take care  |
|
|
|
|
Oct 23 2008, 04:56 PM
Post
#654
|
||
|
Member Group: Members Posts: 257 Joined: 18-December 04 Member No.: 123 |
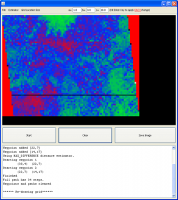
Haven't done much more but I decided to pack up what I have done and let people play with it.
At the following URL you can download a simple app that I have done to plot routes using red/blue/green terrain maps. I have included Mikes terrain map for convenience and to save using Doug's bandwidth http://tinyurl.com/5k3tc8 It is an executable java JAR file so people should have no trouble hopefully. You will need java version 1.5 or greater though (safest would be 1.6). When you run the JAR file just go File->Open Image. Chose a terrain image like the one I provide for download. I designed it using RGB values (red = bad, green = good, blue = medium) The constants used to indicate the cost of crossing a particular colour can be changed by entering the values on top As discussed above: CODE a=red b=blue c=green The cost function is CODE a*red + b*medium + c*green If you change a value, be sure to hit the 'enter' key before moving on. To indicate a start and end point just click on the map and hit 'Start' You can indicate as many points as you like. It just traverses from the first to the last. The size of the grid used to break up the terrain map can be adjusted from the 'Grid Location Size' menu. The estimator menu changes the method used for estimating the distance between points for the A* algorithm. To clear all your points hit the 'Clear' button. Finally you can save your maps using the 'Save Image' button. Just make sure you put in the full file name as a PNG image when saving, e.g myMap.png That's it I think. If there are problems I'll do my best to change them at some point. -Ed Edit: Note there may be a bug in what I have distributed. The behaviour when all weights are 0 seems off.
Attached thumbnail(s)
-------------------- Turn the middle side topwise....TOPWISE!!
|
|
|
|
|
|
|
Oct 23 2008, 08:00 PM
Post
#655
|
|
 Member Group: Members Posts: 646 Joined: 23-December 05 From: Forest of Dean Member No.: 617 |
Thanks jaredGalen, it runs perfectly under Linux... once I'd worked out that I had to click on the image a couple of times to define start and end points before hitting 'Start', if I wanted anything to happen, though. D'oh!
The temptation to try it out on absurd images is great, though. Hmmm, how DO you get to the bottom of Valles Marineris, anyway? ... *cough* ... also, I note that it throws "java.lang.OutOfMemoryError: Java heap space" on STDERR when given a ridiculously hi-res image, though that doesn't show up in the GUI. -------------------- --
Viva software libre! |
|
|
|
|
Oct 23 2008, 09:05 PM
Post
#656
|
|
|
Member Group: Members Posts: 257 Joined: 18-December 04 Member No.: 123 |
Yeah, I guess good instructions were scarce in my post
You need at least 2 points for it to work, start and end point.And yep, java.lang.OutOfMemoryError can happen, I handle it wonderfully by ignoring it. If the terminal is your favourite place then 'java -jar -Xmx1024m RoutePlanner.jar' is your friend, give it as much as you can and see how big an image it can take  All in all I didn't try and account for much user jiggery pokkery, so it will run into trouble. And also, I hate doing GUI stuff Still haven't checked out my potential bug too  Thanks for sharing! -Ed -------------------- Turn the middle side topwise....TOPWISE!!
|
|
|
|
|
Oct 23 2008, 09:21 PM
Post
#657
|
|||
|
Member Group: Members Posts: 236 Joined: 5-June 08 From: Udon Thani Member No.: 4185 |
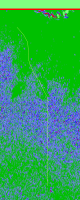
Computer-generated route using directional STDEV, from position at sol 1687 to the point where Mike's SW route and W-spur routes join up with the others. This would require a turn to the southeast which as yet doesn't seem likely.
Total route with STDEV values for southerly course:
latest version (2) of my toolkit can be installed from here |
||
|
|
|
||
|
Oct 25 2008, 02:55 AM
Post
#658
|
|||
|
Senior Member Group: Moderator Posts: 2785 Joined: 10-November 06 From: Pasadena, CA Member No.: 1345 |
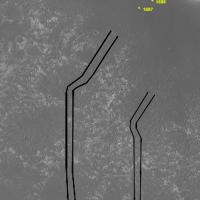
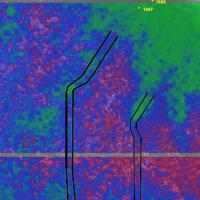
Based on Eduardo Tesheiner's Opportunity Route Map of Sol 1687 (now solidly on all five UMSF Terrain models):
HiRise image with W Spur route (on left) and SW Passage route (on right) indicated:
Shift Differential Terrain Model with W Spur route (on left) and SW Passage route (indicated on right):
Looks like Oppy is headed toward the W Spur route entrance. -Mike -------------------- Some higher resolution images available at my photostream: http://www.flickr.com/photos/31678681@N07/
|
||
|
|
|
||
|
Oct 25 2008, 03:33 AM
Post
#659
|
||
|
Senior Member Group: Moderator Posts: 2785 Joined: 10-November 06 From: Pasadena, CA Member No.: 1345 |
All of the UMSF Terrain Models with Oppy's Sol 1687 position indicated:
(BTW, let me know what y'all think of this format - it's kind of a pain to put together.) -Mike -------------------- Some higher resolution images available at my photostream: http://www.flickr.com/photos/31678681@N07/
|
|
|
|
|
|
|
Oct 25 2008, 06:35 AM
Post
#660
|
|
|
Senior Member Group: Moderator Posts: 4279 Joined: 19-April 05 From: .br at .es Member No.: 253 |
The comparision is very informative Mike.
> Looks like Oppy is headed toward the W Spur route entrance. Agree, although I have some discrepancies about the exact entrance point because there are some big ripples right there. |
|
|
|
|

|
Lo-Fi Version | Time is now: 30th May 2024 - 06:27 PM |
|
RULES AND GUIDELINES Please read the Forum Rules and Guidelines before posting. IMAGE COPYRIGHT |
OPINIONS AND MODERATION Opinions expressed on UnmannedSpaceflight.com are those of the individual posters and do not necessarily reflect the opinions of UnmannedSpaceflight.com or The Planetary Society. The all-volunteer UnmannedSpaceflight.com moderation team is wholly independent of The Planetary Society. The Planetary Society has no influence over decisions made by the UnmannedSpaceflight.com moderators. |
SUPPORT THE FORUM Unmannedspaceflight.com is funded by the Planetary Society. Please consider supporting our work and many other projects by donating to the Society or becoming a member. |
|