mer photos |

  |
mer photos |
 Sep 2 2006, 05:01 PM Sep 2 2006, 05:01 PM
Post
#1
|
|
|
Member  Group: Members Posts: 200 Joined: 2-September 06 Member No.: 1097 |
hello.. i am trying to model in 3d the mars rover and can't find the correct material, so I was wondering whether anyone in here has access to more information than I do and cares to help.
I am looking for detailed pictures of rover parts from all sides (top, left, right and bottom). I am attaching a few pics for the members to see the progress of my work. Trying to be as accurate as possible. Process is really slow since I have to make stuff out of bad reference pics I've tried collecting material from the nasa site, from raw images coming from the rover, from roobtics' sites etc, but couldn't come up with the correct reference i am seeking. if anyone cares to help, please do so     
-------------------- |
 |
 
|
|
Sep 2 2006, 07:44 PM
Post
#2
|
|
 Senior Member Group: Members Posts: 2492 Joined: 15-January 05 From: center Italy Member No.: 150 |
scooterlord, I do not have the documentation you're asking for, but I want to express my enthusiasm: the work you did up to now is simply breathtaking!
 Did you estimated how many polygons should approximately contain the complete model? (I suspect my poor PC will never be able to visualize it  ) )
-------------------- I always think before posting! - Marco -
|
|
|
|
|
Sep 2 2006, 08:25 PM
Post
#3
|
|
|
Founder Group: Chairman Posts: 14434 Joined: 8-February 04 Member No.: 1 |
There are a LOT of high res images at the KSC website
Use the advances search option here http://mediaarchive.ksc.nasa.gov/index.cfm And search for images, in reverse date order, having selected Mars Exploration Rovers under the Expend. LV drop box. This is the first image that includes a rover http://mediaarchive.ksc.nasa.gov/detail.cfm?mediaid=18623 There are a LOT of images in there. Doug |
|
|
|
|
Sep 2 2006, 08:28 PM
Post
#4
|
|
|
Member Group: Members Posts: 200 Joined: 2-September 06 Member No.: 1097 |
thanks dilo..
as for the polys, I have no idea, they can end up as many as they want as long as I am happy  djelisson, thanks for the sites, i'll look into it. for the time being, just in any case anyone happens to have what i want, i need hi-res photos of the high gain antenna, microscopic imager and especially the mossbauer spectroscoper. -------------------- |
|
|
|
|
Sep 2 2006, 08:49 PM
Post
#6
|
|
|
Member Group: Members Posts: 200 Joined: 2-September 06 Member No.: 1097 |
thanks for the help! currently looking to the site myself..
i hope i find helpful reference in there. i'll keep u guys posted for every work-in-progress i do..
-------------------- |
|
|
|
|
Sep 2 2006, 09:39 PM
Post
#7
|
|
|
Senior Member Group: Members Posts: 2492 Joined: 15-January 05 From: center Italy Member No.: 150 |
QUOTE (scooterlord @ Sep 2 2006, 08:49 PM)  I'll keep u guys posted for every work-in-progress i do.. Great!
-------------------- I always think before posting! - Marco -
|
|
|
|
|
Sep 8 2006, 08:09 PM
Post
#8
|
|
|
Member Group: Members Posts: 200 Joined: 2-September 06 Member No.: 1097 |
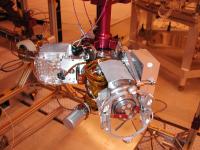
hey there guys... sorry it took me a while to get back to you, but I've been really busy lately (and I don't mean with 3d
 ) )temp render of the hga. i actually spent 3 days modeling just this. modeling and re-modeling that is in order to achieve accuracy. but how am I supposed to do that without the correct reference? I spend more hours trying to figure out the shapes and measuring ratios between this line and that line than actually modeling. i'll keep you guys posted for new stuff..  let me know what you think, and PLEASE if you have clear photos other than the ones suggested previously in this thread please share! -------------------- |
|
|
|
|
Sep 8 2006, 08:16 PM
Post
#9
|
|
|
Rover Driver Group: Members Posts: 1015 Joined: 4-March 04 Member No.: 47 |
Sorry, I can't help you. I will just say: wow! You have done these kind of things before haven't you? Amazing!
|
|
|
|
|
Sep 8 2006, 08:23 PM
Post
#10
|
|
|
Member Group: Members Posts: 200 Joined: 2-September 06 Member No.: 1097 |
thnx remcook! well, i've done it before, I can do it again. 3d takes a LOT of patience and I have it; the recognition along with the personal satisfaction that comes afterwards is worth it. you can visit other samples of my work at http://sc3ddesigns.f2g.net just to have an idea on what results are to come from this mer project
-------------------- |
|
|
|
|
Sep 8 2006, 09:17 PM
Post
#11
|
|
|
Founder Group: Chairman Posts: 14434 Joined: 8-February 04 Member No.: 1 |
Loving the work - I'm wondering what the end goal is - are you intending to animate it - put the model on Turbosquid, or is it a work of passion
Doug |
|
|
|
|
Sep 8 2006, 09:46 PM
Post
#12
|
|
|
Member Group: Members Posts: 200 Joined: 2-September 06 Member No.: 1097 |
well, reason I started this project is because I was all excited with the new 'trasnformers: the movie' -coming up on 2007- trailer, which features the mars rover. i was looking for a new 3d project to fill my free time, so here it was. i usually start such projects for fun, and personal satisfaction - it's like me having it, designing it, really cool feeling. especially when you end up creating a model from crappy reference etc, increases your perception abilities. very important. IRL i finished a radiologist/actinologist. I take x-rays, CTs, etc. perception is really important especially in surgeries, knowing how the object will look like from different angles, what result i will take on my screen if i point my emmiter here or there..
..but after countless hours of work why not get advantage of it? so it's going to end up in turbosquid, probably in a price too high for people to get, but you never know but most importantly it gives you the opportunity to meet new interesting people and get some interesting offers from time to time. let alone adds up to my personal portfolio, which if in need i'll be able to use to get some work
-------------------- |
|
|
|
|
Sep 8 2006, 10:04 PM
Post
#13
|
|
|
Founder Group: Chairman Posts: 14434 Joined: 8-February 04 Member No.: 1 |
Something of an overlap... I'm involved in medical E-learning stuff at work and have done 3d reconstructions of the upper airway from MRI imaging to produce rapid prototyped models of the airway for simulation of aerosol and nebulised drug delivery air flow
I'm also going the other way with a MER model - very low res with simple textures which might end up being of use for people like Indian3000 and his interactive software ( he doesn't know yet )There's a couple of fairly expensive MER models on Turbosquid already - but they're not good on accuracy Doug |
|
|
|
|
Sep 9 2006, 09:20 AM
Post
#14
|
|
 Member Group: Members Posts: 257 Joined: 18-December 04 Member No.: 123 |
QUOTE (scooterlord @ Sep 8 2006, 08:23 PM) you can visit other samples of my work at http://sc3ddesigns.f2g.net just to have an idea on what results are to come from this mer project Hi scooterlord, quick question, what plugins, if any do I need to view your site? Using firefox in Linux, and I can't get anything up. No worries. -------------------- Turn the middle side topwise....TOPWISE!!
|
|
|
|
|
Sep 9 2006, 10:12 AM
Post
#15
|
|
|
Member Group: Members Posts: 200 Joined: 2-September 06 Member No.: 1097 |
QUOTE (jaredGalen @ Sep 9 2006, 12:20 PM) Hi scooterlord, quick question, what plugins, if any do I need to view your site? Using firefox in Linux, and I can't get anything up. No worries. well, have no idea about linux, but you should be able to view it properly. all it requires is the shockwave plugin.. but firefox should have it installed already. first time I hear about anyone having problems accessing my site. people interested can also view my old site: http://sc3ddesigns.f2g.net/index2.html samples of my work can also be found over at www.cgtalk.com -> search for 'Nick Sotiriadis' looks like it became an ad topic :> -------------------- |
|
|
|
|
Sep 14 2006, 08:36 PM
Post
#16
|
|
|
Member Group: Members Posts: 200 Joined: 2-September 06 Member No.: 1097 |
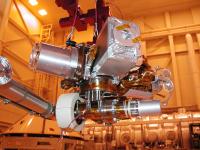
well, here i am again with a difficult update...
  it was all i could make out of the photos, generally i am very happy with the results. many thing seem to be 'connecting right'. it's a way to verify the model is coming out nicely since i model this part by part and then 'combine' them into the scene. so seeing that from different angles they 'connect' it just verifies it's accuracy (ahem, as much as you can get out of crappy reference). i am stuck now at the part begind the hgag, on its left side looking at it from the back, where the film (or small cables?) enter the hga. if anyone happens to come across clear pictures of what i want please send them over. what i need most is dimensions. ratios. angles. clear pictures from exact lefts, rights, tops, bottoms. to finish this i only need to model the part i just mentioned, the cables at the rear of the anntena, one small part that i guess is used to steady the antena at that position and then detailing, nuts, bolts, cables, and stuff. i circle the main part that troubles me and would LOVE to have clearer reference of, especially how it connects to the mer. did anyone happen to notice that the part that rotates the actual antenna and the one that rotates the whole system vertically are exactly the same part? I spent a lot of time staring at photos before i ended up to this conclusion. looks like nasa didn't pay enough to design different parts.
-------------------- |
|
|
|
|
Sep 20 2006, 08:45 PM
Post
#17
|
|
|
Member Group: Members Posts: 200 Joined: 2-September 06 Member No.: 1097 |
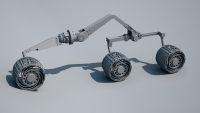
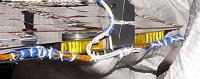
new update guys...
decided to drop the hga for a while since i can't come up with new better reference and turned to the rocker-bogie system where I can work quite fast since many parts are yet to be modeled and are quite clear in the reference photos i have. most of the time (again) is spent to make stuff out of the references. the mer is very tricky, many differences between sides of the same part. i keep measuring from funny angles ratios and angles between parts and so on. ratios most of the times are straight numbers and angles are in differences of x multiplied by 5, so i guess i am doing it all right. here are the results so far after a couple of days modeling:   any comments are welcome, especially ones pointing out errors ps I accidenataly came across this strange thing in my references. notice in the above renders that the main axle that rotated the whole front part of the rocker-bogie has 2 bolts from the inside than the outside. the better you look the better the results!
-------------------- |
|
|
|
|
Sep 23 2006, 08:05 AM
Post
#18
|
|
 Chief Assistant Group: Admin Posts: 1409 Joined: 5-January 05 From: Ierapetra, Greece Member No.: 136 |
woaw, all I can say is, what a cool job you're doing!!
Looking forward to more.. Nico -------------------- photographer, space imagery enthusiast, proud father and partner, and geek.
http://500px.com/sacred-photons & |
|
|
|
|
Sep 23 2006, 08:48 AM
Post
#19
|
|
|
Senior Member Group: Members Posts: 2922 Joined: 14-February 06 From: Very close to the Pyrénées Mountains (France) Member No.: 682 |
Soon, you'll be able to better describe the rovers than the one that actually built them. I love what you're doing. I'll try to hav a close look to hunt for errors. Thought job tho!
-------------------- |
|
|
|
|
Sep 23 2006, 02:18 PM
Post
#20
|
|
|
Member Group: Members Posts: 200 Joined: 2-September 06 Member No.: 1097 |
error hunt sounds great!
try this for the hga, rocker-bogie and the rat and apxs because everything else is incomplete.. this would help a lot. even hand drawn sketches of difficult parts, like the one i circled above in the hga, or the rear part of the rocker-bogie..thanks for the support guys!
-------------------- |
|
|
|
|
Oct 4 2006, 08:36 PM
Post
#21
|
|
|
Member Group: Members Posts: 200 Joined: 2-September 06 Member No.: 1097 |
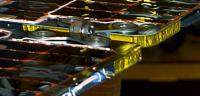
hello again. sorry it took me so long but i've been busy lately with a new job and trying to settle things up. this is a good update though. i progressed a lot with the rocker-bogie suspension which was damn difficult to make out, especially the rear part of it. some things are missing but thought it'd show you this just in case anyone has any clearer reference photos from the ones i have (parts not done are probably shown there). i leave most nuts and bolts and ALL wires for the end of the detailing procedure. here we go:
    ...and a wire  guys, notice the top view. wheels are not aligned on a straight line, this came out by itself and AFTERWARDS i verified this from references. this means i actually did a very good job measuring widths and heights and angles and ratios and comparing things from strange-angled reference material. i actually surprised myself looks very accurate to me so far. expecting your comments and as always... any good reference except the ones mentioned above (or in any case material that you KNOW is rare and diffuclt to come across) let me know... -------------------- |
|
|
|
|
Oct 4 2006, 08:55 PM
Post
#22
|
|
|
Chief Assistant Group: Admin Posts: 1409 Joined: 5-January 05 From: Ierapetra, Greece Member No.: 136 |
Tremendously good work I'd say!
I look forward to the complete model, it should be awesome to say the least. Nico -------------------- photographer, space imagery enthusiast, proud father and partner, and geek.
http://500px.com/sacred-photons & |
|
|
|
|
Oct 4 2006, 09:47 PM
Post
#23
|
||
|
Senior Member Group: Members Posts: 2492 Joined: 15-January 05 From: center Italy Member No.: 150 |
Very impressive, scooterlord!
I'm not so expert of MER mechanics, but about these beautiful CG images, I suggest you to slightly expand the poor contrast/brightness because is more easy to see the incredible details you reproduced. Look at this and compare with original, for example:
(EDIT: wow, 1500 posts!) -------------------- I always think before posting! - Marco -
|
|
|
|
|
|
|
Oct 5 2006, 04:41 AM
Post
#24
|
|
|
Member Group: Members Posts: 200 Joined: 2-September 06 Member No.: 1097 |
thanks!
as for dilo, I didn't play with contrast because these are just temporary renders, after model is finished will be textured, etc and then i'll take care of retouching. let alone i posted the renders late at night and was tired i'll keep you guys updated as soon as i have something new!
-------------------- |
|
|
|
|
Nov 3 2006, 01:51 PM
Post
#25
|
|
|
Member Group: Members Posts: 200 Joined: 2-September 06 Member No.: 1097 |
hello with a new update... not that bigof an update, but very difficult though; really tough (once again) to make out from references. this time i realized that "in-vitro" photographs of the equipment are far more different that the ones actually used on the actual mers. let alone, opportunity and the spirit have waaay too many differences themselves.
anyway, this is the micro-imager. as always if someone comes across any differences from the actual micro-imager i'd like to know. no rear-view though for now, not modeled some details i want to in the back, i'll post as soon as i am done.   this last one is to show the bottom view, base seems to have this strange shape:  ..next task is the moessbauer which is very difficult once more. i found a couple of nice photos of the actual piece of equipment but not very clear references of the base that holds in on the rat arm. i'd be grateful if someone can also help out with this one i've been VERY busy lately but expect an update REALLY soon (hopefully)
-------------------- |
|
|
|
|
Nov 3 2006, 02:11 PM
Post
#26
|
|
 Special Cookie Group: Members Posts: 2168 Joined: 6-April 05 From: Sintra | Portugal Member No.: 228 |
QUOTE (scooterlord @ Nov 3 2006, 01:51 PM) hello with a new update... Incredible detailed work scooterlord!  Following this way it won't be long untill UMSF has it own spacecraft... 
-------------------- "Ride, boldly ride," The shade replied, "If you seek for Eldorado!"
Edgar Alan Poe |
|
|
|
|
Nov 3 2006, 02:17 PM
Post
#27
|
|
 Member Group: Members Posts: 408 Joined: 3-August 05 Member No.: 453 |
I am just in awe at your efforts. I can't even imagine how much time it must take to generate these models.
Seeing the various components in such excruciating detail is just amazing; I find it even better like this than to look at the hi-res photos with their dark shadows, distracting textures and obstructions. It provides a real insight into the design of those components. Airbag PS If you use a Mars dust color instead of gray for the renderings, your final complete model will probably match the actual state of the MERs at that time 
|
|
|
|
|
Nov 3 2006, 02:23 PM
Post
#28
|
|
|
Member Group: Members Posts: 200 Joined: 2-September 06 Member No.: 1097 |
thanks ustrax
airbag.. there's still a LOT of work to be done; many parts i haven't even started modeling, all parts so far need thorough detailing - there are no cables anywhere yet - and it will be a very difficult task, i try not to think about it because i'll just become nervous and it's still not time for that. ...after the modeling is done... exporting the model to import in 3ds. part by part. this needs to be done because the program i am using to model (rhino3d) doesn't help a lot in uv mapping for textures so i need to export in 3ds... ...and last but not least, texturing. VERY difficult, needs optimizing, needs masking, needs testing - renders takes a lot of time. I want to have all details on, the mer seems not to have that many different materials so I hope i don't encounter any problems. so, hm.. that's a lot of work, huh? 
-------------------- |
|
|
|
|
Nov 3 2006, 04:02 PM
Post
#29
|
|
|
Member Group: Members Posts: 408 Joined: 3-August 05 Member No.: 453 |
I was looking for the mechanism on the MI rendering for flipping the dust cover/filter out of the way of the main lens. Is that small cylinder the stepper motor that drives that movement? I don't see any linkage though, or a clear sign of that cover?
Airbag |
|
|
|
|
Nov 3 2006, 04:24 PM
Post
#30
|
|
|
Member Group: Members Posts: 200 Joined: 2-September 06 Member No.: 1097 |
hm, i am not sure what you are talking about airbag. do be honest, i don't quite know what all these things i am modeling actually do, meaning, i don't know it's use. if I knew, maybe i could 'guess' some parts and the modeling would be easier but unfortunately i don't. if you have any photos to show me with what you mean, please put a simple circle around it and post. I haven't seen anything like the thing u mention, EXCEPT some other mechanism on top of the lens, which I only came across a couple of photos, but like i said "in vitro" and actual photos from the panoramic camera of the mer show different equipment.
-------------------- |
|
|
|
| Guest_PhilCo126_* |
Nov 3 2006, 04:57 PM
Post
#31
|
|
Guests |
Quote: Wooow that's really too much ... that's really too much !
Amazing work scooterlord |
|
|
|
|
Nov 3 2006, 04:58 PM
Post
#32
|
|
|
Founder Group: Chairman Posts: 14434 Joined: 8-February 04 Member No.: 1 |
|
|
|
|
|
Nov 3 2006, 06:20 PM
Post
#33
|
|
|
Member Group: Members Posts: 408 Joined: 3-August 05 Member No.: 453 |
I couldn't really find any more useful links than the ones Doug already posted above. But, you can see that there is a "horizontal" cylinder next to the lens, and a square cover over it - I believe these are part of the dust cover mechanism. Many of the photos I came across show the MI without this cover installed, presumably for early testing purposes.
The Athena site has a small picture (rendered too!) of the front of the MI: http://athena.cornell.edu/the_mission/ins_micro.html The 4th picture down on the right shows a (simulated) frontal view of that dust cover. Airbag |
|
|
|
|
Nov 3 2006, 10:59 PM
Post
#34
|
|
|
Member Group: Members Posts: 200 Joined: 2-September 06 Member No.: 1097 |
thanks doug. that mi diagram is very useful. wish i could come across it earlier because as it seems i have to remodel a few things. got me a view of the back side though.
thanks!airbag, a horizontal cylinder i have already modeled, there's nothing more i saw in any of the other photos that i did not model. please find a picture of it and post. in the meantime i'll try to find some time to model a bit more of the other stuff thanks for the support guys! -------------------- |
|
|
|
|
Nov 4 2006, 12:20 AM
Post
#35
|
|
|
Member Group: Members Posts: 200 Joined: 2-September 06 Member No.: 1097 |
here is the...uhm... 'rear view' of the micro imager.
 in a couple of reference pics i've got, i see many differences between them concerning the 'contact sensor housing' this is the best i can make out. airbag, as for this cap you are talking about maybe it's something i came across in a photo, but since i have 10 without it and 1 with it, i choose NOT to model it
-------------------- |
|
|
|
|
Dec 26 2006, 10:09 PM
Post
#36
|
|
|
Member Group: Members Posts: 200 Joined: 2-September 06 Member No.: 1097 |
hello everyone and merry christmas! it's not that i abandoned the project, I Was just too busy with work and redesigning my new site (so re-visit for new stuff)...
anyway, i did a small progress modeling-wise, but was a great step for the final model. I composited the most of the rat's arm. I have just one render for you guys for now, your support is a great help for me to go on, so I hope you enjoy this one. the next few days i'll try to make the whole arm and finish the moessbauer modeling. hope to hear your comments! 
-------------------- |
|
|
|
|
Dec 26 2006, 10:25 PM
Post
#37
|
|
|
Founder Group: Chairman Posts: 14434 Joined: 8-February 04 Member No.: 1 |
Not sure if the MI is spot on - I think the optic design is a little 'short' - as a reference, the backend and electronics box for each camera ( Pancam, MI, Navcam, Hazcam ) is the same...it's just the optical assemb. that changes...and obviously the MI has the dust cover and contact sensor..but I think these might be a bit too far 'forward'..
http://nssdc.gsfc.nasa.gov/planetary/image..._mi_diagram.jpg from http://nssdc.gsfc.nasa.gov/database/Master...3-027A&ex=2 Great work though Doug |
|
|
|
|
Dec 27 2006, 11:10 PM
Post
#38
|
|
|
Member Group: Members Posts: 200 Joined: 2-September 06 Member No.: 1097 |
hello there... new update. first time to post the moessbauer spectrometer. there's still details to be added but I wanted you to take notice of the progress..
 doug, I guess you are wrong on this one, I spent way too many hours analyzing stuff out. I had already checked the reference image you posted but I have to show you the following reference which is one of the crappy ones I used to model. At first I thought you pointed out that the lens was too forward thats why i post the following reference pic, but reading again I realized you meant it is too short compared to the electronics box. it must be the angle though, here is another angle (i know the moessbauers position is totally wrong, currently working on this one)  Moreover as you can see there's no dust cover in the following reference as well. in 8 out of 10 pics there's no dust cover depicted thats why I chose not to model it.  your comments are welcome though, thanks doug, I hope everyone else also helps, I am doing my best here, there are many things that I have remodeled already more than once keep checking things out guys!
-------------------- |
|
|
|
|
Dec 29 2006, 02:28 AM
Post
#39
|
|
|
Member Group: Members Posts: 408 Joined: 3-August 05 Member No.: 453 |
Here is a very nice picture of the instruments, with a particularly good view of the MI's "flip up" dust cover:
 (Photo Credit: NASA/JPL; from http://marswatch.astro.cornell.edu/astro.html) Airbag |
|
|
|
|
Dec 29 2006, 06:03 PM
Post
#40
|
|
|
Founder Group: Chairman Posts: 14434 Joined: 8-February 04 Member No.: 1 |
You had it right all along....you've trumped my 'MER-in-my-head' knowledge
Bloody accurate - further kudos.Doug |
|
|
|
|
Dec 31 2006, 03:07 AM
Post
#41
|
|
|
Member Group: Members Posts: 200 Joined: 2-September 06 Member No.: 1097 |
well, great news today! I am done with the moessbauer. I had to remodel the metal parts that hold it to its base several times in order for it to be in place (like i did with the micro imager) but not everything seems to be in place! I am also done with the device using all the information I could find in the references I have. the base that holds everything on it seems kinda empty now but I hope after i am done with the cables and stuff (leaving this for the end of the whole modeling process) it will look fine.
enjoy the moessbauer spectrometer in all its glory, although it's a bit out of focus :/  I'll continue with the rest of the arm next, it will be some time before i start it though, very busy lately :/ -------------------- |
|
|
|
|
Jan 26 2007, 12:29 AM
Post
#42
|
|
|
Member Group: Members Posts: 200 Joined: 2-September 06 Member No.: 1097 |
hello there! long time no see... I hope some of you guys are still patiently waiting to see the progress of the model. here is some progress. I am taking baby steps because my reference material is narrowing my amount of work plus busy with my life :/
anyway, I modeled parts of the arm that holds the rat-moessbauer-mi-apxs system. I am looking for a good SIDE view of the arm, haven't came across any better reference than the one I am posting and this is not at all helpful. I think that the part that is exactly above the bottom round cylinder (one in the circle) is not round and the bolts seem to be held at pairs. in the rear side of the cylindric part (where red arrow points in the circle) I made there's some sort of film held on it - managed to realize that it gets underneath the cylindric part and into the rear part of the right red arrow (shown in the 2nd reference pic I am posting), clear pictures of the rear side -meaning they can provide me with visual info - will be really helpful as well. it is very tiring staring at pictures for hours and not getting any results. Expecting your support guys.   
-------------------- |
|
|
|
|
Jan 26 2007, 01:40 AM
Post
#43
|
|
 Dublin Correspondent Group: Admin Posts: 1799 Joined: 28-March 05 From: Celbridge, Ireland Member No.: 220 |
QUOTE (scooterlord @ Jan 26 2007, 12:29 AM) hello there! long time no see... Expecting your support guys. I wish I could help but you are so far ahead of me I just can't even begin to make suggestions on how to help out. For now let me just say - WOW! I wish I could help but this isn't my area of expertise - however I really do hope you get the help you need and you end up giving us some cool shots of your model of our dear lil rovers. |
|
|
|
|
Jan 26 2007, 08:33 AM
Post
#44
|
|
 Member Group: Members Posts: 593 Joined: 20-April 05 Member No.: 279 |
I'm never very keen on "me too" postings, but I have to agree with Helvick. This is a stunning piece of work. I'm sure I speak for all of us when I say we're all eager to see this project develop. It's fantastic.
Andy |
|
|
|
|
Jan 26 2007, 11:57 AM
Post
#45
|
|
 Senior Member Group: Members Posts: 2488 Joined: 17-April 05 From: Glasgow, Scotland, UK Member No.: 239 |
It's textbook stuff - and needs to find a home in a textbook!
Most impressive! Bob Shaw -------------------- Remember: Time Flies like the wind - but Fruit Flies like bananas!
|
|
|
|
|
Jan 26 2007, 12:41 PM
Post
#46
|
||
|
Senior Member Group: Moderator Posts: 4279 Joined: 19-April 05 From: .br at .es Member No.: 253 |
One more <clinck> to the swearbox.
It should be a very hard work, but the results are impressive! I was wondering if an image of Opportunity's IDD during those times at Olympia, while driving with the arm unstowed, would help... Here is one of those, taken by the navcam on sol 717: (click on the image to see the full-res) 
If I understood you right, I think that area within the red circle is squared and seems to be the base part where a connector is plugged. |
|
|
|
|
|
|
Jan 26 2007, 02:00 PM
Post
#47
|
|
|
Member Group: Members Posts: 200 Joined: 2-September 06 Member No.: 1097 |
teshneier thanks, but I need MUCH more clearer reference to do what I am doing :/ I am mostly interested in the part of the arm shown on the left on this picture where the equipment connects to the arm. that white roundy thing. I browsed most of the online photos of both mers in order to get reference.. very tiring work. even browsing them on my disk is tough to get the information i need. Anyway I need front and rear sides of that white roundy thing (previous image I posted on the right where the arrow points). It would help a lot!
thanks for the support so far guys really need it hope i get some new work done soon enough to keep you interested!
-------------------- |
|
|
|
|
Jan 26 2007, 09:25 PM
Post
#48
|
|||
|
Junior Member Group: Members Posts: 90 Joined: 13-January 05 Member No.: 143 |
A couple of pictures that may be helpful...
|
||
|
|
|
||
|
Jan 26 2007, 09:26 PM
Post
#49
|
|||
|
Junior Member Group: Members Posts: 90 Joined: 13-January 05 Member No.: 143 |
...and a couple more.
|
||
|
|
|
||
|
Jan 26 2007, 10:16 PM
Post
#50
|
|
|
Member Group: Members Posts: 200 Joined: 2-September 06 Member No.: 1097 |
mars armer!! where the hell did you get these???
I only had the first one! great! that's wonderful news guys! I'm really excited, I'll get back to work as soon as possible! thanks again! btw, wish I had these photos a bit earlier, I was struggling to make things out expecially for the moessbauer from reference you wouldn't imagine you could get information out of. good news is that my model came really nicely and seems quite accurate judging by a quick glance at these photos.hmm, looks like I was right, by studying the last reference pic there's a strange shape where I circled in my last render, I can make it out now, cool! and the back of the arm is ultra clear! my imagination will continue from then on but this stuff is really helpful! just in case you guys come up with an reference found in strange sites, what i need are: pics of the whole arm, especially where it binds with the body the body (i have quite good reference, hi-res photos, but the more the better) *****i need the high gain antennae's part that holds the film that connects to the body (check eariler in this thread) -------------------- |
|
|
|
|
Jan 28 2007, 05:02 PM
Post
#51
|
|
|
Member Group: Members Posts: 200 Joined: 2-September 06 Member No.: 1097 |
hey there! based on the new reference I got you this!
I added the strange shape in the circle- I was right, it was not round at all - and fixed the whole in the white plastic on the right. i'll try to work a bit more the next few days to give you a big update 
-------------------- |
|
|
|
|
Jun 8 2007, 08:13 AM
Post
#52
|
|
|
Member Group: Members Posts: 200 Joined: 2-September 06 Member No.: 1097 |
hello guys. how have you been doing? I gave it a lot of thinking before I posted this, I wanted to show an update that you'd be absolutely amazed, but I decided to post this just to let you people know that I am still working on the project, these past few days many hours a day... so here it is. I spent hunderds of hours studying just to get to this point and tens of hours modeling. As for my current progress I am almost done with detailing the body (everything except cables - which I will start modeling soon) and I'll continue with REMODELING the whole 'head' because I got new details and mine seem to be a lot off as far as accuracy is concerned.
 Waiting for your comments! -------------------- |
|
|
|
|
Jun 8 2007, 08:41 AM
Post
#53
|
|
 Member Group: Members Posts: 648 Joined: 9-May 05 From: Subotica Member No.: 384 |
WOW!!!
You are doing great...BTW, when do you think this model will be finished? -------------------- The scientist does not study nature because it is useful; he studies it because he delights in it, and he delights in it because it is beautiful.
Jules H. Poincare My "Astrophotos" gallery on flickr... |
|
|
|
|
Jun 8 2007, 08:43 AM
Post
#54
|
|
|
Member Group: Members Posts: 200 Joined: 2-September 06 Member No.: 1097 |
to have it done with the level of detail I want, hmm.. modeling maybe like in 5-6 months. I am still lacking reference for the base of the IDD and some other parts though. so if anyone has them.. let me have them too
-------------------- |
|
|
|
| Guest_PhilCo126_* |
Jun 8 2007, 02:54 PM
Post
#55
|
|
Guests |
This is too much...
Superb detail! |
|
|
|
|
Jun 8 2007, 05:17 PM
Post
#56
|
|
 Senior Member Group: Members Posts: 1281 Joined: 18-December 04 From: San Diego, CA Member No.: 124 |
I need a swear jar for this thread as well.....
-------------------- Lyford Rome
"Zis is not nuts, zis is super-nuts!" Mathematician Richard Courant on viewing an Orion test |
|
|
|
|
Jun 8 2007, 05:21 PM
Post
#57
|
|
|
Member Group: Members Posts: 200 Joined: 2-September 06 Member No.: 1097 |
lol! i am not sure why you would need a swear jar for this! into 3d?
-------------------- |
|
|
|
|
Jun 8 2007, 08:15 PM
Post
#58
|
|
|
Senior Member Group: Members Posts: 1281 Joined: 18-December 04 From: San Diego, CA Member No.: 124 |
I am blown away by the detail... it seems more visible even with the monochromatic renders.
-------------------- Lyford Rome
"Zis is not nuts, zis is super-nuts!" Mathematician Richard Courant on viewing an Orion test |
|
|
|
|
Jun 15 2007, 09:34 AM
Post
#59
|
|
|
Member Group: Members Posts: 200 Joined: 2-September 06 Member No.: 1097 |
guys, i am in need of your help again... if anyone has any idea (or better reference) of what the hell is going on in there, please provide me with material:
  this thing is on the rear of the mer. I have no idea what's going on below the cables I circled. I have the fantastic reference someone in here provided me with but I still need to see what it looks like, if it's angled or anything. any pictures you might have, even messy as this one, let me have it. it's what I do. i study several hours to make out whats going on from different angles.  and this one. what the hell the base of the idd looks like. any good pics (apart from the ones found in the creators' site - they have a big one, but still difficult to make out) are welcome. even simple written explanations of how the thing works might still help. eg, it has a rotor there, a weight there, etc. and here's a wip i took quite some time ago (it's FAAAR more detailed now, but will post later) to keep you coming back! 
-------------------- |
|
|
|
|
Jun 15 2007, 06:14 PM
Post
#60
|
|
|
Chief Assistant Group: Admin Posts: 1409 Joined: 5-January 05 From: Ierapetra, Greece Member No.: 136 |
Woaw. The web looks spectacular! Can I have one of them 3d swear jars?
Nico -------------------- photographer, space imagery enthusiast, proud father and partner, and geek.
http://500px.com/sacred-photons & |
|
|
|
|
Jun 15 2007, 07:43 PM
Post
#61
|
|
|
Founder Group: Chairman Posts: 14434 Joined: 8-February 04 Member No.: 1 |
Just drop the cash straight into it.
Wish I could help more with ref. material - but with the KSC website you've got all there is really. These may help - images taken by the rovers themselves : http://qt.exploratorium.edu/mars/opportuni...HEP1152L0M1.JPG http://pancam.astro.cornell.edu/pancam_ins...lse_color6.html ( left column, half way down) Doug |
|
|
|
|
Jun 15 2007, 09:59 PM
Post
#62
|
|
|
Member Group: Members Posts: 200 Joined: 2-September 06 Member No.: 1097 |
djellison, first pic doesn't help at all. shows the bottom part of the mer arm which I have already modeled. what I am having trouble sorting out is the base of the instrument deployment device (idd - I sometimes surprise myself because of the things I learned researching stuff), which is the part that keeps the idd attached on the mer's body.
2nd link also provides same info. these photos would have helped me a lot earlier when I was studying crappy material to make things out. I'll keep them anyway a great THANKS! if anyone is able to get the rear of the mer or the base of idd, please do so for the idd I even emailed the original designers of the thing (alliance spacesystems) to provide me with material but didn't even reply. I guess they were afraid I might steal their patent!
-------------------- |
|
|
|
|
Jun 27 2007, 08:50 AM
Post
#63
|
|
 Senior Member Group: Members Posts: 1619 Joined: 12-February 06 From: Bergerac - FR Member No.: 678 |
Gargle
The 3D model looks very spectacular. I'm amazed I have a question : is it possible that one day we can acceed to the model files (.3ds, .WRL or more for me : .blend (Blender files)) And I have an other question : how do you proceed to make the model : object by object or...? -------------------- |
|
|
|
|
Jun 27 2007, 08:54 AM
Post
#64
|
|
|
Member Group: Members Posts: 200 Joined: 2-September 06 Member No.: 1097 |
well, as for you ppl accessing the files, prolly not
sorry!as for the modeling process, yes, part by part (like exporting/texturing) and if i am tired and have no reference for one part i proceed to the next till i get reference! more pics to come soon!
-------------------- |
|
|
|
|
Jun 27 2007, 02:52 PM
Post
#65
|
|
 Senior Member Group: Admin Posts: 4763 Joined: 15-March 05 From: Glendale, AZ Member No.: 197 |
QUOTE (scooterlord @ Jun 27 2007, 12:54 AM) well, as for you ppl accessing the files, prolly not sorry!I must say that comes as a bit of a disappointment Scooterlord. I've been watching your project all along was envisioning all the creative things that could be accomplished with the final product. Is this being created for commercial purposes? You have obviously put in many dozens of hours of hard work and certainly have earned the right to do whatever you want with your product. If you've spent much time browsing UMSF however, you may have noticed the fantastic things the people here have accomplished through collaboration. Have you considered perhaps sharing a smaller dataset of lesser quality so that you are the one retaining the best part of your hard work? That's what I do with some of the photographic products I spend hours creating. -------------------- If Occam had heard my theory, things would be very different now.
|
|
|
|
|
Jun 27 2007, 03:01 PM
Post
#66
|
|
|
Member Group: Members Posts: 200 Joined: 2-September 06 Member No.: 1097 |
well, sorry if some of you guys are dissapointed, but can't promise you anything till the model is finished. I am doing it mainly for challenging my modeling and perception skills but I wouldn't mind earning some money for it maybe from a company interested in using this for commercial use :/
but, hey, hm.. maybe i could provide you guys with a less detailed model of the mer. just wait the estimated 6motnhs to have it done (modeling ONLY that is) and then we'll see I just rendered this test (head of mer remodeled from scratch) and thought I'd share 
-------------------- |
|
|
|
|
Jun 27 2007, 03:06 PM
Post
#67
|
|
|
Founder Group: Chairman Posts: 14434 Joined: 8-February 04 Member No.: 1 |
QUOTE (scooterlord @ Jun 27 2007, 04:01 PM) for commercial use Realistically, any and all commercial requirement for such a model has been well and truely covered by Dan Maas's work for the pre-launch Animation, the two Nova documentaries (for which he was Emmy nominated) and the Imax movie. Your model is just stunning - but I can't imagine a 'market' for it. Doug |
|
|
|
|
Jun 27 2007, 03:09 PM
Post
#68
|
|
|
Member Group: Members Posts: 200 Joined: 2-September 06 Member No.: 1097 |
well, thought it would be nice didn't say it would happen
anyway, I am not negative with the whole story, we'll see. just be patient till I am done!
-------------------- |
|
|
|
|
Jun 27 2007, 03:48 PM
Post
#69
|
|
|
Rover Driver Group: Members Posts: 1015 Joined: 4-March 04 Member No.: 47 |
How detailed is the Dan Maas model anyway?
|
|
|
|
|
Jun 27 2007, 03:58 PM
Post
#70
|
|
|
Founder Group: Chairman Posts: 14434 Joined: 8-February 04 Member No.: 1 |
Not as good as Scooters, lots of it is done with good texturing, but it's good enough to stand up to the 4k res of Imax. The Imax version is a step up from the version in the usual EDL anim - for instance the arrays are 'glassy' only on the cells themselves, not on the whole panel.
Doug |
|
|
|
|
Jun 27 2007, 08:54 PM
Post
#71
|
|
 Director of Galilean Photography Group: Members Posts: 896 Joined: 15-July 04 From: Austin, TX Member No.: 93 |
Well, Scooter's work I would put in the semi-pro/pro category, so I kinda expected he would want some money for it. Scooter, would you be willing to release your model for sale for a time period, and after that time let us pass the hat around for a UMSF license?
-------------------- Space Enthusiast Richard Hendricks
-- "The engineers, as usual, made a tremendous fuss. Again as usual, they did the job in half the time they had dismissed as being absolutely impossible." --Rescue Party, Arthur C Clarke Mother Nature is the final inspector of all quality. |
|
|
|
|
Jun 28 2007, 08:02 AM
Post
#72
|
|
|
Member Group: Members Posts: 200 Joined: 2-September 06 Member No.: 1097 |
as I said, once I am done anything is possible
it's still a long way ahead and am already lacking important pieces of reference! wait and see!
-------------------- |
|
|
|
|
Jul 15 2007, 06:48 AM
Post
#73
|
|
 Junior Member Group: Members Posts: 60 Joined: 1-August 06 From: Vienna, Austria Member No.: 1002 |
QUOTE (scooterlord @ Dec 28 2006, 12:10 AM) Moreover as you can see there's no dust cover in the following reference as well. in 8 out of 10 pics there's no dust cover depicted thats why I chose not to model it. Scooterlord these images clearly show the MI transparent dust cover in action. Closed/Open: http://qt.exploratorium.edu/mars/spirit/na...CMP1936L0M1.JPG http://qt.exploratorium.edu/mars/spirit/na...CMP1936L0M1.JPG I think your model is only missing the arm bit of the cover which connects it to the motor. Your model is ultra impressive. Great work. |
|
|
|
|
Aug 3 2007, 10:14 PM
Post
#74
|
|
|
Member Group: Members Posts: 200 Joined: 2-September 06 Member No.: 1097 |
hey there...
I have a new render for ppl interested in the project, this was the most difficult part to do - the connectors between the top part of the mer. at first look they might all look the same, but in closer inspection they are far from being the same. anyway, here it is, hope you enjoy it, I still have a lot of things to do, but it's coming out really nicely and I have studied thoroughly the reference I have and looks like I have enough material to finish a few important stuff. enough said, here it is:  comments welcome as always! -------------------- |
|
|
|
|
Aug 3 2007, 10:45 PM
Post
#75
|
|
|
Senior Member Group: Members Posts: 1619 Joined: 12-February 06 From: Bergerac - FR Member No.: 678 |
Incredible! Absolutely incredible! I'm always fascinating about the high detailled-level of your model. Very good job.
-------------------- |
|
|
|
|
Aug 3 2007, 11:07 PM
Post
#76
|
|
|
Senior Member Group: Members Posts: 1281 Joined: 18-December 04 From: San Diego, CA Member No.: 124 |
wonderful work!
-------------------- Lyford Rome
"Zis is not nuts, zis is super-nuts!" Mathematician Richard Courant on viewing an Orion test |
|
|
|
|
Aug 4 2007, 07:30 AM
Post
#77
|
|
 Senior Member Group: Moderator Posts: 2262 Joined: 9-February 04 From: Melbourne - Oz Member No.: 16 |
Great work, as usual.
I'm sure you know this and it's on your long 'to do' list, but note that the forward hinges connecting the central triangle to the wings are missing. James PS - I see it's Spirit your modeling
-------------------- |
|
|
|
|
Aug 4 2007, 09:05 AM
Post
#78
|
|
|
Member Group: Members Posts: 200 Joined: 2-September 06 Member No.: 1097 |
yup, i know the front connectors are missing, they are my primary modeling target for today
thanks for pointing it out though
-------------------- |
|
|
|
|
Aug 22 2007, 01:56 PM
Post
#79
|
|
|
Member Group: Members Posts: 200 Joined: 2-September 06 Member No.: 1097 |
hello again!
this might not seem like a big update compared to the previous render I posted, but trust me.. IT IS. most connections were remodeled, found more differences, surfaces needed optimizing for fillets to work. low gain antenna mostly modeled, a couple more object were modeled (ones that keep the pma connected to the mer's surface), front part also modeled. 'installed' and placed correct dimensions on the hga, that's my main goal to complete in the following days, it has a couple of parts missing and problem is I don't have all that good of reference photos, so don't expect a BIG update any time soon.  then I am off to model the pma's base, I need a clear photo of it's base, anyone has one PLEASE point me to it. I need CLEAR reference of the following thing there. there seems to be some kind of mechanism, all I can make out is 3 bolts, that's it. I need reference.  ..and finally as a reminder, i need reference of the hga's part that holds the film that is connected to the mer, the rear part of the body of the mer without the cables and last but not least, the idd's holding base. i am getting really close to finishing (ahem, a few more months that is) so I need all the help I can get from you guys. comments expected as always!
-------------------- |
|
|
|
|
Oct 31 2007, 09:53 PM
Post
#80
|
|
|
Member Group: Members Posts: 200 Joined: 2-September 06 Member No.: 1097 |
hey there.. it's me again
I am almost done with modeling most stuff of the mer, reached the tough parts and that's why it's taking me so long to post. anyway, here I am with the most difficult update so far. It's been many days (even months) trying to model this thing and actually come out right. most dimensions and stuff seem to come out nicely so I assume it's quite accurate. This was a quick render though, a few stuff might be mirrored (like the base of the idd) so don't take serious notice of them. Of course little details are missing, but that's the easy part and will be added last. anyway, enjoy, comments are always welcome! the few things that are left to model: finish the idd base, a few details at the top and the bottom of the pancam mast, bottom sides of the 'wings', and a few other minor details (like bolts, nuts, etc) and finally... the cables... :/ not in a very good mood to model lately anyway, outta job this period, fights with gf, difficult parts to model -take all my good mood of modeling away... ..Anyway I will render this in a new renderer (maxwell) that I just started using, I have been using brazil r/s so far, so it will take me some time until I learn how to texture with it! -------------------- |
|
|
|
|
Nov 1 2007, 04:28 AM
Post
#81
|
|
 Member Group: Members Posts: 706 Joined: 3-December 04 From: Boulder, Colorado, USA Member No.: 117 |
Fantastic work as usual! Your patience is amazing...
John. |
|
|
|
|
Nov 1 2007, 07:24 AM
Post
#82
|
|
|
Senior Member Group: Members Posts: 2492 Joined: 15-January 05 From: center Italy Member No.: 150 |
Nick, each time I see your fantastic progresses I experience enthusiasm and frustration, because I think to final, assembled version and cannot see it, for the moment! Happy to hear ymodeling is almost complete, less happy to know you have some troubles and not much time to finish...
I would like to help but I'm not able and, at the end, this is your work for your amusement. So, I said to myself, enjoy these progressive, great releases and don't stress this guy! Thanks again. PS: I do not see any mention of this MER project on your linked page. -------------------- I always think before posting! - Marco -
|
|
|
|
|
Nov 1 2007, 07:43 AM
Post
#83
|
|
|
Member Group: Members Posts: 200 Joined: 2-September 06 Member No.: 1097 |
thanks for the support already guys
people interested in this project will have to be patient in order to see it finished. it will take some time and maybe some effort from you guys in order to help me find some reference. hopefully a few people from NASA were kind enough to help me with reference not found on the internet (one of them sent me reference for the idd base. someone else also helped me, kind find his name atm in my emails).anyway, good to know some people enjoy this, I am not enjoying this YET, I will get all the enjoyment I want when I am done; that's what I am working for anyway . When I am done I am seriously thinking of giving this away to the public - will see what will happen...and I know there's no mention of the MER project on my site. Probably I will make a new site just for the mer once I am done with it. people interested in my project can just google them.
-------------------- |
|
|
|
|
Nov 1 2007, 05:35 PM
Post
#84
|
|
|
Senior Member Group: Members Posts: 1619 Joined: 12-February 06 From: Bergerac - FR Member No.: 678 |
Incredible, just an incredible work
.
-------------------- |
|
|
|
|
Dec 21 2007, 07:32 PM
Post
#85
|
|
|
Founder Group: Chairman Posts: 14434 Joined: 8-February 04 Member No.: 1 |
I was just re-texturing my low-res MER for project I'm working on, trying to find MER references...and I ended up back here
Doug |
|
|
|
|
Jan 7 2008, 10:37 PM
Post
#86
|
|
|
Member Group: Members Posts: 200 Joined: 2-September 06 Member No.: 1097 |
happy new year everyone!
doug! LOL! haven't at all abandoned the project, reaching tough parts now though, even more and more difficult to progress. not much time/mood to model these days anyway. plus.. the model has become so big that I tried to do test renders to half of the model and my pc chokes! and that's without textures! :/ -------------------- |
|
|
|
|
Jan 31 2008, 12:27 PM
Post
#87
|
|
|
Member Group: Members Posts: 200 Joined: 2-September 06 Member No.: 1097 |
hello. well, I have a bit of bad news (not all that bad though) but thought I'd share. Although I started the optimizing process of the whole model and the model so far ended up using 2/3 of its original size I am having major trouble rendering it as it is. the file is way too big, consumes 1,2gb if ram just when I open it and I still haven't started small-detail-modeling cables, nor did I put any textures on yet. :/ looks like I am going to need an upgrade in order to have this done properly.
by using alpha channels, I will miss reflections/shadows so that's not an option :/ -------------------- |
|
|
|
|
Jan 31 2008, 03:30 PM
Post
#88
|
|
|
Senior Member Group: Members Posts: 2492 Joined: 15-January 05 From: center Italy Member No.: 150 |
Well, it seems you need a sponsor to finish this great work...
 -------------------- I always think before posting! - Marco -
|
|
|
|
|
Jan 31 2008, 09:59 PM
Post
#89
|
|
|
Member Group: Members Posts: 200 Joined: 2-September 06 Member No.: 1097 |
hmm... looks like I won't have to. there seemed to be an error of some kind with a specific surface in the model. Let alone the memory run out errors, I managed to locate this surface that caused the program to just exit without an error message. anyway, it took some time even before it started rendering but results are quite promising.
sorry, there's a thing that seems to float in front of the left rocker-bogie, it was supposed to be under the warm box. anyway...moreover I came across useful reference that i've been looking for over a year! i found reference of the pancam mast base AND a little help for the hga cable mounting bracket. however, the only thing so far I am not happy with is the hga cable mounting bracket, so if anyone has any sort of reference, let me know. enough said, here it is...  comments welcome as always.. -------------------- |
|
|
|
|
Jan 31 2008, 10:24 PM
Post
#90
|
|
|
Founder Group: Chairman Posts: 14434 Joined: 8-February 04 Member No.: 1 |
THe sandwich material of the arrays is probably the only feature making it look odd at the moment ( i.e. there isn't one ) - that, and the tiny little covers for the Pancam lenses on the end of the stalks. It's a bit hard to see some of the details with the background being the same colour as the default rover material - but having done some radiosity rendering, I know that's basically what you start with.
Doug |
|
|
|
|
Jan 31 2008, 10:57 PM
Post
#91
|
|
|
Member Group: Members Posts: 200 Joined: 2-September 06 Member No.: 1097 |
...sandwich material of the arrays, I assume you mean the sunlight absorbing surface (?). as for the pancam lenses, you mean the ones located in the front and rear of the mer? I know they seem a bit odd because they are capped with glass which, in this situation, because there are no transparent materials it actually looks odd. anyway, good thing is I am almost done with 'difficult' parts, except maybe the hga cable mounting bracket I mentioned earlier. looks like the cad drawings I came across inside a .pdf file I found are different than the actual final part holding the cable.
besides that, everything else I know how it's done and then it's just cables and stuff before I enter the texturing process 
-------------------- |
|
|
|
|
Feb 1 2008, 05:04 AM
Post
#92
|
|
|
Senior Member Group: Members Posts: 2492 Joined: 15-January 05 From: center Italy Member No.: 150 |
Simply brillant, happy to see you solved the issue.
QUOTE (scooterlord @ Jan 31 2008, 10:59 PM) comments welcome as always.. I think that most of us will say "stunning" and "bravo!", at least. This work is a great example of patience and love and the result clearly show that was worth to dedicate so much resources to it. We had the privilege to see it growing up and now that is almost finished I feel emotionally involved, even though my personal contribution was only in terms of encouraging words...  Congrats again! PS: any idea about possible applications when model will be completed with textures? Perhaps, the most immediate one is to do some rendering using real MER panoramas as background or even detailed digital terrain models, if available... (an UMSF "Roving Mars"?  ) )
-------------------- I always think before posting! - Marco -
|
|
|
|
|
Feb 1 2008, 08:41 AM
Post
#93
|
|||
|
Founder Group: Chairman Posts: 14434 Joined: 8-February 04 Member No.: 1 |
I mean the gold coloured honeycomb inbetween the top of the arrays and the bottom of the arrays -
(actually - looking at KSC, there is nowhere near as much of it as I thought there was - it's mainly a channel, pehaps a cm or two deep, to carry cables - but at the key parts for structure - it's a honeycomb)
Attached thumbnail(s)
|
||
|
|
|
||
|
Feb 1 2008, 09:41 AM
Post
#94
|
|
|
Member Group: Members Posts: 200 Joined: 2-September 06 Member No.: 1097 |
dilo, thanks for your kind words! well, you know, I try being patient for almost a couple of years, work bit-by-bit every day, get frustrated, angry, model, remodel mainly to enjoy people's recognition when you are done. I am really glad that there are supportive people out there that keep me going!
djellison, the model might seem complete, but there are a million of things that still have to be modeled. I still need about a month's work of modeling to start really analyzing the hi-res reference I have and start writing a 'to-model list' for the really little things needed to do. Currently, eg, the ones I can think of are: back part of the hga, the damn hga cable mounting bracket - I hope I get reference for this, the cable film on the whole idd, still missing a million nuts and bolts, the honeycomb you mentioned, bottom part of the azimuth drive of the mast, the 'ears' of the mast that keep it attached to the main mer surface, bottom part of the low gain antenna, rear of the mer, that fat thing on the right (can't remember what it is ... and a lot more!anyway, once I am done, trust me, you people should expect to see life-like renders, and I won't dissapoint you. I will try to make HUGE renders so that every little detail can be seen. plus, I am thinking of fish-eye renders from all of the cameras of the mer
-------------------- |
|
|
|
|
Feb 1 2008, 10:15 AM
Post
#95
|
|
|
Senior Member Group: Members Posts: 1619 Joined: 12-February 06 From: Bergerac - FR Member No.: 678 |
Amazing
 Happy to see that you finally succeed to render this big project. I can't wait to see how it will be look with texturing, materials, reflections and other things like that. Keep up your excellent work .PS : I made this last image my wallpaper, it's great .
-------------------- |
|
|
|
| Guest_PhilCo126_* |
Feb 1 2008, 05:42 PM
Post
#96
|
|
Guests |
Very nice work, first impression made me believe that the PanCam Mast Assembly looks a bit too high, but that's because of its perspective seen slightly from above. Truly an amazing job!
|
|
|
|
|
Feb 1 2008, 06:01 PM
Post
#97
|
|
|
Member Group: Members Posts: 200 Joined: 2-September 06 Member No.: 1097 |
so, here's another render.. enjoy!
 I'll post when some serious progress takes place which will be quite some time from now... still expecting your comments! -------------------- |
|
|
|
|
Feb 4 2008, 04:50 PM
Post
#98
|
|
|
Director of Galilean Photography Group: Members Posts: 896 Joined: 15-July 04 From: Austin, TX Member No.: 93 |
With models like this, I can wish to see a UMSF Roving Mars 2.0, with updates to present day.
-------------------- Space Enthusiast Richard Hendricks
-- "The engineers, as usual, made a tremendous fuss. Again as usual, they did the job in half the time they had dismissed as being absolutely impossible." --Rescue Party, Arthur C Clarke Mother Nature is the final inspector of all quality. |
|
|
|
|
Aug 20 2008, 11:09 PM
Post
#99
|
|
|
Member Group: Members Posts: 200 Joined: 2-September 06 Member No.: 1097 |
hello there.. I know, long time no see, started my new perm job (FINALLY!) and a lot of things going on with my life so I kinda abandoned the project a bit, and am just some time away from progressing; IF I manage to gain some strength to study the model again to model stuff I am missing then it will be done soon! Just cables and minor stuff to go. However as I keep modeling I encounter new details here and there... can't say I am dissapointed, just haven't been in the mood to progress.
Anyway, here is a new render with the cabling and almost-full-detail. I would love to hear your comments. Just compare to the first render I posted of this and see the MILLIONS of differences  
-------------------- |
|
|
|
|
Aug 21 2008, 07:38 PM
Post
#100
|
|
|
Director of Galilean Photography Group: Members Posts: 896 Joined: 15-July 04 From: Austin, TX Member No.: 93 |
*thump*
ah ca na tal, mai jaw ia on da flora -------------------- Space Enthusiast Richard Hendricks
-- "The engineers, as usual, made a tremendous fuss. Again as usual, they did the job in half the time they had dismissed as being absolutely impossible." --Rescue Party, Arthur C Clarke Mother Nature is the final inspector of all quality. |
|
|
|
|

|
Lo-Fi Version | Time is now: 24th September 2024 - 01:56 PM |
|
RULES AND GUIDELINES Please read the Forum Rules and Guidelines before posting. IMAGE COPYRIGHT |
OPINIONS AND MODERATION Opinions expressed on UnmannedSpaceflight.com are those of the individual posters and do not necessarily reflect the opinions of UnmannedSpaceflight.com or The Planetary Society. The all-volunteer UnmannedSpaceflight.com moderation team is wholly independent of The Planetary Society. The Planetary Society has no influence over decisions made by the UnmannedSpaceflight.com moderators. |
SUPPORT THE FORUM Unmannedspaceflight.com is funded by the Planetary Society. Please consider supporting our work and many other projects by donating to the Society or becoming a member. |
|