Thoughts on how to enhance an image |

Thoughts on how to enhance an image |
 Jun 10 2009, 10:18 PM Jun 10 2009, 10:18 PM
Post
#1
|
||
 Junior Member  Group: Members Posts: 94 Joined: 22-May 08 From: Loughborough Member No.: 4121 |
Folks
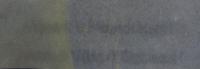
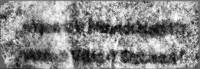
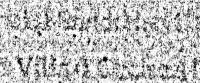
This is certainly unrelated to UMSF (and I assume therefore not best placed in the image processing sub forum) but on the other hand is something that the massive collective experience and prowess of this place should be able to provide pertinent thoughts on (indeed I'm kicking myself for not thinking of asking earlier, having spent so long marvelling at the images generated here). Take the following image:
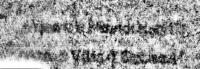
It's actually faint text, and in fact should read the football results thus: Arsenal 0 Sunderland 0 Aston Villa 0 Chelsea 1 So my question would be what techniques might best be used to manipulate such an image to make it as legible as possible? The limit of my Photoshop ability is a simple contrast enhancement, but presumably we could be much smarter than that? Why? I hear you ask....well it harks back to work we published in Chemical Communications last December where we showed that polymerisation of disulfur dinitride is stimulated by inkjet traces. Thus minute amounts of the latter prompt the formation of the dark polymer (SN)x; minute amounts such as the residue on the inside of an envelope which has contained an inkjet printed page. Thus in the above case the results from one saturday were printed out, placed in an envelope and then sent to ourselves. Upon opening the envelope and discarding the printed page, the inside of the envelope was exposed, part of which gave the image shown (which I have reversed from the actual mirror image generated). This is one of the poorer examples, but I guess that makes it even more useful to work on. Any thoughts welcome! Thanks PFK PS What's even spookier is when you can image the contents of the envelope without opening it thanks to the even more minute amounts of inkjet diffusing right through - but that's another story 
|
|
 |
 
|
|
 |
|
Jun 11 2009, 01:58 AM
Post
#2
|
||
 Senior Member Group: Moderator Posts: 2785 Joined: 10-November 06 From: Pasadena, CA Member No.: 1345 |
That's a good problem and I'm interested to see what people come up with.
What is the best technique to pull out signal from a varying background? My recipe: Duplicate image Gaussian blur 10 Gaussian blur 10 (again) Subtract from original image + 128 Contrast stretch Duplicate image take new image HiPass filter, change combine mode to Hard light. Result:
At this point I'm not worried about identity theft. (Did seem to pull out the fibers in the envelope!) -------------------- Some higher resolution images available at my photostream: http://www.flickr.com/photos/31678681@N07/
|
|
|
|
|
|
|
Jun 11 2009, 02:26 AM
Post
#3
|
||
 Senior Member Group: Admin Posts: 3108 Joined: 21-December 05 From: Canberra, Australia Member No.: 615 |
Photoshop only...
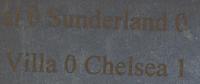
Change mode to Greyscale Contrast and Levels stretch Invert image Levels stretch Select and delete noise Gaussian blur Levels stretch Copy and paste to original image Mode to Hard Light Result:
I have some other techniques to try, but that software is elsewhere. |
|
|
|
|
|
|
Jun 11 2009, 07:53 PM
Post
#4
|
|
|
Junior Member Group: Members Posts: 94 Joined: 22-May 08 From: Loughborough Member No.: 4121 |
Many thanks folks, and any further thoughts from people are very welcome. As I say, in terms of the actual technique we employ this would be one of the poorer examples, and indeed there are physical/chemical tricks we can play on it before the image processing comes in. On the other hand, as you show, it's a tough task and one that will play a key role in determining if this has genuine forensic application.
As an aside, where this reagent does have clear potential is with fingerprint imaging, and we've obtained prints from an unprecedented range of media this way. As another aside - and one pertinent to UMSF and indeed any aspect of scientific endeavour - this whole branch of investigation came from entirely serendipitous observations. We were doing work on the reagent (S2N2) in a completely unrelated area, when we stumbled upon the fingerprint results and then the inkjet work. The results we published generated interest and enquiry from around the world - from Orange County Police Dept through to Nature magazine; from a science writing course at MIT through to the scriptwriters of Numb3rs. But it came about by chance, through a bit of lateral thinking applied to serendipitous observations obtained during fundamental, speculative research. There's a moral there... |
|
|
|
|
Jun 11 2009, 11:57 PM
Post
#5
|
|
 Senior Member Group: Admin Posts: 4763 Joined: 15-March 05 From: Glendale, AZ Member No.: 197 |
You might want to scan it at a very high resolution like 600-1200 dpi so we can apply a more subtler effect on a wider range of data points.
-------------------- If Occam had heard my theory, things would be very different now.
|
|
|
|
|
Jun 12 2009, 10:27 AM
Post
#6
|
||
|
Junior Member Group: Members Posts: 94 Joined: 22-May 08 From: Loughborough Member No.: 4121 |
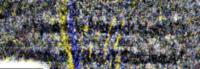
Ah, I did wonder about the resolution issue.
Here is a re-scan at 900 dpi - all I've done to it is rotate, flip and crop in Photoshop.
Note that it IS a small image as the original text was just 14 point. Note also the fact that it now picks out yellow crystals of explosive S4N4 (apologies to anyone kind enough to have a go at this - I wont be able to get to a computer to reply until late Sunday) |
|
|
|
|
|
|
Jun 15 2009, 03:07 AM
Post
#7
|
||
|
Member Group: Members Posts: 808 Joined: 10-October 06 From: Maynard Mass USA Member No.: 1241 |
Here is my shot at enhancing the image.
I used the original lower res version, I'll try the higher-res this week... I ran an adaptive rank order filter to soften any noise-like pixels (26.78% of pixels), while retaining all edges (i.e. adaptive using a 5x5 kernel to see the edges). I then used 4 histogram equalization filters (32x32, 64x64, 96x96, and 128x128) and ran them in a stochastic fashion over the image to convolve the varying background from the faint foreground 'characters'. You can see the artifacts from this processing on the left edge as the different filter sizes moved in a random pattern over the image. The results were obtained after about 2000 iterations, which were summed in an output array and then averaged. I think the letter inside the envelope moved around during handling and made multiple random soft and hard 'impressions' on the envelope, that resulted in the smudge-like letters -etc. I would like to see an image of the original letter that was inside this envelope (to establish ground truth).
Your mileage may vary.... Cheers -------------------- CLA CLL
|
|
|
|
|
|
|
Jun 16 2009, 10:16 AM
Post
#8
|
|
|
Junior Member Group: Members Posts: 94 Joined: 22-May 08 From: Loughborough Member No.: 4121 |
Many thanks for that - fascinating! I suspect the smearing problem is less to do with movement and more to do with simple diffusion. In fact its very very odd that the ink components don't simply diffuse out completely - as I said, we can see this effect through more than one sheet of paper and its conceptually very strange that any structure would be kept at all.
The original is just normal text, but the process does add stuff onto the background, so I can scan normal text that has been treated this way if that would help. For reasons I wont go into now it would be very useful to have one of these processes run again exactly the same on a re-scan of the sample after a few days; I'll get back to people on that. Rest assured that I'll be happy to formally acknowledge people's efforts on this. |
|
|
|
|
Jun 19 2009, 03:38 AM
Post
#9
|
||
|
Member Group: Members Posts: 808 Joined: 10-October 06 From: Maynard Mass USA Member No.: 1241 |
Here is the enhancement on the higher res image....same technique...
Cheers -------------------- CLA CLL
|
|
|
|
|
|
|
Jun 19 2009, 03:54 PM
Post
#10
|
|||
|
Junior Member Group: Members Posts: 94 Joined: 22-May 08 From: Loughborough Member No.: 4121 |
Thanks again, that's very interesting.
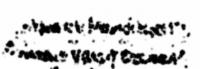
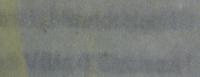
At the risk of prolonging a distinctly non-UMSF related topic (this is the last of it, honest ):(i) as requested, the following is a low resolution scan of original text that has been chemically treated this way - note the golden, conducting layer on the text; it shows the general relationship between what we'd hope for and the background generated by the technique.
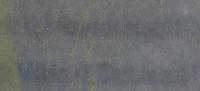
(ii) here is a high resolution scan of the sample we've been looking at, after standing for a good few days. I'd be eternally grateful if someone could re-run one of their attempts at resolving it, in exactly the same way they tried the first time round. Any contrast after the time elapsed could be interesting
As I said before, if people PM me their details I'll make sure they get properly acknowledged for their help down the line. |
||
|
|
|
||
|
Jun 19 2009, 07:38 PM
Post
#11
|
|||
|
Member Group: Members Posts: 104 Joined: 1-June 08 Member No.: 4172 |
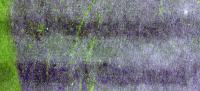
Here are the two images processed with a "decorrelation stretch" using the ImageJ plugin DStretch. Essentially, this process performs a Principal Components Analysis on the three color bands (I chose YCbCr color space), then contrast-stretches each Principal Component image, then inverts the PCA and contrast-stretches the resulting image in RGB space.
First image:
Second image (after a few days):
|
||
|
|
|
||
|
Jun 19 2009, 09:55 PM
Post
#12
|
|
|
Senior Member Group: Members Posts: 3516 Joined: 4-November 05 From: North Wales Member No.: 542 |
I'm not an 'admin' but I don't think you need to worry about inviting members here to help with your enquiry. In fact I think it is a very good place to come to if you want high quality responses about image processing. The thread has no malignant potential so won't ring any alarm bells.
If Doug or any of the other admins disagree I'm sure they will let me know! |
|
|
|
|
Jun 19 2009, 10:39 PM
Post
#13
|
||
|
Senior Member Group: Moderator Posts: 2785 Joined: 10-November 06 From: Pasadena, CA Member No.: 1345 |
Another crack at the original:
Recipe: Convert image to 16 bit [Create pseudo background] Duplicate image to new layer Gaussian 10 Gaussian 10 Label layer as "Pseudo background G10G10" [Subtract pseudo background] Duplicate "original" image to new layer Apply image (original image - pseudo background) + 128 pixel values Label layer as "Apply image (orig-pseudo gray + 128) [Increase contrast] Duplicate "Apply image" to new layer Filter "Hi Pass" 30 pixels Change blending mode to "Hard light" [Remove color and increase contrast] Add layer Black and white (R40,Y60,G40,C60,B20,V80) Add layer "Levels" adjust to edges of histogram [in this case 86 to 180, Gamma = 1.00] [Blur then sharpen cycle] Select all "Copy merged" and paste to a new layer Filter Gaussian blur 0.4 pixels Unsharp Mask (150%, 30, 0) Filter Gaussian blur 0.4 pixels [Increase contrast] Add Curve adjustment layer Curve: (0,0) (49, 46) (119, 163) (255, 255) Add Levels increase gamma to 1.20 Done! (I'll bet half the steps canceled each other out, but I'm pleased with the final results) -Mike -------------------- Some higher resolution images available at my photostream: http://www.flickr.com/photos/31678681@N07/
|
|
|
|
|
|
|
Jun 19 2009, 11:35 PM
Post
#14
|
||
|
Junior Member Group: Members Posts: 94 Joined: 22-May 08 From: Loughborough Member No.: 4121 |
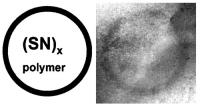
QUOTE (ngunn @ Jun 19 2009, 10:55 PM)  I'm not an 'admin' but I don't think you need to worry about inviting members here to help with your enquiry. Cheers - without going into details you can all rest assured you're on the side of the good guys in this! And thanks Mike. In case anyone is interested, the following figure is from our original paper; here we see (left) a simple diagram which was printed on inkjet and placed in an envelope. Paper was placed against the envelope and weighed down with a textbook for a day - then "developed" in the manner previously mentioned, giving (after mirroring and the simplest of Photoshop contrast enhancements) the result shown on the right. Thus that image was achieved without opening the envelope. I show it simply because I'm still amazed that ink components could travel so far and yet keep reasonable integrity of image. You live and learn! - and that's as good a set of four words to sum up UMSF.com as I think anyone could come up with.
|
|
|
|
|
|
|
Jun 20 2009, 12:30 AM
Post
#15
|
||||
|
Senior Member Group: Moderator Posts: 2785 Joined: 10-November 06 From: Pasadena, CA Member No.: 1345 |
Both images 8c and 9 needed a slight change in the processing recipe. Since they were bigger (more pixels), I needed to up the gaussian and high pass.
(I used Gaussian 20 Gaussian 20 for the pseudo-background, and High Pass 60, (unsharp mask the same, however), and the last two Gaussian blurs were at 0.8.) (The first levels layer was set at 83, 1.00, and 175; and the second levels layer was set at 0, 1.20, 200) I also added a second curves layer: Curve (0,0) (105, 63) (170, 170) (255, 255) I expanded the original image (using old parameters) and the mark8c and mark9 images and cropped them down to the common overlap region. Here are the results (all cut down by 50%): mark2 original:
mark8c hi res:
mark 9 hi-res:
-------------------- Some higher resolution images available at my photostream: http://www.flickr.com/photos/31678681@N07/
|
|||
|
|
|
|||
 |

|
Lo-Fi Version | Time is now: 13th June 2024 - 04:22 AM |
|
RULES AND GUIDELINES Please read the Forum Rules and Guidelines before posting. IMAGE COPYRIGHT |
OPINIONS AND MODERATION Opinions expressed on UnmannedSpaceflight.com are those of the individual posters and do not necessarily reflect the opinions of UnmannedSpaceflight.com or The Planetary Society. The all-volunteer UnmannedSpaceflight.com moderation team is wholly independent of The Planetary Society. The Planetary Society has no influence over decisions made by the UnmannedSpaceflight.com moderators. |
SUPPORT THE FORUM Unmannedspaceflight.com is funded by the Planetary Society. Please consider supporting our work and many other projects by donating to the Society or becoming a member. |
|