Enceladus PDS image products |

Enceladus PDS image products |
 Jul 22 2010, 03:22 PM Jul 22 2010, 03:22 PM
Post
#1
|
|||
 IMG to PNG GOD  Group: Moderator Posts: 2254 Joined: 19-February 04 From: Near fire and ice Member No.: 38 |
Following discussions in the Image Processing Techniques subforum (see in particular this thread but also this one) I have now managed to create DEMs of acceptable quality of Enceladus using shape from shading and extensive post processing (mainly destriping). I now have a DEM mosaicked together from 5 images obtained during Cassini's first flyby of Enceladus in 2005. This will eventually become a global 23040x11520 pixel DEM but finishing it is going to be a lot of work (I will probably be using 50-100 images or more). Not all of Enceladus has been imaged at this resolution but there are many high resolution patches and I want a DEM big enough for these.
This 5 image DEM was big enough for me to really want to see what an Enceladus DEM animation would look like. So here we go:  enceladus_sfs_umsf.avi ( 7.74MB )
Number of downloads: 1318
enceladus_sfs_umsf.avi ( 7.74MB )
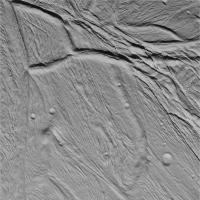
Number of downloads: 1318The field of view is 50 degrees. Most of the animation is at an altitude of 25-30 km. This is similar to Cassini's altitide during the closest flybys and the speed is not far from Cassini's speed either. However, the animation starts and ends at higher altitudes and we also swoop down to an altitude of ~10 km where the resolution of the DEM is highest. This is the Cassini image I used for the highest resolution part of the DEM:
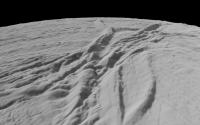
And a single frame from the animation showing a part of this terrain:
The DEM should be fairly accurate - in particular the animation should give a very good general idea of what Enceladus looks like even though some details are inaccurate. Also a higher resolution DEM is really needed for these low altitudes - the surface should look less smooth than it does here. Most of the striping is real though as there are lots of parallel ridges and grooves on Enceladus. There may be some spurious stripes but these are very subtle - the obvious ones are real. I'll do a new animation once I have a significantly bigger DEM. It will probably have better optimized illumination. Shadows are really needed in the first half of this one because I optimized the illumination for the highest resolution part of the DEM. We fly over that part of the DEM at roughly 00:30. EDIT: To play the animation you need to have an H.264 codec installed (if you are using Windows you can find one here for example). |
||
 |
 
|
||
 |
|
Mar 4 2012, 08:38 PM
Post
#2
|
|
 Senior Member Group: Members Posts: 1669 Joined: 5-March 05 From: Boulder, CO Member No.: 184 |
Very nice animation Bjorn. It's fun to try and recognize various features as you fly over. One example is the sequence starting at 4:55 when the crater Sabur is centered in the view. Then from 5:00 to 5:12 we are flying northbound alongside Anbar Fossae. At 5:21 we're transitioning from Samarkand Sulci to Hamah Sulci (note unnamed crater at that time), then about 5:30 when flying from Hamah Sulci down to Ebony Dorsum.
Earlier at 2:23 we come upon a double crater, the one on the right side being Al-Mustazi. We approach the northern part of Bishangarh Fossae at 2:26. Then we catch the western part of Al-Yaman Sulci (oriented from left to right) around 2:33. By 2:43 we swing to look at the southern end of Harran Sulci (towards the west). At 2:49, we are looking westward at the northern end of Khorasan Fossa. At 3:00 we spot the intersection of Harran Sulci and Kaukaban Fossae near the limb. Then by 3:07 the crater Harun is located above the center. The southbound canyon fly through at 3:30 looks like we're going back through the southern end of Harran Sulci. Perhaps the makings of a narrated sound track? Things like the serrated limb help to make this look very realistic. Might be interesting to consider texture and even some slight color at some point? Steve -------------------- Steve [ my home page and planetary maps page ]
|
|
|
|
|
Mar 5 2012, 10:10 PM
Post
#3
|
|
|
IMG to PNG GOD Group: Moderator Posts: 2254 Joined: 19-February 04 From: Near fire and ice Member No.: 38 |
QUOTE (scalbers @ Mar 4 2012, 08:38 PM)  Very nice animation Bjorn. It's fun to try and recognize various features as you fly over. One example is the sequence starting at 4:55 when the crater Sabur is centered in the view. Then from 5:00 to 5:12 we are flying northbound alongside Anbar Fossae. At 5:21 we're transitioning from Samarkand Sulci to Hamah Sulci (note unnamed crater at that time), then about 5:30 when flying from Hamah Sulci down to Ebony Dorsum. [snip] Perhaps the makings of a narrated sound track? Things like the serrated limb help to make this look very realistic. Might be interesting to consider texture and even some slight color at some point? Steve A narrated sound track - that's an interesting idea. And it's nice to see there are lots of recognizable features there ;-). Regarding texture, it wouldn't add any details since compared to the original images, loss of resolution is negligible in the DEM. QUOTE (ugordan @ Mar 4 2012, 08:47 PM) Interesting to watch the phase angle effects as well, it's clear right from the initial frame that the photometric modelling of the disc is more realisic than what one would expect from just illuminating a ball in a commercial 3D renderer. About the only thing that gives away the fact this is a rendering is the lack of secondary illumination of shadowed slopes near the terminator by the opposing sunlit slopes. Other than that, add some point spread function and this could pass under an actual Cassini image. I'm using a slightly modified version of the earliest Hapke function - it's modified to avoid unrealistic effects when the emission angle approaches 90 degrees. The phase effects are interesting and very strong. I even had to reduce the opposition effect a bit to avoid problems with dynamic range. The lack of completely black shadows (no secondary illumination) is a problem and makes terminator closeups less realistic. The only reason I avoided them was to speed up the rendering time. Adding a point spread function is a nice idea but some of my test renders look realistic to me anyway. A year or two ago I somehow managed to confuse an Enceladus test render with a Cassini image for a few seconds. Needless to say I was happy when I realized what had happened. QUOTE (machi @ Mar 5 2012, 10:21 AM) It looks fantastic Bjorn! Can you make some anaglyph versions? That's probably a bit complicated due to the complicated flight path. A bigger problem is rendering time even though my renderer is at least two times faster now than it was two months ago. But this might be an interesting future project. |
|
|
|
|
Mar 13 2012, 01:01 AM
Post
#4
|
|
|
Junior Member Group: Members Posts: 41 Joined: 12-April 06 Member No.: 738 |
QUOTE (Bjorn Jonsson @ Mar 5 2012, 11:10 PM) I'm using a slightly modified version of the earliest Hapke function - it's modified to avoid unrealistic effects when the emission angle approaches 90 degrees. The phase effects are interesting and very strong. I even had to reduce the opposition effect a bit to avoid problems with dynamic range. Outstanding video Bjorn! Amazing!  I loved the phase-angle effects too. Could you elaborate on the modified version of the earliest Hapke function or point to where that function can be found? Those zero-phase glares are very prominent on the Moon/lunar surface too, but I suspect generally on any body with rough surfaces. Thank you very much for any pointers! Edit: Is this what you've been working with? -> http://selena.sai.msu.ru/Pug/Publications/ms42/m42_60.pdf Rafael |
|
|
|
|
Mar 17 2012, 12:47 AM
Post
#5
|
|
|
IMG to PNG GOD Group: Moderator Posts: 2254 Joined: 19-February 04 From: Near fire and ice Member No.: 38 |
The modified Hapke function I'm using can be found in my software and (probably) nowhere else ;-). What I'm doing is a crude (probably), simple and empirical modification: I'm preventing the emission angle from ever getting 'too close' to 90 degrees by multiplying it with a number that is a slightly lower than 1 once the emission angle exceeds ~80 degrees. This number is actually a function of the emission angle and gets a bit lower as the emission angle approaches 90 degrees. This may seem strange but since the patch of surface within a pixel really is never perfectly smooth the average emission angle of the visible 'facets' within the pixel should never get extremely close to 90 degrees. This is simpler (but also less accurate) than the more complicated forms of the Hapke functions and eliminates unrealistic bright 'rims' around some terrain edges or planetary discs.
|
|
|
|
 Bjorn Jonsson Enceladus PDS image products Jul 22 2010, 03:22 PM
 charborob I must be missing something in my version of Quick... Jul 22 2010, 03:47 PM Bjorn Jonsson I forgot to mention that to play the animation you... Jul 22 2010, 03:55 PM Floyd Very nice! And thanks for the directions to t... Jul 22 2010, 06:16 PM lyford Beautiful - thank you! Jul 23 2010, 12:46 AM nprev ...outstanding, Bjorn, thank you!!! Jul 23 2010, 01:59 AM Ian R Very well done! Jul 23 2010, 03:43 AM JohnVV very nice
it is time consuming isn't it
by... Jul 23 2010, 09:41 AM Bjorn Jonsson Yes, finishing the DEM is time consuming - it... Jul 23 2010, 07:18 PM Bjorn Jonsson After seeing machi's anaglyphs of Titania I de... Apr 19 2011, 02:10 AM machi Very nice!
I'm glad, that my work is inspi... Apr 19 2011, 11:27 AM Phil Stooke Right... approaching the south pole with the plume... Apr 19 2011, 03:14 PM
charborob I must be missing something in my version of Quick... Jul 22 2010, 03:47 PM Bjorn Jonsson I forgot to mention that to play the animation you... Jul 22 2010, 03:55 PM Floyd Very nice! And thanks for the directions to t... Jul 22 2010, 06:16 PM lyford Beautiful - thank you! Jul 23 2010, 12:46 AM nprev ...outstanding, Bjorn, thank you!!! Jul 23 2010, 01:59 AM Ian R Very well done! Jul 23 2010, 03:43 AM JohnVV very nice
it is time consuming isn't it
by... Jul 23 2010, 09:41 AM Bjorn Jonsson Yes, finishing the DEM is time consuming - it... Jul 23 2010, 07:18 PM Bjorn Jonsson After seeing machi's anaglyphs of Titania I de... Apr 19 2011, 02:10 AM machi Very nice!
I'm glad, that my work is inspi... Apr 19 2011, 11:27 AM Phil Stooke Right... approaching the south pole with the plume... Apr 19 2011, 03:14 PM
 Bjorn Jonsson QUOTE (Phil Stooke @ Apr 19 2011, 03:14 P... Apr 20 2011, 11:06 AM machi Superb work!
Can you make this animation in r... Apr 20 2011, 12:29 PM Bjorn Jonsson As I have mentioned, I'm working on a DEM of E... Jun 28 2011, 08:46 PM volcanopele Not bad, not bad at all. You did better at blendin... Jun 28 2011, 10:23 PM Ian R That's top-drawer, Bjorn. Simply top-drawer. Jul 1 2011, 04:09 PM machi Feast for the Eyes! Jul 1 2011, 06:26 PM tedstryk Wow...Bjorn, that is all I can say, wow. Great wo... Jul 2 2011, 03:05 AM ElkGroveDan Bjorn knows more than a little bit about ice. Jul 2 2011, 03:35 AM Bjorn Jonsson QUOTE (ElkGroveDan @ Jul 2 2011, 03:35 AM... Jul 3 2011, 11:24 PM elakdawalla Are you using ISIS on a Mac or running Linux? Jul 4 2011, 02:13 PM Bjorn Jonsson QUOTE (elakdawalla @ Jul 4 2011, 02:13 PM... Jul 4 2011, 02:17 PM djellison On a Mac, apart from having to use the terminal to... Jul 4 2011, 02:21 PM machi Beautiful! Oct 5 2011, 06:53 PM Phil Stooke agreed!
Phil Oct 5 2011, 09:01 PM ngunn An all time classic. That deserves wide circulatio... Oct 5 2011, 10:23 PM ugordan Thanks.
BTW, if that image looks slightly ... Oct 5 2011, 10:36 PM Stu Absolutely beautiful. Seriously, why your images a... Oct 5 2011, 11:21 PM djellison QUOTE (Stu @ Oct 5 2011, 04:21 PM) and on... Oct 6 2011, 12:41 AM eoincampbell Wondrous ! Oct 6 2011, 02:09 AM ugordan Subject: Enceladus plume temporal variance. 3 NAC ... Oct 10 2011, 08:33 PM ugordan Here's a ratio flicker gif. First frame is fra... Oct 10 2011, 08:43 PM machi QUOTE (ugordan @ Oct 10 2011, 10:33 PM) S... Oct 10 2011, 10:08 PM john_s QUOTE (ugordan @ Oct 10 2011, 02:33 PM) S... Oct 12 2011, 02:34 AM ngunn I'm not sure if it's two variable vents or... Oct 10 2011, 09:01 PM eoincampbell Has the long shadow been explained? Oct 11 2011, 02:49 AM nprev Re the long shadow: Looks to me like that's pr... Oct 12 2011, 10:22 PM hendric Isn't that mostly Saturnshine lighting up the ... Oct 13 2011, 06:24 PM Bjorn Jonsson This is a 21 frame mosaic of images obtained durin... Nov 15 2011, 09:54 PM tedstryk QUOTE (Bjorn Jonsson @ Nov 15 2011, 09:54... Nov 16 2011, 05:59 PM Juramike Wow! The detail in that image is fantastic... Nov 16 2011, 01:02 AM Guillermo Abramson Amazing. Thanks for sharing it.
Guillermo Nov 17 2011, 01:37 AM scalbers Greetings - thought I'd post my latest Encelad... Feb 25 2012, 06:07 PM elakdawalla These are cool, Steve! Thanks for sharing. R... Feb 26 2012, 10:18 PM scalbers Thanks Emily. Here's an updated version where ... Feb 27 2012, 07:51 PM Bjorn Jonsson My latest animation:
Flight over Enceladus
This ... Mar 4 2012, 08:14 PM Zack Moratto QUOTE (Bjorn Jonsson @ Mar 4 2012, 12:14 ... Mar 9 2012, 10:44 PM ugordan QUOTE (scalbers @ Mar 4 2012, 09:38 PM) M... Mar 4 2012, 08:47 PM machi It looks fantastic Bjorn!
Can you make some an... Mar 5 2012, 10:21 AM JohnVV nice
It might be my imagination but
did you use ... Mar 6 2012, 06:24 AM Bjorn Jonsson I used ISIS' dstripe 'indirectly' - th... Mar 6 2012, 11:44 PM Bjorn Jonsson Not a list but the March and July 2005 flybys prov... Mar 10 2012, 01:34 PM PDP8E Bjorn,
That flight was tremendous! Thanks for ... Mar 10 2012, 05:14 PM Ian R I'll second that. Mar 11 2012, 08:47 PM FordPrefect Thank you very much Bjorn for the insight! Mar 17 2012, 01:58 PM Bjorn Jonsson On November 27, 2016 Cassini at last obtained real... Nov 5 2017, 08:10 PM jccwrt Monochrome image mosaic of Enceladus taken during ... May 24 2018, 09:17 PM
Bjorn Jonsson QUOTE (Phil Stooke @ Apr 19 2011, 03:14 P... Apr 20 2011, 11:06 AM machi Superb work!
Can you make this animation in r... Apr 20 2011, 12:29 PM Bjorn Jonsson As I have mentioned, I'm working on a DEM of E... Jun 28 2011, 08:46 PM volcanopele Not bad, not bad at all. You did better at blendin... Jun 28 2011, 10:23 PM Ian R That's top-drawer, Bjorn. Simply top-drawer. Jul 1 2011, 04:09 PM machi Feast for the Eyes! Jul 1 2011, 06:26 PM tedstryk Wow...Bjorn, that is all I can say, wow. Great wo... Jul 2 2011, 03:05 AM ElkGroveDan Bjorn knows more than a little bit about ice. Jul 2 2011, 03:35 AM Bjorn Jonsson QUOTE (ElkGroveDan @ Jul 2 2011, 03:35 AM... Jul 3 2011, 11:24 PM elakdawalla Are you using ISIS on a Mac or running Linux? Jul 4 2011, 02:13 PM Bjorn Jonsson QUOTE (elakdawalla @ Jul 4 2011, 02:13 PM... Jul 4 2011, 02:17 PM djellison On a Mac, apart from having to use the terminal to... Jul 4 2011, 02:21 PM machi Beautiful! Oct 5 2011, 06:53 PM Phil Stooke agreed!
Phil Oct 5 2011, 09:01 PM ngunn An all time classic. That deserves wide circulatio... Oct 5 2011, 10:23 PM ugordan Thanks.
BTW, if that image looks slightly ... Oct 5 2011, 10:36 PM Stu Absolutely beautiful. Seriously, why your images a... Oct 5 2011, 11:21 PM djellison QUOTE (Stu @ Oct 5 2011, 04:21 PM) and on... Oct 6 2011, 12:41 AM eoincampbell Wondrous ! Oct 6 2011, 02:09 AM ugordan Subject: Enceladus plume temporal variance. 3 NAC ... Oct 10 2011, 08:33 PM ugordan Here's a ratio flicker gif. First frame is fra... Oct 10 2011, 08:43 PM machi QUOTE (ugordan @ Oct 10 2011, 10:33 PM) S... Oct 10 2011, 10:08 PM john_s QUOTE (ugordan @ Oct 10 2011, 02:33 PM) S... Oct 12 2011, 02:34 AM ngunn I'm not sure if it's two variable vents or... Oct 10 2011, 09:01 PM eoincampbell Has the long shadow been explained? Oct 11 2011, 02:49 AM nprev Re the long shadow: Looks to me like that's pr... Oct 12 2011, 10:22 PM hendric Isn't that mostly Saturnshine lighting up the ... Oct 13 2011, 06:24 PM Bjorn Jonsson This is a 21 frame mosaic of images obtained durin... Nov 15 2011, 09:54 PM tedstryk QUOTE (Bjorn Jonsson @ Nov 15 2011, 09:54... Nov 16 2011, 05:59 PM Juramike Wow! The detail in that image is fantastic... Nov 16 2011, 01:02 AM Guillermo Abramson Amazing. Thanks for sharing it.
Guillermo Nov 17 2011, 01:37 AM scalbers Greetings - thought I'd post my latest Encelad... Feb 25 2012, 06:07 PM elakdawalla These are cool, Steve! Thanks for sharing. R... Feb 26 2012, 10:18 PM scalbers Thanks Emily. Here's an updated version where ... Feb 27 2012, 07:51 PM Bjorn Jonsson My latest animation:
Flight over Enceladus
This ... Mar 4 2012, 08:14 PM Zack Moratto QUOTE (Bjorn Jonsson @ Mar 4 2012, 12:14 ... Mar 9 2012, 10:44 PM ugordan QUOTE (scalbers @ Mar 4 2012, 09:38 PM) M... Mar 4 2012, 08:47 PM machi It looks fantastic Bjorn!
Can you make some an... Mar 5 2012, 10:21 AM JohnVV nice
It might be my imagination but
did you use ... Mar 6 2012, 06:24 AM Bjorn Jonsson I used ISIS' dstripe 'indirectly' - th... Mar 6 2012, 11:44 PM Bjorn Jonsson Not a list but the March and July 2005 flybys prov... Mar 10 2012, 01:34 PM PDP8E Bjorn,
That flight was tremendous! Thanks for ... Mar 10 2012, 05:14 PM Ian R I'll second that. Mar 11 2012, 08:47 PM FordPrefect Thank you very much Bjorn for the insight! Mar 17 2012, 01:58 PM Bjorn Jonsson On November 27, 2016 Cassini at last obtained real... Nov 5 2017, 08:10 PM jccwrt Monochrome image mosaic of Enceladus taken during ... May 24 2018, 09:17 PM |

|
Lo-Fi Version | Time is now: 26th September 2024 - 02:30 PM |
|
RULES AND GUIDELINES Please read the Forum Rules and Guidelines before posting. IMAGE COPYRIGHT |
OPINIONS AND MODERATION Opinions expressed on UnmannedSpaceflight.com are those of the individual posters and do not necessarily reflect the opinions of UnmannedSpaceflight.com or The Planetary Society. The all-volunteer UnmannedSpaceflight.com moderation team is wholly independent of The Planetary Society. The Planetary Society has no influence over decisions made by the UnmannedSpaceflight.com moderators. |
SUPPORT THE FORUM Unmannedspaceflight.com is funded by the Planetary Society. Please consider supporting our work and many other projects by donating to the Society or becoming a member. |
|