Juno PDS data |

Juno PDS data |
 Jan 8 2016, 10:15 PM Jan 8 2016, 10:15 PM
Post
#1
|
|
 Administrator  Group: Admin Posts: 5172 Joined: 4-August 05 From: Pasadena, CA, USA, Earth Member No.: 454 |
There is now PDS-format JunoCam cruise and Earth flyby data available; it's been submitted to the PDS, but MSSS has gone ahead and posted it on their website. I've created an index page to it here. Unlike my usual index pages, there aren't any thumbnails because of the odd nature of JunoCam images, with their long skinny shapes and interleaved framelets. I haven't played much with these data because it's a bit beyond my skill -- I look forward to seeing what any of you can do with it.
-------------------- My website - My Patreon - @elakdawalla on Twitter - Please support unmannedspaceflight.com by donating here.
|
 |
 
|
 |
|
Jun 28 2016, 12:14 PM
Post
#2
|
|||
|
Senior Member Group: Members Posts: 2346 Joined: 7-December 12 Member No.: 6780 |
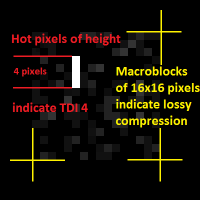
This is a 16-fold brightness-stretched and 2-fold enlarged crop of 2013107_00C048:
It shows one copy of a pattern which repeats each 3x128=384 pixel rows in the raw swath. Those repetitive patterns are mostly caused by hot pixels. But there exist some repetitive spots of different type, too. The 3x128 pixels are resulting from exposures made of three color bands times 128 pixels framelet height. This is a 16-fold enlarged crop:
It shows a vertical line of 4 bright pixels. This line is the result of one hot pixel on the CCD copied 4-times by the TDI mechanism. It indicates, that 4 TDI steps have been applied for this image. - TDI 4 is hard for finding many stars. TDI 64 and TDI 80 are much better-suited for this purpose. The 16x16 noisy block indicates, that the image has been compressed lossily on macroblocks (tiles) of 16x16 pixels. When looking for real objects, first mark all repetitive patterns, or clean the image from these patterns. Then decompose the swath into framelets of height 128 pixels, grouped into exposures of 3 framelets. Insert a gap of 27 pixels between neighbouring framelets within one exposure. Assign a color channel to each framelet within each exposure. Shift the exposures vertically, until you get a match of corresponding features (about 114 pixels, give or take a few). Use the valid color channel of each exposure to obtain full rgb coverage. The result will be a first draft of an RGB image. I'd recommend to use 2013282_000C91 (aka EFB01), showing Earth's moon, as a first exercise. The first 22 slides of the pdf I've provided a few weeks ago should apply to moon and star RGB images, as well. Spacecraft trajectory and rotation of the target objects can be neglected for distant targets. You may use weights for the colors in order to adjust the raw colors, if you use EDRs; the weights for the colors are likely to undergo refined calibration. |
||
|
|
|
||
 elakdawalla Juno PDS data Jan 8 2016, 10:15 PM
 Gerald In the meanwhile I've looked at all the 2x121 ... Jan 14 2016, 02:08 AM
 mcaplinger QUOTE (Gerald @ Jan 13 2016, 06:08 PM) I ... Jan 14 2016, 04:03 AM Gerald I've implemented a quick&dirty de-blocking... Jan 15 2016, 02:41 AM mcaplinger QUOTE (Gerald @ Jan 14 2016, 06:41 PM) I... Jan 15 2016, 03:51 AM elakdawalla When I ran IMG2PNG on these images I thought the b... Jan 15 2016, 02:53 AM Gerald This week I worked on a better understanding of th... Jan 22 2016, 05:56 PM Gerald This one is mostly about finding blips used as sta... Jan 30 2016, 03:27 PM Gerald This is about a first crude simulation of image JN... Feb 15 2016, 02:46 PM Gerald The following tentative BSC star identifications o... Feb 22 2016, 06:23 PM Gerald This article is about a geometric calibration meth... Mar 24 2016, 07:29 PM wildespace I don't know how to work with IMG files (they ... Jun 27 2016, 07:59 AM javierluiso QUOTE (wildespace @ Jun 27 2016, 04:59 AM... Jul 2 2016, 03:33 AM Gerald I'll try to convert the square root encoded ED... Jun 27 2016, 05:36 PM mcaplinger We didn't take any RGB images of stars and the... Jun 27 2016, 05:49 PM wildespace QUOTE (mcaplinger @ Jun 27 2016, 06:49 PM... Jun 28 2016, 07:11 AM Gerald Well, applying the saying would mean, read my post... Jun 27 2016, 09:59 PM mcaplinger QUOTE (Gerald @ Jun 28 2016, 04:14 AM) Th... Jun 28 2016, 02:16 PM JohnVV any reason you are not opining img files as a raw ... Jul 2 2016, 07:13 PM Gerald Reading the IMGs is just the first small hurdle. T... Jul 2 2016, 08:47 PM mcaplinger QUOTE (Gerald @ Jul 2 2016, 12:47 PM) The... Jul 2 2016, 09:05 PM Gerald To me, the most easy file format to handle is the ... Jul 3 2016, 06:25 AM Gerald Juno PDS Imaging Node is online. Mar 8 2017, 04:05 AM elakdawalla The first Juno data release to the PDS is out! Jun 27 2017, 10:54 PM Bjorn Jonsson Today when starting work on some additional Juno i... Aug 26 2017, 01:07 AM Bjorn Jonsson The new frame and instrument kernels (plus informa... Sep 5 2017, 09:29 PM mcaplinger QUOTE (Bjorn Jonsson @ Sep 5 2017, 01:29 ... Sep 5 2017, 10:58 PM Brian Swift QUOTE (mcaplinger @ Sep 5 2017, 03:58 PM)... Sep 25 2017, 05:24 AM mcaplinger QUOTE (Brian Swift @ Sep 24 2017, 09:24 P... Sep 25 2017, 04:14 PM Brian Swift QUOTE (mcaplinger @ Sep 25 2017, 09:14 AM... Sep 26 2017, 05:09 PM mcaplinger QUOTE (Brian Swift @ Sep 26 2017, 09:09 A... Sep 27 2017, 01:05 AM Gerald x=814.21 for the optical axis is astonishingly sim... Sep 6 2017, 12:02 PM mcaplinger QUOTE (Gerald @ Sep 6 2017, 04:02 AM) Unf... Sep 6 2017, 04:57 PM Bjorn Jonsson QUOTE (Gerald @ Sep 6 2017, 12:02 PM) Unf... Sep 19 2017, 12:38 AM mcaplinger QUOTE (Bjorn Jonsson @ Sep 18 2017, 04:38... Sep 19 2017, 02:34 AM Gerald QUOTE (mcaplinger @ Sep 19 2017, 04:34 AM... Oct 28 2017, 11:42 PM Gerald I'll try to squeeze it in appropriately during... Sep 6 2017, 07:11 PM Bjorn Jonsson Is there any possibility the compression factor co... Sep 27 2017, 11:00 PM mcaplinger QUOTE (Bjorn Jonsson @ Sep 27 2017, 03:00... Sep 27 2017, 11:43 PM Bjorn Jonsson Yes, ENCODING_COMPRESSION_RATIO in the Galileo fil... Sep 28 2017, 01:01 AM Brian Swift The Mathematica apps Ive developed for processing... Sep 29 2017, 08:13 PM Brian Swift Mike, how small of an INTERFRAME_DELAY can be comm... Dec 18 2017, 06:57 PM mcaplinger QUOTE (Brian Swift @ Dec 18 2017, 10:57 A... Dec 18 2017, 08:00 PM Gerald Any attempts to create SR products would require l... Dec 18 2017, 10:42 PM Brian Swift Mike, were the MTF images collected during thermov... Jan 31 2018, 01:50 AM mcaplinger QUOTE (Brian Swift @ Jan 30 2018, 05:50 P... Jan 31 2018, 01:56 AM Brian Swift QUOTE (mcaplinger @ Jan 30 2018, 05:56 PM... Jan 31 2018, 04:11 AM mcaplinger QUOTE (Brian Swift @ Jan 30 2018, 05:50 P... Jan 31 2018, 05:55 AM Gerald One of the questions, I've been interested in,... Jan 31 2018, 10:53 AM mcaplinger QUOTE (Gerald @ Jan 31 2018, 02:53 AM) On... Jan 31 2018, 12:30 PM Gerald Far from anything I'd call a proof, but a firs... Jan 31 2018, 03:37 PM mcaplinger QUOTE (Gerald @ Jan 31 2018, 07:37 AM) Fa... Jan 31 2018, 06:38 PM fredk Ioshine or light scattered along Jupiter's atm... Jan 31 2018, 05:26 PM Gerald With Io's radius of about 1820 km, I get a cro... Jan 31 2018, 06:05 PM Gerald I've seen the stray light in the later images ... Jan 31 2018, 08:18 PM Brian Swift Anyone have suggestions on how I can determine the... Feb 23 2018, 08:46 PM mcaplinger QUOTE (Brian Swift @ Feb 23 2018, 12:46 P... Feb 24 2018, 03:29 AM Gerald Out-of-the-hip, I can only say, that the deviation... Feb 24 2018, 02:17 AM Brian Swift Mike, Gerald - Thanks for the replies.
Rotation a... Feb 26 2018, 08:22 AM mcaplinger QUOTE (Brian Swift @ Feb 26 2018, 12:22 A... Feb 26 2018, 03:37 PM Gerald For DCT compressed images, you get the usual type ... Feb 26 2018, 12:58 PM Brian Swift QUOTE (Gerald @ Feb 26 2018, 04:58 AM) Th... Feb 26 2018, 06:29 PM Brian Swift QUOTE (Gerald @ Feb 26 2018, 04:58 AM) He... Mar 1 2018, 04:15 AM Gerald Inferred means inferred from raw JunoCam images.
A... Feb 26 2018, 10:25 PM mcaplinger QUOTE (Gerald @ Feb 26 2018, 02:25 PM) In... Feb 26 2018, 10:36 PM Brian Swift Note for anyone else who hasn't noticed...
The... Feb 26 2018, 10:30 PM Gerald I'm not quite sure any more, what we are talki... Feb 26 2018, 11:27 PM mcaplinger QUOTE (Gerald @ Feb 26 2018, 03:27 PM) Fo... Feb 27 2018, 03:32 AM Brian Swift Gerald, do you have a RotOffestZ estimate for JNCE... Mar 1 2018, 05:30 AM Gerald The effect in your comparison is indeed larger tha... Mar 1 2018, 12:08 PM mcaplinger QUOTE (Gerald @ Mar 1 2018, 04:08 AM) Dur... Mar 1 2018, 03:46 PM Brian Swift QUOTE (mcaplinger @ Mar 1 2018, 07:46 AM)... Mar 1 2018, 06:06 PM Gerald QUOTE (mcaplinger @ Mar 1 2018, 04:46 PM)... Mar 1 2018, 11:06 PM Bjorn Jonsson QUOTE (mcaplinger @ Mar 1 2018, 03:46 PM)... Mar 5 2018, 11:22 PM mcaplinger QUOTE (Bjorn Jonsson @ Mar 5 2018, 03:22 ... Mar 6 2018, 03:06 AM Brian Swift QUOTE (mcaplinger @ Mar 5 2018, 07:06 PM)... Mar 6 2018, 04:03 AM Brian Swift QUOTE (Gerald @ Mar 1 2018, 04:08 AM) The... Mar 1 2018, 05:24 PM Gerald Without any warranty, not even tested, just in ter... Mar 2 2018, 10:51 AM Brian Swift Juno28g, a JunoCam raw processing pipeline impleme... Mar 2 2018, 08:48 PM Sean Thanks for sharing this Brian...very keen to wrap ... Mar 3 2018, 02:11 AM Brian Swift QUOTE (Sean @ Mar 2 2018, 06:11 PM) Thank... Mar 3 2018, 05:21 PM Sean Ah thankee! I've fed 214 raw files into th... Mar 3 2018, 10:00 PM Brian Swift QUOTE (Sean @ Mar 3 2018, 02:00 PM) Do th... Mar 3 2018, 10:43 PM Brian Swift QUOTE (Brian Swift @ Mar 3 2018, 02:43 PM... Mar 4 2018, 07:16 AM Sean Thank you for the explanation.
I have noticed ver... Mar 4 2018, 05:07 PM Brian Swift QUOTE (Sean @ Mar 4 2018, 09:07 AM) I hav... Mar 4 2018, 10:21 PM Brian Swift QUOTE (Sean @ Mar 4 2018, 09:07 AM) I hav... Mar 5 2018, 09:19 AM Sean The example image I used was PJ08_118 Mar 4 2018, 10:31 PM Sean 'Perijoves'
214 images, 11 perijoves, 3.1... Mar 5 2018, 02:50 AM Brian Swift QUOTE (Sean @ Mar 4 2018, 06:50 PM) ... Mar 5 2018, 04:38 AM Brian Swift QUOTE (Sean @ Mar 4 2018, 06:50 PM) ... Mar 5 2018, 05:17 AM Gerald For my drafts, like these for PJ09, I don't us... Mar 6 2018, 05:03 AM Brian Swift Mike, Can you release to public domain the photo o... Mar 18 2018, 04:38 PM mcaplinger QUOTE (Brian Swift @ Mar 18 2018, 08:38 A... Mar 23 2018, 06:11 PM Brian Swift QUOTE (mcaplinger @ Mar 23 2018, 11:11 AM... Mar 24 2018, 12:44 AM mcaplinger QUOTE (Brian Swift @ Mar 23 2018, 04:44 P... Mar 24 2018, 01:22 AM Brian Swift QUOTE (mcaplinger @ Mar 23 2018, 05:22 PM... Mar 24 2018, 05:21 AM mcaplinger QUOTE (Brian Swift @ Mar 23 2018, 09:21 P... Mar 24 2018, 03:55 PM Gerald 82 * 32µs = 2.624ms. This would be a little less t... Mar 26 2018, 02:16 AM
mcaplinger QUOTE (Gerald @ Jan 13 2016, 06:08 PM) I ... Jan 14 2016, 04:03 AM Gerald I've implemented a quick&dirty de-blocking... Jan 15 2016, 02:41 AM mcaplinger QUOTE (Gerald @ Jan 14 2016, 06:41 PM) I... Jan 15 2016, 03:51 AM elakdawalla When I ran IMG2PNG on these images I thought the b... Jan 15 2016, 02:53 AM Gerald This week I worked on a better understanding of th... Jan 22 2016, 05:56 PM Gerald This one is mostly about finding blips used as sta... Jan 30 2016, 03:27 PM Gerald This is about a first crude simulation of image JN... Feb 15 2016, 02:46 PM Gerald The following tentative BSC star identifications o... Feb 22 2016, 06:23 PM Gerald This article is about a geometric calibration meth... Mar 24 2016, 07:29 PM wildespace I don't know how to work with IMG files (they ... Jun 27 2016, 07:59 AM javierluiso QUOTE (wildespace @ Jun 27 2016, 04:59 AM... Jul 2 2016, 03:33 AM Gerald I'll try to convert the square root encoded ED... Jun 27 2016, 05:36 PM mcaplinger We didn't take any RGB images of stars and the... Jun 27 2016, 05:49 PM wildespace QUOTE (mcaplinger @ Jun 27 2016, 06:49 PM... Jun 28 2016, 07:11 AM Gerald Well, applying the saying would mean, read my post... Jun 27 2016, 09:59 PM mcaplinger QUOTE (Gerald @ Jun 28 2016, 04:14 AM) Th... Jun 28 2016, 02:16 PM JohnVV any reason you are not opining img files as a raw ... Jul 2 2016, 07:13 PM Gerald Reading the IMGs is just the first small hurdle. T... Jul 2 2016, 08:47 PM mcaplinger QUOTE (Gerald @ Jul 2 2016, 12:47 PM) The... Jul 2 2016, 09:05 PM Gerald To me, the most easy file format to handle is the ... Jul 3 2016, 06:25 AM Gerald Juno PDS Imaging Node is online. Mar 8 2017, 04:05 AM elakdawalla The first Juno data release to the PDS is out! Jun 27 2017, 10:54 PM Bjorn Jonsson Today when starting work on some additional Juno i... Aug 26 2017, 01:07 AM Bjorn Jonsson The new frame and instrument kernels (plus informa... Sep 5 2017, 09:29 PM mcaplinger QUOTE (Bjorn Jonsson @ Sep 5 2017, 01:29 ... Sep 5 2017, 10:58 PM Brian Swift QUOTE (mcaplinger @ Sep 5 2017, 03:58 PM)... Sep 25 2017, 05:24 AM mcaplinger QUOTE (Brian Swift @ Sep 24 2017, 09:24 P... Sep 25 2017, 04:14 PM Brian Swift QUOTE (mcaplinger @ Sep 25 2017, 09:14 AM... Sep 26 2017, 05:09 PM mcaplinger QUOTE (Brian Swift @ Sep 26 2017, 09:09 A... Sep 27 2017, 01:05 AM Gerald x=814.21 for the optical axis is astonishingly sim... Sep 6 2017, 12:02 PM mcaplinger QUOTE (Gerald @ Sep 6 2017, 04:02 AM) Unf... Sep 6 2017, 04:57 PM Bjorn Jonsson QUOTE (Gerald @ Sep 6 2017, 12:02 PM) Unf... Sep 19 2017, 12:38 AM mcaplinger QUOTE (Bjorn Jonsson @ Sep 18 2017, 04:38... Sep 19 2017, 02:34 AM Gerald QUOTE (mcaplinger @ Sep 19 2017, 04:34 AM... Oct 28 2017, 11:42 PM Gerald I'll try to squeeze it in appropriately during... Sep 6 2017, 07:11 PM Bjorn Jonsson Is there any possibility the compression factor co... Sep 27 2017, 11:00 PM mcaplinger QUOTE (Bjorn Jonsson @ Sep 27 2017, 03:00... Sep 27 2017, 11:43 PM Bjorn Jonsson Yes, ENCODING_COMPRESSION_RATIO in the Galileo fil... Sep 28 2017, 01:01 AM Brian Swift The Mathematica apps Ive developed for processing... Sep 29 2017, 08:13 PM Brian Swift Mike, how small of an INTERFRAME_DELAY can be comm... Dec 18 2017, 06:57 PM mcaplinger QUOTE (Brian Swift @ Dec 18 2017, 10:57 A... Dec 18 2017, 08:00 PM Gerald Any attempts to create SR products would require l... Dec 18 2017, 10:42 PM Brian Swift Mike, were the MTF images collected during thermov... Jan 31 2018, 01:50 AM mcaplinger QUOTE (Brian Swift @ Jan 30 2018, 05:50 P... Jan 31 2018, 01:56 AM Brian Swift QUOTE (mcaplinger @ Jan 30 2018, 05:56 PM... Jan 31 2018, 04:11 AM mcaplinger QUOTE (Brian Swift @ Jan 30 2018, 05:50 P... Jan 31 2018, 05:55 AM Gerald One of the questions, I've been interested in,... Jan 31 2018, 10:53 AM mcaplinger QUOTE (Gerald @ Jan 31 2018, 02:53 AM) On... Jan 31 2018, 12:30 PM Gerald Far from anything I'd call a proof, but a firs... Jan 31 2018, 03:37 PM mcaplinger QUOTE (Gerald @ Jan 31 2018, 07:37 AM) Fa... Jan 31 2018, 06:38 PM fredk Ioshine or light scattered along Jupiter's atm... Jan 31 2018, 05:26 PM Gerald With Io's radius of about 1820 km, I get a cro... Jan 31 2018, 06:05 PM Gerald I've seen the stray light in the later images ... Jan 31 2018, 08:18 PM Brian Swift Anyone have suggestions on how I can determine the... Feb 23 2018, 08:46 PM mcaplinger QUOTE (Brian Swift @ Feb 23 2018, 12:46 P... Feb 24 2018, 03:29 AM Gerald Out-of-the-hip, I can only say, that the deviation... Feb 24 2018, 02:17 AM Brian Swift Mike, Gerald - Thanks for the replies.
Rotation a... Feb 26 2018, 08:22 AM mcaplinger QUOTE (Brian Swift @ Feb 26 2018, 12:22 A... Feb 26 2018, 03:37 PM Gerald For DCT compressed images, you get the usual type ... Feb 26 2018, 12:58 PM Brian Swift QUOTE (Gerald @ Feb 26 2018, 04:58 AM) Th... Feb 26 2018, 06:29 PM Brian Swift QUOTE (Gerald @ Feb 26 2018, 04:58 AM) He... Mar 1 2018, 04:15 AM Gerald Inferred means inferred from raw JunoCam images.
A... Feb 26 2018, 10:25 PM mcaplinger QUOTE (Gerald @ Feb 26 2018, 02:25 PM) In... Feb 26 2018, 10:36 PM Brian Swift Note for anyone else who hasn't noticed...
The... Feb 26 2018, 10:30 PM Gerald I'm not quite sure any more, what we are talki... Feb 26 2018, 11:27 PM mcaplinger QUOTE (Gerald @ Feb 26 2018, 03:27 PM) Fo... Feb 27 2018, 03:32 AM Brian Swift Gerald, do you have a RotOffestZ estimate for JNCE... Mar 1 2018, 05:30 AM Gerald The effect in your comparison is indeed larger tha... Mar 1 2018, 12:08 PM mcaplinger QUOTE (Gerald @ Mar 1 2018, 04:08 AM) Dur... Mar 1 2018, 03:46 PM Brian Swift QUOTE (mcaplinger @ Mar 1 2018, 07:46 AM)... Mar 1 2018, 06:06 PM Gerald QUOTE (mcaplinger @ Mar 1 2018, 04:46 PM)... Mar 1 2018, 11:06 PM Bjorn Jonsson QUOTE (mcaplinger @ Mar 1 2018, 03:46 PM)... Mar 5 2018, 11:22 PM mcaplinger QUOTE (Bjorn Jonsson @ Mar 5 2018, 03:22 ... Mar 6 2018, 03:06 AM Brian Swift QUOTE (mcaplinger @ Mar 5 2018, 07:06 PM)... Mar 6 2018, 04:03 AM Brian Swift QUOTE (Gerald @ Mar 1 2018, 04:08 AM) The... Mar 1 2018, 05:24 PM Gerald Without any warranty, not even tested, just in ter... Mar 2 2018, 10:51 AM Brian Swift Juno28g, a JunoCam raw processing pipeline impleme... Mar 2 2018, 08:48 PM Sean Thanks for sharing this Brian...very keen to wrap ... Mar 3 2018, 02:11 AM Brian Swift QUOTE (Sean @ Mar 2 2018, 06:11 PM) Thank... Mar 3 2018, 05:21 PM Sean Ah thankee! I've fed 214 raw files into th... Mar 3 2018, 10:00 PM Brian Swift QUOTE (Sean @ Mar 3 2018, 02:00 PM) Do th... Mar 3 2018, 10:43 PM Brian Swift QUOTE (Brian Swift @ Mar 3 2018, 02:43 PM... Mar 4 2018, 07:16 AM Sean Thank you for the explanation.
I have noticed ver... Mar 4 2018, 05:07 PM Brian Swift QUOTE (Sean @ Mar 4 2018, 09:07 AM) I hav... Mar 4 2018, 10:21 PM Brian Swift QUOTE (Sean @ Mar 4 2018, 09:07 AM) I hav... Mar 5 2018, 09:19 AM Sean The example image I used was PJ08_118 Mar 4 2018, 10:31 PM Sean 'Perijoves'
214 images, 11 perijoves, 3.1... Mar 5 2018, 02:50 AM Brian Swift QUOTE (Sean @ Mar 4 2018, 06:50 PM) ... Mar 5 2018, 04:38 AM Brian Swift QUOTE (Sean @ Mar 4 2018, 06:50 PM) ... Mar 5 2018, 05:17 AM Gerald For my drafts, like these for PJ09, I don't us... Mar 6 2018, 05:03 AM Brian Swift Mike, Can you release to public domain the photo o... Mar 18 2018, 04:38 PM mcaplinger QUOTE (Brian Swift @ Mar 18 2018, 08:38 A... Mar 23 2018, 06:11 PM Brian Swift QUOTE (mcaplinger @ Mar 23 2018, 11:11 AM... Mar 24 2018, 12:44 AM mcaplinger QUOTE (Brian Swift @ Mar 23 2018, 04:44 P... Mar 24 2018, 01:22 AM Brian Swift QUOTE (mcaplinger @ Mar 23 2018, 05:22 PM... Mar 24 2018, 05:21 AM mcaplinger QUOTE (Brian Swift @ Mar 23 2018, 09:21 P... Mar 24 2018, 03:55 PM Gerald 82 * 32µs = 2.624ms. This would be a little less t... Mar 26 2018, 02:16 AM |

|
Lo-Fi Version | Time is now: 4th June 2024 - 04:48 PM |
|
RULES AND GUIDELINES Please read the Forum Rules and Guidelines before posting. IMAGE COPYRIGHT |
OPINIONS AND MODERATION Opinions expressed on UnmannedSpaceflight.com are those of the individual posters and do not necessarily reflect the opinions of UnmannedSpaceflight.com or The Planetary Society. The all-volunteer UnmannedSpaceflight.com moderation team is wholly independent of The Planetary Society. The Planetary Society has no influence over decisions made by the UnmannedSpaceflight.com moderators. |
SUPPORT THE FORUM Unmannedspaceflight.com is funded by the Planetary Society. Please consider supporting our work and many other projects by donating to the Society or becoming a member. |
|