Voyager Images and Isis3, applications and methods |

  |
Voyager Images and Isis3, applications and methods |
 Jun 5 2016, 07:41 PM Jun 5 2016, 07:41 PM
Post
#1
|
|
|
Member  Group: Members Posts: 890 Joined: 18-November 08 Member No.: 4489 |
read through and run the examples in the Workshop
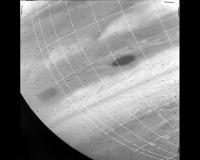
https://isis.astrogeology.usgs.gov/IsisWork...hp/IsisWorkshop isis3 can be a bit daunting . First the linux requirement ( there is a mac port) the rhel 6 build runs just fine on ( i have tested ) CentOS 6.8 ScientificLinux 6.7 ( will be 6.8 soon ) Opensuse 13.2 and 42.1 -- WARNING on Fedora - has issues Then the old Voyager data Those that have been fallowing any of the reprocessing threads have seen the images missing lines and reseaus marks and it is 8 bit and searching for data can be a problem unless you are just garbing it all for this post i am using a few Blue,Green and Orange ( no red filter) ( orange and blue make red ) and using the pds atlas http://pds-imaging.jpl.nasa.gov/search/ -- WARNING!!!!!! this archive sends isis3 incompatible "img" files !!! the wget script needs to be "CORRECTED!!! for example the "atlas_wget_script" give this CODE wget -O c1113006.img 'http://pds-imaging.jpl.nasa.gov/pds/prod?q=OFSN+%3D+/data/voyager//vg_0010/extras/pds/neptune/c1113xxx//c1113006.img+AND+RT+%3D+RAW' wget -O c1113017.img 'http://pds-imaging.jpl.nasa.gov/pds/prod?q=OFSN+%3D+/data/voyager//vg_0010/extras/pds/neptune/c1113xxx//c1113017.img+AND+RT+%3D+RAW' wget -O c1113039.img 'http://pds-imaging.jpl.nasa.gov/pds/prod?q=OFSN+%3D+/data/voyager//vg_0010/extras/pds/neptune/c1113xxx//c1113039.img+AND+RT+%3D+RAW' these img files can not be opened with "voy2isis" You need the imq ( Q on the end ) a simple edit of the script will solve this --fixed-- CODE wget -O c1113006.imq 'http://pdsimage.wr.usgs.gov/archive/vg1_vg2-n-iss-2-edr-v1.0/vg_0010/neptune/c1113xxx/c1113006.imq' wget -O c1113017.imq 'http://pdsimage.wr.usgs.gov/archive/vg1_vg2-n-iss-2-edr-v1.0/vg_0010/neptune/c1113xxx/c1113017.imq' wget -O c1113039.imq 'http://pdsimage.wr.usgs.gov/archive/vg1_vg2-n-iss-2-edr-v1.0/vg_0010/neptune/c1113xxx/c1113039.imq' the voyager " *.imq " files are gziped compressed archives isis3 has BUILT IN batch support -- very handy to ingest into isis3 and also get a "preview" image i use this script CODE #!/bin/sh ls *.imq | sed s/.imq// > cube.lis voy2isis from=\$1.imq to=\$1.cub -batchlist=cube.lis spiceinit from=\$1.cub -batchlist=cube.lis voycal from=\$1.cub to=\$1.cal.cub -batchlist=cube.lis isis2std from=\$1.cal.cub to=\$1.png minpercent=0.1 maxpercent=99.9 -batchlist=cube.lis i have now a calibrated and geo-referenced image these images 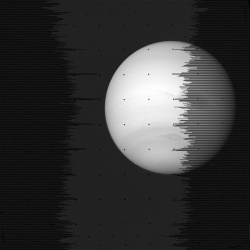 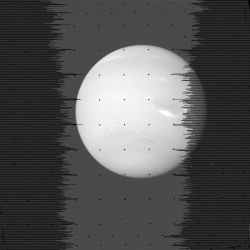 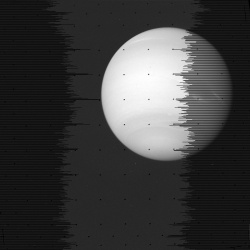 and they need work ( the pointing data is OFF - hay this is from Voyager after all ) ( preview of "c1113006" using isis3's "Grid " program ) 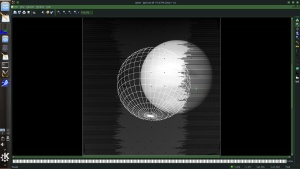 i will worry about that later the spiceinit'ed and voycal images are now 2.5 Meg 32bit float images -- "c1113006.cal.cub" have a look in Qview CODE qview c1113006.cal.cub 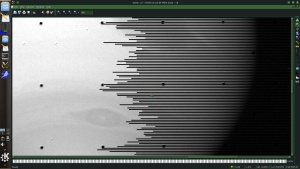 -- if you are going to use the built in isis3 tools then leave the NULL pixels and do not run stretch -- for using gimp or other tools the missing lines are "NULL" data ( px value -3.8 E^38 ) and some low instrument values that are negative pixel values -- for cleaning up and exporting the images to Gimp2.9.3 ( or Krita )these need to be zero a handy isis3 tool is "stretch " CODE stretch from=c1113006.cal.cub to=c1113006.cal1.cub null=0.0 lis=0.0 on to exporting it to a RAW image so it can be cleaned up and then moved back into isis3 best done in a new sub folder CODE cubeatt from=c1113006.cal1.cub to=c1113006.cal1.raw+BSQ+detached you now have a raw and detached headers ( rename c1113006.cal1.raw.cub to c1113006.cal1.raw ) |
 |
 
|
|
Jun 5 2016, 08:16 PM
Post
#2
|
|
|
Member Group: Members Posts: 890 Joined: 18-November 08 Member No.: 4489 |
on to the next bit
this will require some other linux tools ( also build on windows ) Gmic http://gmic.sourceforge.net/ DEVELOPMENT!!! version of Gimp 2.9.3 handles 16 bit and 32 bit image depth -- this really is not hard to build and NOT mess up your centos or opensuse install -- just a bit complex https://github.com/GNOME/gimp and using this guide http://wiki.gimp.org/wiki/Hacking:Building/Linux and that guide is based in this http://lightningismyname.blogspot.com/p/compiling-gimp.html and using the "config.site" for autotools -- a script that makes that file is here https://drive.google.com/file/d/0B6ZYAd08tZ...iew?usp=sharing -- works fine build gmic using gimp2.9.3 ( or use the terminal version of gmic) gmic is being used to fill in the lines ( there is also a lowpass way inside isis3 ) but i like this better and the gimp "heal" tool is being used for the "reseaus marks" ( there is a built in tool in isis3 but it dose not give good results ) ----------or Krita ----------------- or install Krita this editor already has Gmic-gimp plugin built into the program and is in most repos !!! for opensuse "calligra-krita" https://krita.org/ you will still need the TERMINAL version of Gmic, but the prebuilt WILL work , just NO display like Imagemagick has ----------------------------- ----------------- after renaming the *.raw.cub to *.raw open the new lbl file in a text editor ( gedit or kate) "c1113006.cal1.raw.lbl" at the beginning is this QUOTE Group = Dimensions Samples = 800 Lines = 800 Bands = 1 End_Group Group = Pixels Type = Real ByteOrder = Lsb Base = 0.0 Multiplier = 1.0 End_Group End_Object so it is a "real" -- 32 bit float image that is 800x800 px convert the raw to a tiff using Gmic CODE gmic c1113006.cal1.raw,800,800 -o c1113006.cal1.F.tiff tiff's can be many formats for a floating point i add a "F" to the name screenshot of "c1113006.cal1.F.tiff" in gimp2.9.3 DEV 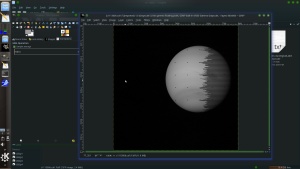 now we have the 32 bit image in gimp the next thing to do is remove the horizontal lines of missing data the NULL values were set to "0" using "stretch" a bit back so the lines have a value of 0 filters / G'Mic then in the dialog open "repair" and click on the "inpaint ( morphological ) and change the red masking color to black "0" and click "ok" 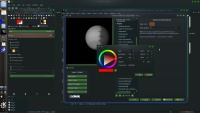 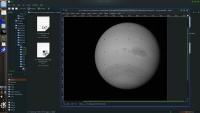 and the lines are gone onto the "reseaus marks" use the heal tool" crossed "band-aids" and set the brush Opacity (transparency) to 15 % and use the hardness 25% brush and a 16 pixel brush  and save |
|
|
|
|
Jun 6 2016, 12:25 AM
Post
#3
|
|
|
Member Group: Members Posts: 890 Joined: 18-November 08 Member No.: 4489 |
now all this can also be done using the tools in isis3
-- just my preference i like gmic and gimp better on the cal that was NOT streched to remove null px run "findrx" to locate the reseaus marks https://isis.astrogeology.usgs.gov/Applicat...drx/findrx.html -- corrects the listing in the header then run " remrx " to remove then https://isis.astrogeology.usgs.gov/Applicat...emrx/remrx.html set it to fill then with NULL and a box size of about 5x5 or 7x7 then fill in NULL pixels using a lowpass -- WARNING javascript and needs to run a app in the sandbox https://isis.astrogeology.usgs.gov/IsisWork...-in_NULL_pixels from the level 1 workshop https://isis.astrogeology.usgs.gov/IsisWork....php/Level1_ISS run "lowpass" https://isis.astrogeology.usgs.gov/Applicat...ss/lowpass.html and there is a single check box that needs setting "filter pixels outside low and high " CODE lowpass filter=outside and the boxcar size of about 11x11 or 13x13 -- side by side 8 bit copies using gimp and using isis tools 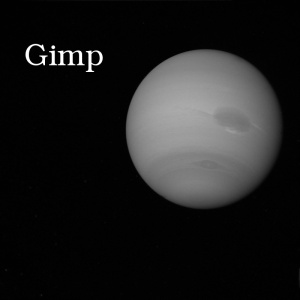 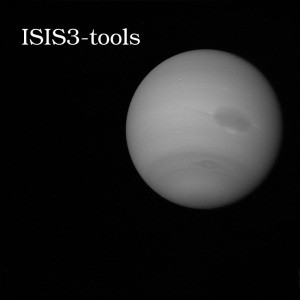 gimp on the left isis3 tools on the right 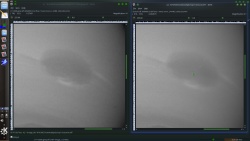 the image on the right has some visible horizontal artifacts from the lowpass gmic's fill looks more natural next remapping and sub pixel registration a solid surface WORKS better than CLOUDS |
|
|
|
|
Jun 6 2016, 06:17 PM
Post
#4
|
|
|
Junior Member Group: Members Posts: 45 Joined: 27-August 14 From: Private island on Titan Member No.: 7250 |
Having great success with the Isis directions... keep it up! Weird to finally be able to do this. As you said, the Isis lowpass filter is sort of not perfect, but converting the images to .png and adding a deinterlace filter fixed it, at the cost of some slight blurriness (which I honestly doubt I would notice unless I was told it was added).
-------------------- aka the Vidiconvict
|
|
|
|
|
Jun 6 2016, 11:44 PM
Post
#5
|
|
|
Member Group: Members Posts: 890 Joined: 18-November 08 Member No.: 4489 |
on to aligning and remapping and registering
i said i was going to get back to this we have two options that are easy the image is open in gimp ( or still in a cub file) this bit is trial and error so expect a few tries with moving it one or two pixels isis3 has "translate" ( not language ) but move the image X number of samples or X number of lines https://isis.astrogeology.usgs.gov/Applicat.../translate.html measure the above 006 image in qview there is a measuring tool it is aprox -136 samples and +40 lines off from the grid 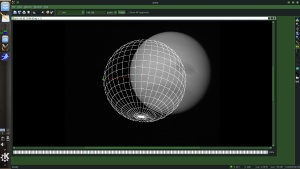 run translate then rerun on a test the grid program  -- you do not want the grid in the image -- this is just to see if it is close for gimp 2.9.3 you can run the grid program with the grid set to a value of 1 and background to 0 -- grid only -- no planet CODE grid from=c1113006.cal.cub to=grid.cub linevalue=dn dnvalue=1 bkgndvalue=dn bkgnddnvalue=0 then convert it to a tiff CODE gdal_translate grid.cub grid.tiff open the grid and the image copy/past the image into gimp select the pasted layer as a new layer and set to lighten only 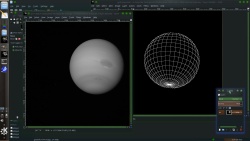 drag and drop the top layer until it is lined up then delete the grid layer and flatten the image 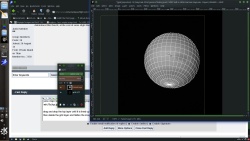 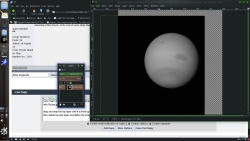 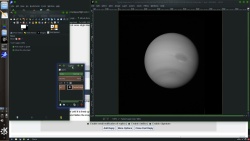 and do this for all the image now hopefully ( cross your fingers ) these are going to be "close " a simple test to see just HOW far off they are in to remap( if needed) and join into a "TEST" image -- DO NOT expect this to look great -- for Gimp 2.9.3 time to ingest back into isis3 convert the last tiff to a raw image CODE gmic c1113006.F2.tiff -o c1113006.F2.raw edit the lbl file to point to this NEW raw image and rerun "cubeatt " CODE cubeatt from=c1113006.raw.lbl to=c1113006.lev1.cub 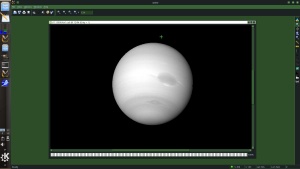 isis3 has a tool to blend cubes into multi layer cubes "cubeit" https://isis.astrogeology.usgs.gov/Applicat...eit/cubeit.html needs a list CODE ls *.cub > list.lis this is a orange ,green,blue blend with just the very BASIC of alignment ( and a TEST) open in qview and select rgb and layer 1 ,2,3 and max the stretch 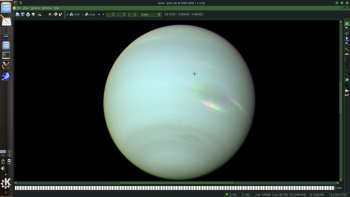 not too bad, there is some rotational offsets 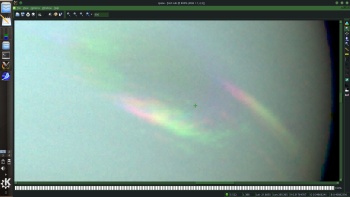 that need fixing this is where re-projecting and remapping comes in cam2map ,map2map ,and map2cam and the use of control networks Clouds do not work to well with the auto tools https://isis.astrogeology.usgs.gov/Applicat...ontrol_Networks ( i am NOT going to get into "Radiometric_and_Photometric_Correction" yet ) https://isis.astrogeology.usgs.gov/Applicat...tric_Correction |
|
|
|
|
Jun 7 2016, 03:33 AM
Post
#6
|
|
|
Member Group: Members Posts: 890 Joined: 18-November 08 Member No.: 4489 |
i like to run tests before creating a control net ( they are time consuming )
and for small images like this might not be needed as long as the "rotational" data in spice is not off and gas giants are a pain in the rear end for sub-pixel registering so 3 images a orange( not converter to a red yet) green and blue camera image format these need to become Simple Cylindrical for this take a look in $ISIS3DATA/data/base/templates/maps/ copy and edit "simplecylindrical.map" this is the one i am using CODE Group = Mapping TargetName = Neptune ProjectionName = SimpleCylindrical EquatorialRadius = 24764000.0 <meters> PolarRadius = 24341000.0 <meters> LatitudeType = Planetocentric LongitudeDirection = PositiveEast LongitudeDomain = 180 Scale = 5 <pixels/degree> MinimumLatitude = -90.0 MaximumLatitude = 90.0 MinimumLongitude = -180.0 MaximumLongitude = 180.0 CenterLongitude = 0.0 End_Group save it ( i rename it to simplecylindrical1.map ) in the folder with the 3 images run "cam2map" and check "match map" https://isis.astrogeology.usgs.gov/Applicat...ap/cam2map.html CODE cam2map from=c1113017.cub map=simplecylindrical1.map to=c1113017.map.cub matchmap=yes then run "cubit" on all 3 new maped files orange first then green then blue in the file list 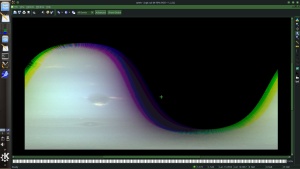 from examining the 3 images the Orange is in the middle with green and blue on the left and right lines up fairly well on to "map2cam" https://isis.astrogeology.usgs.gov/Applicat...am/map2cam.html ( you could also use "cam2cam and skip the simple cylindrical map ) CODE map2cam from=ogb.cub match=c1113017.cub to=OGB.cam.cub using the ORANGE image as the match image side by side  on the left is the new remapped image and on the right is the post above test image still needs some work BUT the color separation on the edges ARE A FACT OF LIFE unless you use many images and make a full planet map but some work can be done to lessen the color changes on the edges and make a RED layer ( instead of a orange ) |
|
|
|
|
Jun 7 2016, 11:12 PM
Post
#7
|
|
 IMG to PNG GOD Group: Moderator Posts: 2254 Joined: 19-February 04 From: Near fire and ice Member No.: 38 |
Big thanks for posting this, lots of very useful information here.
Have you experimented with the calibrated Voyager images (available from the PDS rings node) in ISIS3? If I understand correctly you are using the original (not calibrated) 800x800 pixel images in the examples above. The calibrated files are 1000x1000 pixels and the FOV is also slightly different, however the Voyager kernels that can be downloaded from the USGS ISIS website seem to assume that the FOV is as in the non-calibrated files. |
|
|
|
|
Jun 8 2016, 01:35 AM
Post
#8
|
|
|
Member Group: Members Posts: 890 Joined: 18-November 08 Member No.: 4489 |
I have basically stuck with the edr's with voyager
this data predates isis and parts of vicar -- vicar is now on Github https://github.com/nasa/VICAR but this got me thinking and have a look CODE http://pds-imaging.jpl.nasa.gov/data/voyager/vg_0026/saturn/c3353xxx/c3353709.imq opus -- ring node http://pds-rings-tools.seti.org/opus/#/planet=Saturn&typeid=Image&missionid=Voyager×ec1=1980-09-27T02:16×ec2=1980-09-28T02:17&qtype-volumeid=contains&view=detail&browse=gallery&colls_browse=gallery&page=1&gallery_data_viewer=true&limit=100&order=time1&cols=ringobsid,planet,target,phase1,phase2,time1,time2&widgets=timesec1&widgets2=&detail=S_IMG_VG1_ISS_3353709_N http://pds-rings.seti.org/volumes/VGISS_6xxx/VGISS_6105/DATA/C33537XX/C3353709_CALIB.IMG http://pds-rings.seti.org/volumes/VGISS_6xxx/VGISS_6105/DATA/C33537XX/C3353709_CALIB.LBL the calib is 800x800 BUT the C3353709_GEOMED.IMG is 1000x1000 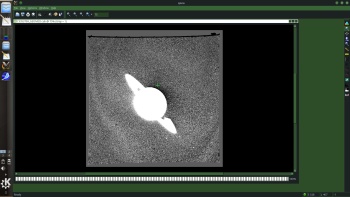 this is adding a lens warp to unbend the edges and corners as you can see on this close up of Neptune c1133403.cub 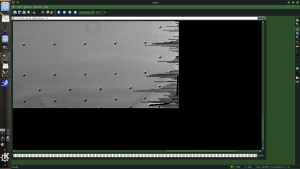  you can see the frame edge mark for alignment in the bottom right corner unfortunately the img's in the ring node error with CODE "No value or default value to translate for translation group [MissionName] in file [/mnt/USB.Drive/USB.P2/ISIS3/data/base/translations/MissionName- 2DataDir.trn]" i will have to manually edit and enter data into the labels missing the mission name so i can not run spiceinit However the edr imq files on the ring node are the same as the ones on the imaging node http://pds-rings.seti.org/volumes/VG_0xxx/...ATURN/C3353XXX/ from the imq in the imaging node i can run spiceinit on it and georeferance it and remap  some fairly cool things can be done once images are Geo-referanced this i did a bit back Saturn's northpole ( Clear filter only ) 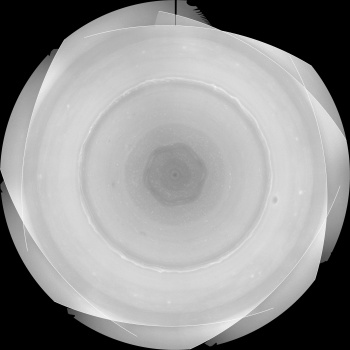 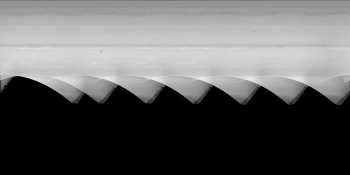 see the hexagon ! |
|
|
|
|
Sep 3 2016, 09:09 AM
Post
#9
|
|
 Junior Member Group: Members Posts: 54 Joined: 7-July 16 From: Austin, Texas Member No.: 7991 |
Thanks for the instructions. I decided to bite the bullet and try ISIS - I've got my virtual machine all set up, everything is installed, but I'm running into the same problem - the IMG LBL file missing the MissionName.
CODE # ingest the pds file (combines LBL and IMG files into a cube file) $ pds2isis from=C1625003_CALIB.LBL to=foo.cub # view it - works $ qview foo.cub # append SPICE data to cube file $ spiceinit from=foo.cub **PROGRAMMER ERROR** No value or default value to translate for translation group [MissionName] in file [/home/bburns/Isis/isis/../data/base/translations/MissionName2DataDir.trn]. # check the embedded label - missing the MissionName $ catlab from=foo.cub Object = IsisCube Group = Archive DataSetId = VG1/VG2-J-ISS-2/3/4/6-PROCESSED-V1.0 ProductId = C1625003_CALIB.IMG InstrumentHostName = "VOYAGER 1" InstrumentHostId = VG1 InstrumentName = "IMAGING SCIENCE SUBSYSTEM - NARROW ANGLE" InstrumentId = ISSN TargetName = JUPITER MissionPhaseName = "JUPITER ENCOUNTER" End_Group End_Object End There's a Voyager-specific routine though - voy2isis Import PDS formatted Voyager EDR into Isis format cube This program will take in raw image files from the Voyager spacecraft mission and import them into Isis formatted cubes. The input files are compressed Planetary Data System (PDS) formatted Voyager Experiment Data Record (EDR) files. The output cube will contain tranlated labels in pvl format with instrument, archive, bandbin, kernel, and nominal reseau information. But it doesn't work with IMG files? CODE $ voy2isis from=C1625003_CALIB.LBL to=foo.cub **USER ERROR** Input file [C1625003_CALIB.LBL] does not appear to be a Voyager EDR. $ voy2isis from=C1625003_CALIB.IMG to=foo.cub **USER ERROR** Unable to set PDS file. Decompressed input file [C1625003_CALIB.IMG] does not appear to be a PDS product. So the IMQ files are the older versions and work with ISIS, while the IMG/LBL files are newer, but they don't work with ISIS? I tried adding MISSION_NAME = "VOYAGER 1" into the LBL file but pds2isis didn't pick it up. So I tried adding it to the .cub file, but got the same error with spiceinit. So is there any way to edit the LBL or cube file to get spiceinit to work with the IMG files? I've got a pipeline set up to use the PDS archives so would prefer to use the IMG files if possible. |
|
|
|
|
Sep 3 2016, 07:53 PM
Post
#10
|
|
|
Member Group: Members Posts: 890 Joined: 18-November 08 Member No.: 4489 |
this will take some time
first "voy2isis" takes as input the Gz ( Gnu zip) IMQ file and not the IMG you would need to use pds2isis or vicar2isis and manually ad the header data using editlab or similar tools or use vicar ( it is on github ) nasa released the source https://github.com/nasa/VICAR -- i have NOT used this on voyager img/lbl's give me a few days to see what i can do --- from just this afternoon and early evening there will be NO!!! "quick fix" so you will need to manually copy out the header in the img and save it then edit that header to convert it from the pds2 sudf format to the pds3 format then use pds2isis then MANUALLY add sections to the cub label using editlab and all before you can run "spiceinit" it is WAY EASIER to use the imq compressed pds images using "voy2isis" than the uncompressed img files and "pds2isis" |
|
|
|
|
Sep 3 2016, 11:28 PM
Post
#11
|
||
|
Junior Member Group: Members Posts: 54 Joined: 7-July 16 From: Austin, Texas Member No.: 7991 |
(I just missed your edit - looks like we came to the same conclusion!)
Thank you - I started looking at some of the source code though and it looks like voy2isis does a lot of things to the resulting cube file, so I should probably use that, which means I should use the IMQ files. It looks like they have the LBL information embedded in them - it's too bad the IMG/LBL files aren't handled - I guess people don't use Voyager images with ISIS very much? Anyway, it's something I could file a feature request for, and depending on how long it might take I could possibly switch to using the IMQ files. I downloaded a few IMQ files from here - http://pds-rings.seti.org/vol/VG_0xxx/VG_0...PITER/C1620XXX/ and was able to ingest them and attach the SPICE data and project a grid onto it - very cool, very simple! (aside from the C kernel pointing problems) $ voy2isis from=C1620000.imq to=im.cub $ spiceinit from=im.cub web=yes $ grid from=im.cub to=imgrid.cub $ qview imgrid.cub
So I think I'll file a feature request on the ISIS site - and in the meantime I'll see if I can make some mosaicks / maps with the IMQ files. 
|
|
|
|
|
|
|
Sep 4 2016, 04:18 PM
Post
#12
|
||
|
Junior Member Group: Members Posts: 54 Joined: 7-July 16 From: Austin, Texas Member No.: 7991 |
So here are some steps to make a mosaic map (might be better ways to do this) -
First download some IMQ files, e.g. from http://pds-rings.seti.org/vol/VG_0xxx/VG_0...PITER/C1620XXX/ # convert the IMQ files into ISIS image cubes $ voy2isis from=C1620000.imq to=im00.cub $ voy2isis from=C1620004.imq to=im04.cub $ voy2isis from=C1620008.imq to=im08.cub $ voy2isis from=C1620012.imq to=im12.cub $ voy2isis from=C1620016.imq to=im16.cub $ voy2isis from=C1620020.imq to=im20.cub # attach SPICE position and pointing information to each cube, from the web $ spiceinit from=im00.cub web=yes $ spiceinit from=im04.cub web=yes $ spiceinit from=im08.cub web=yes $ spiceinit from=im12.cub web=yes $ spiceinit from=im16.cub web=yes $ spiceinit from=im20.cub web=yes # initialize a mapping file $ maptemplate map=map.txt projection=SimpleCylindrical clon=0.0 # project the first image cube to a simple cylindrical map, and save the updated mapping file $ cam2map from=im00.cub to=map00.cub map=map.txt > map.txt # project remaining image cubes to simple cylindrical maps using the same parameters $ cam2map from=im04.cub to=map04.cub map=map.txt pixres=map $ cam2map from=im08.cub to=map08.cub map=map.txt pixres=map $ cam2map from=im12.cub to=map12.cub map=map.txt pixres=map $ cam2map from=im16.cub to=map16.cub map=map.txt pixres=map $ cam2map from=im20.cub to=map20.cub map=map.txt pixres=map # now combine all the maps into a single mosaic map $ ls -1 map??.cub > map.lis $ automos fromlist=map.lis mosaic=mos.cub # view the mosaic $ qview mos.cub # convert it to a jpeg (3.5MB) $ isis2std from=mos.cub to=mos.jpg format=jpeg
There are better ways to combine the maps so the seams don't show so much, using averaging, or the program noseam, but I haven't tried those yet. And there are pointing errors, of course... There's a program jigsaw, which seems like it might help with correcting pointing information, given correspondences between images (which can be calculated using findfeatures)- findfeatures applies feature-based matching (FBM) algorihms using the full suite of OpenCV feature matching frameworks. The points detected by these algorithms are associated with special surface features identified by the type of detector algorithm designed to identify certain charcteristics. https://isis.astrogeology.usgs.gov/Applicat...ndfeatures.html jigsaw performs a bundle adjustment on a group of overlapping Isis 3, level 1, cubes from framing and/or line-scan cameras. The adjustment simultaneously refines the selected image geometry information (camera pointing, spacecraft position) and control point coordinates (x,y,z or lat,lon,radius) to reduce boundary mismatches in mosaics of the images. https://isis.astrogeology.usgs.gov/Applicat...saw/jigsaw.html Will eventually try these out also. One problem is that cam2map is very slow - it takes about a minute on my laptop to do a simple cylindrical projection, though I'm using a virtual machine so I'm not sure how much of that is overhead. Hopefully there will be a way to speed this up. |
|
|
|
|
|
|
Sep 6 2016, 11:12 PM
Post
#13
|
||
|
Junior Member Group: Members Posts: 54 Joined: 7-July 16 From: Austin, Texas Member No.: 7991 |
I filed a feature request with ISIS to handle the Voyager IMG/LBL files - it looks like the labels in the IMQ files are fairly different from the LBL files though, so it might be a pretty involved change. It seems that no one has been using those with ISIS, as they came out in 2012 and I can't find any mention of the problem anywhere. https://isis.astrogeology.usgs.gov/fixit/issues/4345
So I'll need to switch over to using the IMQ archives (I guess you call those the EDR archives, and the newer ones the PDS archives?), which mainly differ in the way their directories are organized. Here's the program qmos with some images map-projected - it lets you visualize where the images end up.
And once you have a good map you can project it back into camera space to basically take a picture of it, or pull back missing channel info to colorize an image. qmos can also show control points that are supposed to align the images together - I'm still trying to figure that part out. On a side note, working with ISIS in a Linux VM is actually pretty nice - just takes a little work to get the VM set up. It's basically like running any other program in Windows - you can Alt-Tab out of it, use the clipboard, use the files on your Windows drive, etc. I've been using Xubuntu 16.04 in VirtualBox - they only officially support Ubuntu 12.04, but so far I've been able to find the libraries to get it to work okay - there's some info here - https://isis.astrogeology.usgs.gov/fixit/issues/4330. If you want to try it, just make sure to get a 64-bit Linux and set your BIOS to allow virtualization, as ISIS is 64-bit. |
|
|
|
|
|
|
Sep 3 2017, 05:37 PM
Post
#14
|
|
|
Junior Member Group: Members Posts: 45 Joined: 27-August 14 From: Private island on Titan Member No.: 7250 |
Just in time for the 40th anniversary festivities, I quickly made some really important strides in image processing in the past week that'll help me pull off a lot of ideas that have been in my head for a long time.
Firstly, I finally figured out how to batch convert pds images to image cubes, and then batch convert the cubes to png using ISIS3 (I've never been able to try IMG2PNG since I don't have a PC or a virtual machine or anything like that), using a version of some code JohnVV sent me a long time ago that I modified for my own purposes. I used to convert pds images in ISIS to cubes one at a time, then each of those cubes one at a time to fits, and then each of those fits one at a time to .pngs with my own customized contrast selections using QFitsView. Then I would stabilize each image by hand in Final Cut Pro. This unbearably long process wasn't that bad if I just wanted to work on a few images, but I'm a video guy, so every project I really wanted to do was too daunting to pull off and then I would lose interest for a while. When you jump into an area like this with little or no context it can be very difficult and confusing to follow at first, especially when you don't come from a coding background, but with the help of people on this board, I feel much more comfortable and understand how to do the specific stuff I want to accomplish. Thank you all so much. So my png conversion is now fully automatized, but what about the image stabilization? For a while I've known that the motion tracker on Fusion 8 - a video processing application I use a lot - is incredibly smart. But shortly before I learned how to batch convert images in ISIS, I applied Fusion's motion tracker to Voyager images and it works extremely well. Yet another back breaking activity I no longer have to do myself. Additionally I found a motion interpolation plugin for Final Cut Pro that works absolute wonders. This should work really well for creating fringeless color videos. The tests I've done combining these three techniques I'm now using are truly thrilling, and I'll be posting some results in threads for the relevant planets/encounters. Here is my customized code for converting an entire folder of images to cubes and then pngs. For this example code I would have chosen a manual stretch that works with the calibrated calib and geomed level images, since I find those versions of the images most helpful as pngs for my purposes, but I have yet to find one manual stretch that works well on all calibrated images so I can get at least Voyager-accurate color. A stretch that looks excellent on some images causes others to either appear far too dim or have clipped whites. So, for the sake of including a reliable stretch at all, I included a stretch with 255 positive values, which represents the tones of the 8-bit raw images. CODE #!/bin/sh ls *.LBL | sed s/.LBL// > cube.lis pds2isis from=\$1.LBL to=\$1.cub -batchlist=cube.lis ls *.cub | sed s/.cub// > cube2.lis isis2std from=\$1.cub to=\$1.png mode=grayscale format=png quality=100 stretch=manual minimum=0 maximum=255 -batchlist=cube2.lis Voila! 
-------------------- aka the Vidiconvict
|
|
|
|
|
Sep 3 2017, 06:40 PM
Post
#15
|
|
|
Member Group: Members Posts: 890 Joined: 18-November 08 Member No.: 4489 |
for bulk processing isis3 has a built in set of basic tools, as in using a list
or for more complex things you can use the bash shell and the full set of terminal tools and codding - including loops and if's the main issues i have had is with the reseau( or however one spells that) points ( rmrex) you also might want to run "voycal" on them -- also Voy2( i think it is 2 , need to double check on that ) data has a bit of extra noise and there is a tool for those images voy2isis for the IMQ data voycal for all of it voyramp for the needed voy2 data |
|
|
|
|

|
Lo-Fi Version | Time is now: 20th September 2024 - 03:21 AM |
|
RULES AND GUIDELINES Please read the Forum Rules and Guidelines before posting. IMAGE COPYRIGHT |
OPINIONS AND MODERATION Opinions expressed on UnmannedSpaceflight.com are those of the individual posters and do not necessarily reflect the opinions of UnmannedSpaceflight.com or The Planetary Society. The all-volunteer UnmannedSpaceflight.com moderation team is wholly independent of The Planetary Society. The Planetary Society has no influence over decisions made by the UnmannedSpaceflight.com moderators. |
SUPPORT THE FORUM Unmannedspaceflight.com is funded by the Planetary Society. Please consider supporting our work and many other projects by donating to the Society or becoming a member. |
|