Cape York - Shoemaker Ridge and the NE traverse, Starting sol 2735 |

  |
Cape York - Shoemaker Ridge and the NE traverse, Starting sol 2735 |
 Oct 27 2011, 03:57 PM Oct 27 2011, 03:57 PM
Post
#256
|
|
 Member  Group: Members Posts: 593 Joined: 20-April 05 Member No.: 279 |
Hi Steve,
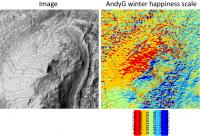
My post #250 would produce one number for each pixel - the "angle from rover-normal to the noon midwinter sun" - and this number (the potential insolation) takes into account the slope and the aspect. What are the limitations on drivability? Not aspect, so much - we know north is best, but that's subsumed in the insolation. The slope, however, is an issue relating to the stability limits of Opportunity. The steepest slopes are best avoided. So maybe a more visually useful presentation would be to combine potential insolation with slope. Say a range of white-green-yellow-red for insolation, and simply black out any slopes over X degrees. Andy |
 |
 
|
|
Oct 27 2011, 05:29 PM
Post
#257
|
|
|
Senior Member Group: Members Posts: 3516 Joined: 4-November 05 From: North Wales Member No.: 542 |
How about just mapping the northward component of the slope vector? Not as sophisticated as your solution Andy, but maybe easier to do and simpler to understand when done.
Great anaglyph pan mhoward. Eyeball to eyeball with the summit! |
|
|
|
|
Oct 27 2011, 07:07 PM
Post
#258
|
|
 Senior Member Group: Members Posts: 4246 Joined: 17-January 05 Member No.: 152 |
Thanks a lot for those maps, Pete. I agree a simple estimate of the northward component of slope is all we really need. There's got to be enough uncertainty in the DEM that too much effort is pointless. This is basically what the team has done before, like this plot around home plate.
The slopes on CY don't look too bad - apart from very small features, the only areas that might be a problem for driving are the east sides of the big "knobs" on the north part of CY, and those are sloping east, so we'll probably ignore them anyway. |
|
|
|
|
Oct 27 2011, 08:32 PM
Post
#259
|
||
 Senior Member Group: Moderator Posts: 3431 Joined: 11-August 04 From: USA Member No.: 98 |
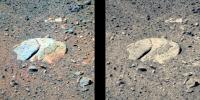
Here's a my3D stereo pair for "New Consort". Only so much can be done with L257R2 (as far as I know), but it actually more or less works for me.
Attached thumbnail(s)
|
|
|
|
|
|
|
Oct 27 2011, 08:45 PM
Post
#260
|
|
 Chief Assistant Group: Admin Posts: 1409 Joined: 5-January 05 From: Ierapetra, Greece Member No.: 136 |
I remember registering the color info only from the left channel per Photoshop > copy left image > paste onto right image > left 'top' layer 'layer blend mode' screen > register with select and skew / distort / warp / etc ... > 'layer blend mode' to color
 I'll try uploading something somewhere.. I'll try uploading something somewhere..
-------------------- photographer, space imagery enthusiast, proud father and partner, and geek.
http://500px.com/sacred-photons & |
|
|
|
|
Oct 27 2011, 08:50 PM
Post
#261
|
|
|
Senior Member Group: Members Posts: 4246 Joined: 17-January 05 Member No.: 152 |
QUOTE (walfy @ Oct 27 2011, 05:48 AM)  Unfortunately, this method for 3D viewing without equipment is limited to narrow slices of images in the vertical. You can use the stereophoto maker software I linked to to view stereo pairs as wide as you like, either crosseyed or parallel, and without shrinking the images. Click "100" to view at 100% scale, then narrow the window until your eyes can fuse the images. Then you can just drag the images to scroll across.
|
|
|
|
|
Oct 27 2011, 09:18 PM
Post
#262
|
||
|
Chief Assistant Group: Admin Posts: 1409 Joined: 5-January 05 From: Ierapetra, Greece Member No.: 136 |
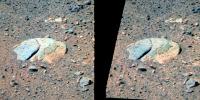
stereo-rightframecolor-stolen-from-leftframe..
Attached thumbnail(s)
-------------------- photographer, space imagery enthusiast, proud father and partner, and geek.
http://500px.com/sacred-photons & |
|
|
|
|
|
|
Oct 27 2011, 11:08 PM
Post
#263
|
|
|
Senior Member Group: Moderator Posts: 3431 Joined: 11-August 04 From: USA Member No.: 98 |
QUOTE (Nix @ Oct 27 2011, 03:18 PM) stereo-rightframecolor-stolen-from-leftframe.. (small size) Nice color matching! So small it's blurry in my3D though. |
|
|
|
|
Oct 27 2011, 11:21 PM
Post
#264
|
|
 Senior Member Group: Admin Posts: 4763 Joined: 15-March 05 From: Glendale, AZ Member No.: 197 |
QUOTE (SteveM @ Oct 27 2011, 08:06 AM) Can anyone suggest an easy way to do that? Use the "replace color" feature in Photoshop. Start with the lowest setting, and then replace the next color with that same color, but turn up the saturation a bit, and continue up through the scale. -------------------- If Occam had heard my theory, things would be very different now.
|
|
|
|
|
Oct 27 2011, 11:37 PM
Post
#265
|
|
|
Chief Assistant Group: Admin Posts: 1409 Joined: 5-January 05 From: Ierapetra, Greece Member No.: 136 |
QUOTE (mhoward @ Oct 28 2011, 01:08 AM) Nice color matching! So small it's blurry in my3D though. fixed:) -------------------- photographer, space imagery enthusiast, proud father and partner, and geek.
http://500px.com/sacred-photons & |
|
|
|
|
Oct 28 2011, 12:20 AM
Post
#266
|
||
|
Solar System Cartographer Group: Members Posts: 10153 Joined: 5-April 05 From: Canada Member No.: 227 |
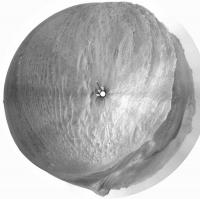
mhoward's latest pan in circular format...
Phil
-------------------- ... because the Solar System ain't gonna map itself.
Also to be found posting similar content on https://mastodon.social/@PhilStooke Maps for download (free PD: https://upload.wikimedia.org/wikipedia/comm...Cartography.pdf NOTE: everything created by me which I post on UMSF is considered to be in the public domain (NOT CC, public domain) |
|
|
|
|
|
|
Oct 28 2011, 01:41 AM
Post
#267
|
|
|
Senior Member Group: Members Posts: 2998 Joined: 30-October 04 Member No.: 105 |
Very good, Phil-- I was hoping you would post one of your Polar Pans of this latest Navcam Pan.
Oppy is still moving along just to the west of the ridgetop and should be within sight of "winterhaven" within the next driving Sol or two. That site ought to look much like the areas we've seen to the east (our right) the past few days-- light/reddish-toned with plenty of neat rocks and outcrops. --Bill -------------------- |
|
|
|
|
Oct 28 2011, 04:34 AM
Post
#268
|
|||
|
Junior Member Group: Members Posts: 59 Joined: 18-July 07 From: London, UK Member No.: 2873 |
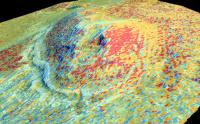
Hmm, does this help? I think I've managed to whip Arc into shape enough to do AndyG's suggestion of combining slope and aspect. The perspective view is x3 vertical exaggeration.
I think it's probably showing us what we kind of know already, and probably pushing the helpfulness of the data, but nice nonetheless. Pete |
||
|
|
|
||
|
Oct 28 2011, 04:43 AM
Post
#269
|
|
 Senior Member Group: Members Posts: 2228 Joined: 1-December 04 From: Marble Falls, Texas, USA Member No.: 116 |
QUOTE (fredk @ Oct 27 2011, 02:07 PM) ... I agree a simple estimate of the northward component of slope is all we really need. I've really enjoyed this discussion about ways to map the important data for Oppy's next winter haven choice. I wonder about this, though. Is a simple estimate of the northward component of the slope all we need? What if the northward component is just right in a Goldilocks sense, but the eastward or westward slope component exceeds the stability specification for the rover?-------------------- ...Tom
I'm not a Space Fan, I'm a Space Exploration Enthusiast. |
|
|
|
|
Oct 28 2011, 06:07 AM
Post
#270
|
|
|
Member Group: Members Posts: 293 Joined: 22-September 08 From: Spain Member No.: 4350 |
@SteveM: On GIMP, create a gradient with whatever color steps you want, then apply Colors | Gradient Map. On Photoshop it will be Layer | New Adjustment layer | Gradient Map, I think.
For just color coding, it's better to make a color map layer with full colors, then set blend mode to Color and adjust Alpha to get the desired amount of saturation. That way you don't need to fiddle with your base gradient. |
|
|
|
|

|
Lo-Fi Version | Time is now: 29th April 2024 - 01:42 AM |
|
RULES AND GUIDELINES Please read the Forum Rules and Guidelines before posting. IMAGE COPYRIGHT |
OPINIONS AND MODERATION Opinions expressed on UnmannedSpaceflight.com are those of the individual posters and do not necessarily reflect the opinions of UnmannedSpaceflight.com or The Planetary Society. The all-volunteer UnmannedSpaceflight.com moderation team is wholly independent of The Planetary Society. The Planetary Society has no influence over decisions made by the UnmannedSpaceflight.com moderators. |
SUPPORT THE FORUM Unmannedspaceflight.com is funded by the Planetary Society. Please consider supporting our work and many other projects by donating to the Society or becoming a member. |
|