Printable Version of Topic
Click here to view this topic in its original format
Unmanned Spaceflight.com _ Perseverance- Mars 2020 Rover _ Perseverance Imagery
Posted by: Greenish Feb 22 2021, 02:26 AM
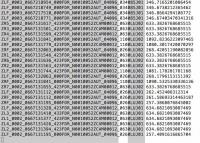
Putting this here, for reference as the payload of the JSON feed link for Perseverence raws (http://www.unmannedspaceflight.com/index.php?showtopic=8591&view=findpost&p=250010)
https://mars.nasa.gov/rss/api/?feed=raw_images&category=mars2020&feedtype=json&num=50&page=0&order=sol+desc&&&extended=
Looks like there's a ton of good data in addition to just the (PNG! Bayer color separated!) images 
This is for the first image shown on the page at the moment.
[
{
"extended":
{
"mastAz":"UNK",
"mastEl":"UNK",
"sclk":"667129493.453",
"scaleFactor":"4",
"xyz":"(0.0,0.0,0.0)",
"subframeRect":"(1,1,1280,960)",
"dimension":"(1280,960)"
},
"sol":2,
"attitude":"(0.415617,-0.00408664,-0.00947025,0.909481)",
"image_files":
{
"medium":"https://mars.nasa.gov/mars2020-raw-images/pub/ods/surface/sol/00002/ids/edr/browse/rcam/RRB_0002_0667129492_604ECM_N0010052AUT_04096_00_2I3J01_800.jpg",
"small":"https://mars.nasa.gov/mars2020-raw-images/pub/ods/surface/sol/00002/ids/edr/browse/rcam/RRB_0002_0667129492_604ECM_N0010052AUT_04096_00_2I3J01_320.jpg",
"full_res":"https://mars.nasa.gov/mars2020-raw-images/pub/ods/surface/sol/00002/ids/edr/browse/rcam/RRB_0002_0667129492_604ECM_N0010052AUT_04096_00_2I3J01.png",
"large":"https://mars.nasa.gov/mars2020-raw-images/pub/ods/surface/sol/00002/ids/edr/browse/rcam/RRB_0002_0667129492_604ECM_N0010052AUT_04096_00_2I3J01_1200.jpg"
},
"imageid":"RRB_0002_0667129492_604ECM_N0010052AUT_04096_00_2I3J01",
"camera":
{
"filter_name":"UNK",
"camera_vector":"(-0.7838279435884001,0.600143487448691,0.15950407306054173)",
"camera_model_component_list":"2.0;0.0;(46.176,2.97867,720.521);(-0.701049,0.00940617,0.713051);(8.39e-06,0.0168764,-0.00743155);(-0.00878744,-0.00869157,-0.00676256);(-1.05782,-0.466472,-0.724517);(-0.702572,0.0113481,0.711523);(-448.981,-528.002,453.359)",
"camera_position":"(-1.05782,-0.466472,-0.724517)",
"instrument":"REAR_HAZCAM_RIGHT",
"camera_model_type":"CAHVORE"
},
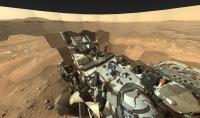
"caption":"NASA's Mars Perseverance rover acquired this image of the area in back of it using its onboard Rear Right Hazard Avoidance Camera. \n\n This image was acquired on Feb. 21, 2021 (Sol 2) at the local mean solar time of 15:37:11.",
"sample_type":"Full",
"date_taken_mars":"Sol-00002M15:37:11.985",
"credit":"NASA/JPL-Caltech",
"date_taken_utc":"2021-02-21T02:16:26Z",
"json_link":"https://mars.nasa.gov/rss/api/?feed=raw_images&category=mars2020&feedtype=json&id=RRB_0002_0667129492_604ECM_N0010052AUT_04096_00_2I3J01",
"link":"https://mars.nasa.gov/mars2020/multimedia/raw-images/?id=RRB_0002_0667129492_604ECM_N0010052AUT_04096_00_2I3J01",
"drive":"52",
"title":"Mars Perseverance Sol 2: Rear Right Hazard Avoidance Camera (Hazcam)",
"site":1,
"date_received":"2021-02-21T23:12:58Z"
},
(with syntax color):

|
Here's hoping that one of you skilled characters can make good use...
Posted by: phase4 Feb 23 2021, 12:17 PM
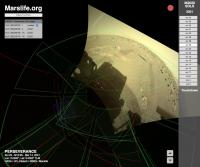
A small Perseverance update for Marslife, implementing the camera pointing data is a bit troublesome.
It suffers from a hit-and-miss accuracy.
|
Posted by: Greenish Feb 23 2021, 02:40 PM
So cool!
Maybe they're still refining which way is up... lots of local coordinate frames to sort out and probably need some time (and the sun shots it looks like they just took, and some 3d processing of the local area, and some radio ranging) to get absolute position & orientation info.
The instrument position details will certainly be different vs MSL. And in my skim of the data it looked to me like they re-jiggered some of the pointing data formats, did you see that too? Not sure which parts you're using.
Posted by: djellison Feb 23 2021, 08:39 PM
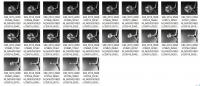
For the less technically minded among us...Ryan Kinnet has put up a page that grabs a listing with links to the PNG files that you can then use any browser-plugin-batch-downloader with
https://twitter.com/rover_18/status/1364309922167488512
I tried Firefox with 'DownloadThemAll' and it worked perfectly.
Meanwhile http://www.unmannedspaceflight.com/index.php?showuser=7220 has python code to also grab the data
https://twitter.com/kevinmgill/status/1364311336000258048
Posted by: ugordan Feb 23 2021, 08:45 PM
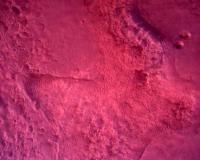
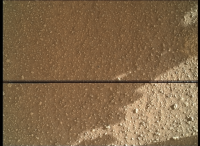
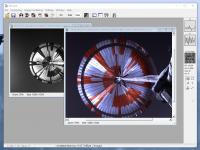
Speaking of raw images, are these weird colorations due to something wrong with the pipeline or the cameras themselves (I'm thinking and hoping it's the former)?
Examples attached, one is a NavCam-L from yesterday (seems to have been pulled since), the other an RDC frame.
|
|
Posted by: mcaplinger Feb 23 2021, 08:56 PM

Yes.
Posted by: ugordan Feb 23 2021, 09:01 PM
That's reassuring to hear. One could sort of expect this from (well, almost) off-the shelf commercial EDL cameras, but the navcams are on a whole other level.
Yep, looks like they started download on the full quality, Bayered RDC camera views.
On a side note, I found it interesting how the color balance between RDC and DDC was so different. Yes, different detector resolutions, but same vendor.
Posted by: phase4 Feb 23 2021, 09:35 PM
Yes, I hope this erronous positioning will improve when the rover is calibrated properly. Otherwise it is my code to blame...
I use the rover attitude, mastAz and mastEl values for camerapointing, I don't know if that has changed much since Curiosity.
Posted by: nprev Feb 24 2021, 01:30 AM
Hey, all. This thread is for the imagewizards among us & will focus on the abundance of data Mars 2020 will provide. Please post your products, methods, and tips, and use this thread to share information & likewise learn from others. 
Posted by: bdshort Feb 24 2021, 05:01 AM
Okay, I hope this is the right forum for this question - one of the things I really like about both rovers having the ability to take stereo imagery is the ability to see stuff in 3D. Is there a utility out there that lets us view images in 3D using a VR headset? I've briefly searched around but haven't seen much. Anaglyphs are cool and everything but it leaves a bit to be desired.
Posted by: Cargo Cult Feb 24 2021, 01:44 PM
Stereo imagery viewed in a VR headset is a bit underwhelming - reconstructing geometry using photogrammetry to create a fully 3D representation of a landscape is much more interesting.
I did this with some Curiosity imagery a few years ago, with fascinating results. If you have a SteamVR capable VR headset, you can have a look here: https://steamcommunity.com/sharedfiles/filedetails/?id=928142301 - I typed up some fairly detailed notes in the description which will broadly apply to Perseverance imagery.
(Full disclosure: I work for Valve, creators of SteamVR. The Mars stuff was a fun personal project which turned into something a bit larger...)
Getting right back on topic for this thread - some notes on photogrammetry involving Perseverance imagery!
Some decent camera parameters* to start with in Agisoft Metashape (formerly PhotoScan):
Navcam
Camera type: Fisheye
Pixel size (mm): 0.0255 x 0.0255 (for 1280x960 images)
Focal length (mm) 19.1
Hazcam
Camera type: Fisheye
Pixel size (mm): 0.0255 x 0.0255 (for 1280x960 images)
Focal length (mm) 14
Using separate calibration profiles for left and right cameras may make sense - stuff worked better for Curiosity's navcams when I did this. (They're beautifully hand-made one-off scientific instruments, after all.) Metashape will further refine camera parameters once given these reasonable starting points.
It's all looking like really exciting data to play around with - navcam imagery in high-resolution, full colour after a bit of processing. I'm starting to figure out debayering stuff - I'm sure that this thread will come in great use!
* derived from The Mars 2020 Engineering Cameras and Microphone on the Perseverance Rover: A Next-Generation Imaging System for Mars Exploration
: Table 2, Perseverance Navcam, Hazcam, and Cachecam characteristics
Posted by: bdshort Feb 24 2021, 04:22 PM
Great! Thanks for the answer. I have an Index, so I'll check that out!
Edit: Just tried it - that's awesome! Gives a great sense of scale to the rover, and I liked all the point of interest spots. I'm surprised there isn't more stuff out there like this, it would be a fantastic educational tool and it's just fun to stand or sit around in for awhile.
I did this with some Curiosity imagery a few years ago, with fascinating results. If you have a SteamVR capable VR headset, you can have a look here: https://steamcommunity.com/sharedfiles/filedetails/?id=928142301 - I typed up some fairly detailed notes in the description which will broadly apply to Perseverance imagery.
(Full disclosure: I work for Valve, creators of SteamVR. The Mars stuff was a fun personal project which turned into something a bit larger...)
Getting right back on topic for this thread - some notes on photogrammetry involving Perseverance imagery!
Some decent camera parameters* to start with in Agisoft Metashape (formerly PhotoScan):
Navcam
Camera type: Fisheye
Pixel size (mm): 0.0255 x 0.0255 (for 1280x960 images)
Focal length (mm) 19.1
Hazcam
Camera type: Fisheye
Pixel size (mm): 0.0255 x 0.0255 (for 1280x960 images)
Focal length (mm) 14
Using separate calibration profiles for left and right cameras may make sense - stuff worked better for Curiosity's navcams when I did this. (They're beautifully hand-made one-off scientific instruments, after all.) Metashape will further refine camera parameters once given these reasonable starting points.
It's all looking like really exciting data to play around with - navcam imagery in high-resolution, full colour after a bit of processing. I'm starting to figure out debayering stuff - I'm sure that this thread will come in great use!
* derived from The Mars 2020 Engineering Cameras and Microphone on the Perseverance Rover: A Next-Generation Imaging System for Mars Exploration
: Table 2, Perseverance Navcam, Hazcam, and Cachecam characteristics
Posted by: scalbers Feb 24 2021, 11:41 PM
Regarding the API "quaternion" coordinate info with the raw images, a LINUX program 'jq' is good for manipulating these. While this is just a starting point it would be interesting to see how an automated program might work with putting together a mosaic. I would just need some time to hook up some of my Fortran code with some scripts.
CargoCult - can your SteamVR creation be viewed somehow with a regular computer? With Curiosity, http://www.unmannedspaceflight.com/index.php?s=&showtopic=7613&view=findpost&p=231304 (YouTube link below) had some really nice videos moving through a 3D landscape that might be interesting to see in VR. Sittingduck back in 2016 had used a Blender Plug-In obtained from phase4.
https://www.youtube.com/watch?v=7zW9yISB01Y&feature=youtu.be
Posted by: fredk Feb 25 2021, 01:13 AM
About image pointing, the algorithm I use for MSL, based on http://www.unmannedspaceflight.com/index.php?showtopic=8460&st=345&p=245610&#entry245610, seems to work fine for Percy, with the "rover_attitude" quaternion field replaced with "attitude". So for the "shiny rock" image:
https://mars.nasa.gov/mars2020-raw-images/pub/ods/surface/sol/00003/ids/fdr/browse/zcam/ZLF_0003_0667217574_000FDR_N0010052AUT_04096_034085J01.png
I get elevation,azimuth = 1.2, 251.5 degrees, which looks about right. That presumably is for the centre of the FOV, which happens to correspond almost exactly with the shiny rock.
Posted by: djellison Feb 25 2021, 02:04 AM
It's not great - but this is my agisoft metashape results with the Navcam images so far
https://sketchfab.com/3d-models/m2020-landing-site-d94365df6b574c74b7215aa7db2fb0c8
Posted by: scalbers Feb 25 2021, 06:28 PM
https://sketchfab.com/3d-models/m2020-landing-site-d94365df6b574c74b7215aa7db2fb0c8
Looks pretty nice given the available vantage points (one rover location). Is there a possibility the "1st Person" navigation mode would work with this model?
Posted by: MarT Feb 25 2021, 08:11 PM
I did this with some Curiosity imagery a few years ago, with fascinating results. If you have a SteamVR capable VR headset, you can have a look here: https://steamcommunity.com/sharedfiles/filedetails/?id=928142301 - I typed up some fairly detailed notes in the description which will broadly apply to Perseverance imagery.
(Full disclosure: I work for Valve, creators of SteamVR. The Mars stuff was a fun personal project which turned into something a bit larger...)
Thats awsome! Great to see you here. I just ran into that two days ago. It is something I always wanted to do, but never fully found the time to work for a longer period of time. I have tried Photogrammetry on InSight, this is the result two years ago: https://www.youtube.com/watch?v=cBYAwTm_ArE&feature=youtu.be
Big thanks for the info here an on steam! It will be surely very helpfull to others too.
To stay on topic: I had a run with a short sequence of the true raw data from the down-look cams: https://www.youtube.com/watch?v=l4WKIoTjE4c&pbjreload=101
I will just wait for all the EDL data to download and will have a run with the data in Agisoft. I tried with the MARDI cam. While it was capable of clearly registering the images, I must have done something wrong, as the last image ended up "under the ground". Anyway the Perseverance data surely look promising in that matter.
I am working on a stabilized 360 video as with the MARDI cam. This is a quick version of the underlaying layer simulating approximately the view from 10km above the surface. I made it from the debayered data. Propably impacted by the FFMPEG compression.
|
Posted by: phase4 Feb 25 2021, 09:00 PM
Thank you for this hint, fredk. I didn't realize the Spice toolkit works just as fine without kernels.
For future use, does anyone know how to obtain the zoom value from the JSON information? Should it be derived from the CAHVOR data?
|
Posted by: mcaplinger Feb 25 2021, 09:56 PM
Should be if the CAHVOR model is set correctly, which they may or may not be at this point. See https://github.com/bvnayak/CAHVOR_camera_model and https://agupubs.onlinelibrary.wiley.com/doi/full/10.1029/2003JE002199
Posted by: John Whitehead Feb 25 2021, 11:03 PM
Do color calibration targets ever fade (change color) from solar (and worse) radiation on Mars?
How are they tested on Earth and proven to not fade?
Posted by: mcaplinger Feb 25 2021, 11:14 PM
How are they tested on Earth and proven to not fade?
https://mastcamz.asu.edu/mars-in-full-color/
Typically, they get dusty before fading would be an issue. Hopefully these magnets work better than the last time.
Posted by: JohnVV Feb 26 2021, 12:56 AM
just came across a paper on the cameras and mic
"The Mars 2020 Engineering Cameras and Microphone on the Perseverance Rover: A Next-Generation Imaging System for Mars Exploration"
https://link.springer.com/article/10.1007/s11214-020-00765-9
Posted by: phase4 Feb 26 2021, 12:32 PM
Thanks for the links. I tried the code but it gave very low values and fluctuating results for the Mastcam-Z focal length.
Will try again when new images arrive.
Posted by: mcaplinger Feb 26 2021, 04:44 PM
Seems like, for the one case I looked at, that the values in the JSON are in the order VORCAH instead of CAHVOR as one would expect. I don't know if this is intentional or a bug. And I'm not sure if these models are actually correct anyway. But you could take a look.
Posted by: djellison Feb 26 2021, 05:30 PM
Jim has put out a Mastcam-Z filename decode guide
https://mastcamz.asu.edu/decoding-the-raw-publicly-released-mastcam-z-image-filenames/
It includes digits in there that describe the focal length in mm as three digits.
All the stereo pan images report 34mm for that - which matches the widest angle of Mastcam-Z MSL Mastcam Left.
Posted by: mcaplinger Feb 26 2021, 05:35 PM
Oh yeah, duh. Well, it was much more interesting to extract it from the camera model

FYI, widest angle of MCZ is 26mm.
Posted by: djellison Feb 26 2021, 05:45 PM
Ahh ok - they miss spoke at yesterdays thing then. This matches MSL Mastcam Left then
Posted by: mcaplinger Feb 26 2021, 06:15 PM
Correct. Original MCZ spec was for 34mm to 100mm but we ended up with some extra credit range and can do 26mm to 110mm. Typically values 26, 34, 48, 63, 79, 100, and 110 will be used, but AFAIK nobody is sure yet how they'll be chosen. Zoom has to be stowed at 26mm for driving, so that might motivate use of that setting sometimes.
Posted by: phase4 Feb 26 2021, 06:51 PM
So close. Processing the CAHVOR as VORCAH gave more plausible results, although one decimal off.
It was a fun exercise but no longer nescessary... thanks for posting the decode guide Doug!
|
Posted by: mcaplinger Feb 26 2021, 07:00 PM
Pixel size is 7.4e-6 m = 7.4e-3 mm, is that what you were using?
Posted by: phase4 Feb 26 2021, 07:10 PM
Ah thank you, I used 0.074 mm instead of 0.0074. Things are obviously ok now.
Posted by: fredk Feb 26 2021, 07:21 PM
In a http://www.unmannedspaceflight.com/index.php?showtopic=8591&st=330&p=250226&#entry250226 I estimated the horizontal FOV to be 19.5 degrees for an image with a "34" focal length filename field. I said there that that was near the maximum FOV of 19.2 deg, but I mistakenly used vertical FOV, not horizontal. My measured 19.5 deg corresponds very closely to the max horizontal 25.6 scaled from 26 to 34 mm, so everything is consistent with a 34 mm focal length (apart from the statement yesterday as Doug mentioned).
And we seem to have a little bonus of around 1608 horizontal pixels, vs the 1600 photoactive stated in Bell etal.
Posted by: MahFL Feb 27 2021, 11:19 PM
Is there a way to tell the zoom used from the MastCamZ file names ?
Posted by: mcaplinger Feb 27 2021, 11:31 PM
Yes. See post #25 in this thread.
Posted by: Greenish Mar 1 2021, 04:36 AM
It appears the JSON data for the Sol 9 images has corrected the CAHVORE formatting issue we saw in the earlier image metadata (i.e. in correct order).
I wonder if it was a different version effect from the cruise software load.
"filter_name": "UNK",
"camera_vector": "(0.6929857012250769,-0.7042489328574726,-0.1542862873579498)",
"camera_model_component_list": "(1.10353,-0.008945,-0.729124);(0.884935,-0.17181,0.432865);(2606.49,1675.44,1273.54);(747.819,-326.9,2757.19);(0.885293,-0.171227,0.432363);(1e-06,0.00889,-0.006754);(-0.006127,0.010389,0.004541);2.0;0.0",
"camera_position": "(1.10353,-0.008945,-0.729124)",
"instrument": "FRONT_HAZCAM_LEFT_A",
"camera_model_type": "CAHVORE"
Posted by: djellison Mar 1 2021, 04:43 AM
The front hazcams have quite a significant toe-out between them. ~20deg.
page 17
See https://www.ncbi.nlm.nih.gov/pmc/articles/PMC7686239/pdf/11214_2020_Article_765.pdf
Posted by: MarkL Mar 1 2021, 08:14 PM
Thank you!
Posted by: PDP8E Mar 1 2021, 11:07 PM
The cameras used for rover lookdown and lookup are AMS CMV20000
here is the datasheet from AMS
https://ams.com/documents/20143/36005/CMV20000_DS000440_2-00.pdf/6221994b-b358-48fd-9be1-428cb363ab0a
Maybe the lookup camera can be used for stargazing, cloud studies, tau....
My debayer program is still a little wonky green
(are there R and B multiplier 'factors' known for this camera?)
I downsized it to fit in 3MB here

|
Posted by: Andreas Plesch Mar 2 2021, 03:19 AM
Since I believe this may not have been mentioned, it is useful to know that the rss API json feed allows for just returning a single record based on id. It has an id query parameter.
So one can browse to find an image, say
https://mars.nasa.gov/mars2020-raw-images/pub/ods/surface/sol/00002/ids/edr/browse/edl/EDF_0002_0667111022_758ECV_N0010052EDLC00002_0010LUJ01.png
and then use the id (filename without suffix) to get the record:
https://mars.nasa.gov/rss/api/?feed=raw_images&category=mars2020&feedtype=json&id=EDF_0002_0667111022_758ECV_N0010052EDLC00002_0010LUJ01
For example, this is interesting pointing out that the downlook rover camera does not have any interesting additional data.
[edit:] If the filename for the image has trailing digits as in https://mars.nasa.gov/mars2020-raw-images/pub/ods/surface/sol/00009/ids/edr/browse/fcam/FRE_0009_0667754529_115ECM_N0030000FHAZ00102_06_0LLJ01.png, for some cameras (not sure which ones) it is necessary to omit the trailing digits (here "01") for the json id: https://mars.nasa.gov/rss/api/?feed=raw_images&category=mars2020&feedtype=json&id=FLE_0009_0667754529_115ECM_N0030000FHAZ00102_07_0LLJ
EDF_0002_0667111022_758ECV_N0010052EDLC00002_0010LUJ01 (for EDL) vs.
FLE_0009_0667754529_115ECM_N0030000FHAZ00102_07_0LLJ (for FHAZ)
Posted by: Greenish Mar 2 2021, 03:23 AM
Good info from Emily Lakdawalla on twitter:
- I just got off WebEx with Justin Maki, who leads of the Perseverance engineering camera team. I've learned a lot and gotten a lot of confused questions sorted out. I'll try to bang out a blog entry with lots of techy detail about raw images tomorrow.
- The TL;DR: of the interview was: a lot of the things that are weird and confusing in the raw image metadata from sols 1-4 have to do with the rover being on the cruise flight software at the time.
- For example, the cruise flight software did not "know" how to automatically create image thumbnails. So they had to instruct the rover computer with separate commands to make thumbnails for each image, which is why sequence IDs don't match up between thumbnail and full-res.
- Many of the more confusing issues were solved by the flight software update. They're going to continue to tweak parameters over the next week or two, testing to see what modes they like best for returning their data, but before long they'll settle into some routines.
- It's SO FUN to see this process working out in real time. They *could* hold all the images back until they're happy with their tweaking, but they're not. They're just shunting the images out, never mind the temporarily wonky metadata.
Posted by: JohnVV Mar 2 2021, 03:26 AM
have you tried the debayer in G'Mic
https://gmic.eu/
Posted by: fredk Mar 2 2021, 06:02 PM
Yeah, gmic gives the same wonky green/yellow cast. The particular deBayering interpolation algorithm shouldn't determine the overall hue (but may affect pixel-scale chroma details). What a deBayering by itself gives is known as "raw colour", and won't generally look right because the relative sensitivities of the RGB channels differ from those of the eye. DeBayered images released have similar casts, eg:
https://mars.nasa.gov/mars2020-raw-images/pub/ods/surface/sol/00009/ids/edr/browse/ncam/NRF_0009_0667756282_606ECM_N0030000NCAM05000_01_295J02.png
A simple relative scaling between RGB channels, ie a whitebalance, should help a lot with these images.
Posted by: fredk Mar 2 2021, 07:48 PM
If the black level isn't maintained during the autostretch which is done on the public engineering cam frames, then such a simple fixed RGB scaling won't work for all frames and we're left with trial and error. So it could be that different tiles of a full frame navcam would need different colour adjustment.
Posted by: lingyuk Mar 3 2021, 07:58 AM
So, as I understand it - Perseverance has the ability compress frames into .MP4 files? And the landing videos posted by NASA on youtube were uploads of those MP4 files? And the rover will later send all of the full resolution frames (1000s of them) of the landing?
My question is: are those MP4 files available anywhere to download? Has NASA made them available?
Because Youtube compresses videos a lot, and the original files would have a lot more detail. Thanks!
Posted by: MarkL Mar 3 2021, 05:54 PM
Great question. JPL ws able to get video footage very quickly and there are still a lot of individual frames to be published so these must have been videos created by the cameras and uplinked on Sol 1.
Where are the raw video files do you suppose?
Can we get our hands on them?
Posted by: lingyuk Mar 4 2021, 10:57 AM
Where are the raw video files do you suppose?
Can we get our hands on them?
I found this file:
https://mars.nasa.gov/system/downloadable_items/45732_nasa_perseverance_parachute_deployment.mp4
It looks like it's the original MP4 file. I couldn't find any others though.
Posted by: fredk Mar 4 2021, 03:37 PM
That video is slowed down and has duplicated frames, so must've been re-encoded from the original.
Posted by: Osvold Mar 8 2021, 04:05 PM
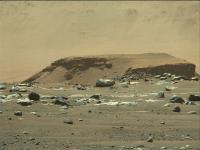
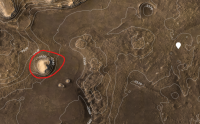
Hello guys, I am new here and I have no expirience with pictures from Mars, so could be, this is obvious to you, but I struggle to find out how this works. I would like to know, if there is any way how to find out direction the rover is looking from a picture. As an example, i would love to know, if the hill
|
|
Posted by: john_s Mar 8 2021, 05:19 PM
One easy way to get oriented is to look for http://www.unmannedspaceflight.com/index.php?s=&showtopic=8608&view=findpost&p=250701 which he posts regularly to support his mapping efforts. These always have north at the top, and show vertically-exaggerated images of features in the distance. The one linked here confirms your hunch about the identity of that mesa.
Posted by: Pando Mar 8 2021, 08:56 PM
Yes, it is.
Posted by: Floyd Mar 9 2021, 01:48 AM
The Raw page has several types of images and cameras. I did not see listed the SuperCam (Perseverence ChemCam). Will these images eventually find their way to the raw page?
Posted by: MahFL Mar 9 2021, 04:15 AM
I would assume so, as the list has grown as images come down from the different cameras.
Posted by: Osvold Mar 9 2021, 07:09 AM
@john_s @Pando thanks a lot guys
Posted by: MarkL Mar 9 2021, 09:57 AM
https://mars.nasa.gov/system/downloadable_items/45732_nasa_perseverance_parachute_deployment.mp4
It looks like it's the original MP4 file. I couldn't find any others though.
Thanks for finding it. I hope they release all the raw videos that were uplinked from the rover on Sols 0-1. Please JPL. This is historic stuff being first use of a legendary open source utility on another planet. Ffmpeg rocks the (solar) system.
Posted by: Explorer1 Mar 9 2021, 02:48 PM
A silly clickbait video where someone zooms in on empty sky (https://www.youtube.com/watch?v=dQHYA0-Tfrk) got me thinking; how good would the Mastcam-Z be at astronomy? It would presumably be able to catch both moons if pointed at the right place and time (either during the day or at night, if power allows)?
I remember the Phobos-rise image taken early in Curiosity's mission ( http://www.midnightplanets.com/web/MSL/image/00613/0613ML0025880000301758E01_DXXX.html ); Maztcam-Z could do a much better job now.
Posted by: fredk Mar 9 2021, 03:48 PM
The MCZ specs are pretty similar to MSL mastcam, apart from the ability to zoom. The long end is 110mm at f/9.5 vs 100mm at f/10 for MR, and the sensor resolutions are very similar. So moon imaging should be very similar.
I thought the main advantages of MCZ were the ability to do stereo imaging with the same FOV in L and R cameras, as well as the intermediate zoom focal lengths.
Posted by: mcaplinger Mar 9 2021, 04:48 PM
Fred is correct, MCZ will not improve significantly on images like https://photojournal.jpl.nasa.gov/catalog/PIA17350
Posted by: tolis Mar 9 2021, 06:52 PM
For astronomical imaging, there is also SkyCam.
Posted by: djellison Mar 9 2021, 08:35 PM
The MEDA SkyCam is a repurposed MER/MSL heritage Hazcam. They are INCREDIBLY optically dark. We're tried ( and failed ) to image night time features with MSL NavCams - even Earth and Venus were not visible. You're not going to get much, if anything, astronomical, through the MEDA SkyCam
Posted by: tolis Mar 9 2021, 09:18 PM
Pity. It would have been a great edu resource.
Posted by: PaulH51 Mar 9 2021, 10:01 PM
Sol 18: Our first image from the SHERLOC/WATSON camera with its lens cap open
I did Bayer reconstruction of the raw image using GIMP with the add-on filter 'G'MIC-Qt'
The image data drop out was seen on some of the earlier images with the lens cap closed, but in a different place, so hopefully not a problem.
I noted that no focus motor count was issued on the raw page so it's not possible to establish the distance to the target or estimate the scale like we could do for MAHLI. Maybe that data will be in the JSON details?
|
https://mars.nasa.gov/mars2020/multimedia/raw-images/SI0_0018_0668555815_008ECM_N0030578SRLC08001_0000LUJ
Posted by: fredk Mar 9 2021, 10:15 PM
I see no motor count at the json details page for that image:
https://mars.nasa.gov/rss/api/?feed=raw_images&category=mars2020&feedtype=json&id=SI0_0018_0668555815_008ECM_N0030578SRLC08001_0000LUJ
The filter name field just says "open".
Posted by: Andreas Plesch Mar 9 2021, 11:47 PM
Here is the full json in case something jumps out:
"image": [
{
"extended": {
"mastAz": "307.733",
"mastEl": "-20.2427",
"sclk": "668555815.086",
"scaleFactor": "1",
"xyz": "(39.3213,34.1703,-0.00444177)",
"subframeRect": "(1,1,1648,1200)",
"dimension": "(1648,1200)"
},
"link_related_sol": "https://mars.nasa.gov/mars2020/multimedia/raw-images/?sol=18",
"sol": 18,
"attitude": "(0.812911,-0.0114458,0.0116122,0.582159)",
"json_link_related_sol": "https://mars.nasa.gov/rss/api/?feed=raw_images&category=mars2020&feedtype=json&sol=18",
"image_files": {
"medium": "https://mars.nasa.gov/mars2020-raw-images/pub/ods/surface/sol/00018/ids/edr/browse/shrlc/SI0_0018_0668555815_008ECM_N0030578SRLC08001_0000LUJ02_800.jpg",
"small": "https://mars.nasa.gov/mars2020-raw-images/pub/ods/surface/sol/00018/ids/edr/browse/shrlc/SI0_0018_0668555815_008ECM_N0030578SRLC08001_0000LUJ02_320.jpg",
"full_res": "https://mars.nasa.gov/mars2020-raw-images/pub/ods/surface/sol/00018/ids/edr/browse/shrlc/SI0_0018_0668555815_008ECM_N0030578SRLC08001_0000LUJ02.png",
"large": "https://mars.nasa.gov/mars2020-raw-images/pub/ods/surface/sol/00018/ids/edr/browse/shrlc/SI0_0018_0668555815_008ECM_N0030578SRLC08001_0000LUJ02_1200.jpg"
},
"imageid": "SI0_0018_0668555815_008ECM_N0030578SRLC08001_0000LUJ",
"camera": {
"filter_name": "OPEN",
"camera_vector": "(0.5740789607042541,-0.7421743420005331,0.3458476441336543)",
"camera_model_component_list": "(2.08195,-0.111422,-1.69411);(0.577631,-0.741337,0.341707);(-1801.91,-2368.23,291.421);(946.46,-1240.2,-2497.62);(0.580824,-0.747997,0.321164);(0.000473,-0.032613,0.136778)",
"camera_position": "(2.08195,-0.111422,-1.69411)",
"instrument": "SHERLOC_WATSON",
"camera_model_type": "CAHVOR"
},
"caption": "NASA's Mars Perseverance rover acquired this image using its SHERLOC WATSON camera, located on the turret at the end of the rover's robotic arm. \n\nThis image was acquired on Mar. 9, 2021 (Sol 18) at the local mean solar time of 17:13:24.",
"sample_type": "Full",
"date_taken_mars": "Sol-00018M17:13:24.434",
"credit": "NASA/JPL-Caltech",
"date_taken_utc": "2021-03-09T17:56:16.000",
"link": "https://mars.nasa.gov/mars2020/multimedia/raw-images/?id=SI0_0018_0668555815_008ECM_N0030578SRLC08001_0000LUJ",
"link_related_camera": "https://mars.nasa.gov/mars2020/multimedia/raw-images/?camera=SHERLOC_WATSON&sol=18",
"drive": "578",
"title": "Mars Perseverance Sol 18: WATSON Camera ",
"site": 3,
"date_received": "2021-03-09T18:26:55Z"
}
],
"type": "mars2020-imagedetail-1.1",
"mission": "mars2020"
}
Posted by: Greenish Mar 10 2021, 03:12 AM
If "camera_position" is correct at (2.08195,-0.111422,-1.69411) then WATSON's eyeball would be a fairly high 1.7m off the ground, and out ~1m in front of the body, just left (port) of centerline.
(For ref, in RNAV frame z=0 is ~ground level, positive down; hazcams are at x~ +1.1, z~ -0.7 and navcam at z~ -1.9.)
An FOV of 37 deg diag would give about 1.1m diagonal in the image if pointed straight down. However if the axis in CAHVOR is correct then it's pointed ~20 deg below horizontal (it works out to match the "mast" azimuth & elevation values). Not convinced either of these is right - or my math, for that matter.
Posted by: lingyuk Mar 10 2021, 10:41 AM
What is the current best method for downloading all of the raw png files from all cameras?
Posted by: mcaplinger Mar 10 2021, 03:17 PM
That looks wrong to me, I suspect a bug somewhere.
Posted by: xflare Mar 10 2021, 05:23 PM
Ah I didnt realise we wouldn't be seeing SUPERCAM RAW images like we did with Curiosity
Posted by: MarkL Mar 10 2021, 09:50 PM
https://rkinnett.github.io/roverpics/
Firefox/DownThemAll is a great combo and you can get the actual JSON files or just the URLs. Great service!
Posted by: fredk Mar 10 2021, 11:50 PM
Using the camera_vector and attitude quaternion gives el,az = -19.3,19.5 deg in the LL frame (so az is relative to north), so the azimuth is quite different from the mastAz value. My guess is that mastEl and mastAz are for the RNAV frame (elevations are pretty close since the rover was close to level).
Posted by: htspace Mar 11 2021, 08:02 AM
How to batch debayer images?
What software is there? Fast and easy?
When I download these pictures, I dont know how to batch process
Thank you!
|
Posted by: htspace Mar 11 2021, 08:06 AM
Hello, there is no response when clicking Export selected image URLs. 
Posted by: htspace Mar 11 2021, 08:07 AM
Firefox/DownThemAll is a great combo and you can get the actual JSON files or just the URLs. Great service!
Hello, there is no response when clicking Export selected image URLs.
Posted by: JohnVV Mar 11 2021, 01:07 PM
i use Gmic's built in program " bayer2rgb"
https://gmic.eu/
it is a commandline tool
now they will be a bit "yellow/green" do to the contrast stretch that these png's have had done to them
Posted by: JRehling Mar 11 2021, 05:22 PM
The goals of a panoramic color camera and astrophotography are in many ways diametrically opposed. (That said, that image of Phobos and Deimos is simply awesome.) For imaging Phobos, Earth, Jupiter, etc. from Mars and getting the most impressive results, you'd want an instrument very different from Mastcam-Z. And for obvious reasons, that's not what this mission is about.
To do astrophotography from Mars (where, I imagine, the "seeing" would almost always be excellent due to the low pressure) the ideal instrument would be the same as on Earth a big aperture on the telescope and a small pixel count, just big enough to capture the object of interest. Lots of area means your system is capturing meaningless data when you're looking at a small object surrounded by empty sky. (Some camera software allows you to capture just a small window of a larger frame; I have one with that capability, but I don't think there's any reason why you'd want that on Mars.) Color via a monochrome sensor and the ability to move different filters in front of it
Bayer color automatically reduces your resolution by about 1.5.
It'd be fun to see what a ~20 cm aperture telescope could do from Mars, but I think we can imagine
take pictures of Jupiter as seen by amateurs on Earth and improve the resolution about 2x. It'd be amazing. Almost Voyager quality. Pictures of Earth would have about half the resolution of pictures of Mars as seen from Earth (because you'd only be looking at Earth's night side when the planets are closest).
But I don't see this sort of add-on justifying the cost anytime soon.
Posted by: djellison Mar 11 2021, 06:36 PM
I must admit - I've found Gmic's debayer performance to be pretty ugly - especially at the edge of images.
I've been using PIPP which can batch debayer images and I've been very pleased with the results
https://sites.google.com/site/astropipp/
Posted by: Ant103 Mar 11 2021, 07:29 PM
As for me, I'm using ImageJ with Debayer plugin. Alongside with a batch script, I can do hundred of pictures in a very short time.
Posted by: James Sorenson Mar 11 2021, 08:00 PM
I'm using Pixinsight which is an astrophotography processing suite, it has a real nice debayer script. I use it for my astrophotography and it is expensive, 300 USD, but for those that can't afford that, the Planetary Image Pre-processor (PIPP) has a great batch debayer function in it which I've also used and it works great. On the plus side it's a free and easy program.
Posted by: phase4 Mar 11 2021, 08:49 PM
The Marslife website uses an open source GPU shader to debayer images 'on-the-fly' which is blazingly fast.
While not really useful for non-coders I thought to share this solution as a reference. Pretty well documented, too.
https://casual-effects.com/research/McGuire2009Bayer/
Posted by: fredk Mar 12 2021, 12:37 AM
Thanks; I was wondering how you deBayered the mastcam sequences so fast.
Incidentally the Malvar etal interpolation scheme you use is the same as that used onboard MSL to deBayer when jpegs are sent down; see the http://pds-imaging.jpl.nasa.gov/data/msl/MSLMRD_0001/DOCUMENT/MSL_MMM_EDR_RDR_DPSIS.PDF (And that's the scheme I use in my own code.)
Anyway, deBayering M20 frames is a breeze - dealing well with the jpeged Bayered images for MSL is hard work!
Posted by: htspace Mar 12 2021, 01:32 AM
https://gmic.eu/
it is a commandline tool
now they will be a bit "yellow/green" do to the contrast stretch that these png's have had done to them
Thank you!
Posted by: htspace Mar 12 2021, 01:48 AM
I've been using PIPP which can batch debayer images and I've been very pleased with the results
https://sites.google.com/site/astropipp/
I don't know how to perform batch operations, only one picture can be output.can you teach me? Thank you!

|
Posted by: htspace Mar 12 2021, 01:49 AM
Yes, this software is expensive.
I don't know how to perform batch operations, only one picture can be output.can you teach me? Thank you!

Posted by: James Sorenson Mar 12 2021, 03:02 AM
For PIPP, all you need to do is open up all of the images that you are going to debayer, then on the input tab select the option "Debayer Monochrome frames" and the pattern to RGGB. You can also choose the processing algorithm as well if you want VNG or Bilinear works good, you can experiment. To see a preview before final processing, you can click the "Test Options" button in the top right. If it looks good, you can move to the output tab and choose your output file options. Once ready, just go to the "Do Processing" tab and click "Start Processing". All the images that you loaded should be batch debayerd into a new folder.
Posted by: Greenish Mar 12 2021, 04:58 AM
... Not convinced ...
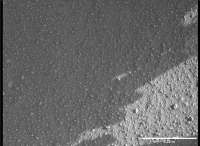
Well, maybe I'm not totally nuts. These pictures are https://mars.nasa.gov/mars2020-raw-images/pub/ods/surface/sol/00018/ids/edr/browse/ncam/NRF_0018_0668555532_151ECM_N0030578NCAM00188_01_290J01.png & https://mars.nasa.gov/mars2020-raw-images/pub/ods/surface/sol/00018/ids/edr/browse/ncam/NRF_0018_0668556082_855ECM_N0030578NCAM00188_01_290J01.png the WATSON test images. Looks pretty high to me.

|
Implies roughly the scale bar shown below, so the larger rocks are ~2cm.
|
Posted by: htspace Mar 12 2021, 06:54 AM
Thank you! The previous steps were successful, and finally failed.I don't know how to solve it.
|
Posted by: htspace Mar 12 2021, 09:17 AM
Oh it's you! Thank you for your work!

How to create a batch script?I am a novice
Posted by: htspace Mar 12 2021, 10:14 AM
I found the reason, it is the system language problem.
Posted by: Art Martin Mar 12 2021, 03:40 PM
I just installed PIPP and it seems to be a very full featured program but I'm certainly lacking a great deal of info. I downloaded a Watson image of the underbelly that to my untrained eye seems like it's a candidate for debayering since there are lines and dots across the image that makes it look blurry and unprocessed. However, when processing it through PIPP it didn't seem like it did anything. The output looked pretty much like the input and it certainly was not in color. There were tons of options to choose but unfortunately the examples on the website were for some Jupiter video file not some single image. Any shortcuts someone can point to?
Edit: I did manage to get a color image debayered using Gmic by just trial and error. I'll post it in the helicopter area.
Posted by: mcaplinger Mar 12 2021, 04:54 PM
I take it back, perhaps this is correct. Should be possible to find the WATSON footprint in the front Hazcam image.
I've asked if the focus position can be put back into the public data, but we don't have much control over that.
Posted by: fredk Mar 14 2021, 06:13 PM
Has anyone figured out how to sort the images at http://mars.nasa.gov/mars2020/multimedia/raw-images/ by time taken? Selecting a sort in the "sort by" box gives images out of order according to the listed LMST. (Eg, the first few images are out of order when you filter on sol 18.) The corresponding operation on the MSL site works fine.
The corresponding api call
Maybe this is related to the http://www.unmannedspaceflight.com/index.php?s=&showtopic=8590&view=findpost&p=250438 that are being worked on?
Posted by: phase4 Mar 14 2021, 08:17 PM
Not from the website directly. For the arm animation I made earlier I sorted the JSON entries on the spacecraft clock time which is given as "extended/sclk". (and can also be found as part of the image filename)
Posted by: Hynee Mar 15 2021, 10:57 AM
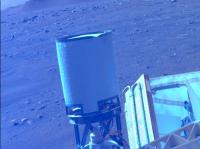
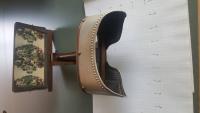
Does anybody know this plate's purpose?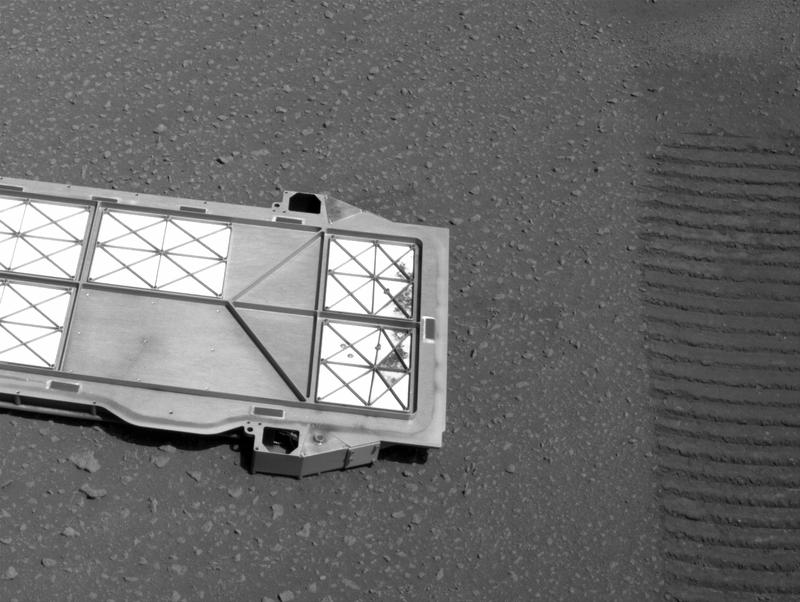
Here are some other pictures:
Posted by: PaulH51 Mar 15 2021, 11:22 AM
It's a 'Bellypan' that protected the Adaptive Caching Assembly (ACA) since launch, but especially during the final part of EDL...
Surface operations on Mars require the Sample Handling Assembly (SHA) to extend approximately 200 mm (~8 inches) below the Rovers bellypan. Therefore, an ejectable belly-pan was implemented directly below the Adaptive Caching Assembly (ACA) volume, which was released after landing to provide the SHA with an unobstructed volume to extend into during operations. Surface features are then assessed via Rover imaging prior to SHA motion to prevent contact with potential obstacles below the Rover.
Extracted from this https://esmats.eu/amspapers/pastpapers/pdfs/2020/silverman.pdftitled: Mars 2020 Rover Adaptive Caching Assembly: Caching Martian Samples for Potential Earth Return
Posted by: Hynee Mar 15 2021, 11:25 AM
Surface operations on Mars require the Sample Handling Assembly (SHA) to extend approximately 200 mm (~8 inches) below the Rovers bellypan. Therefore, an ejectable belly-pan was implemented directly below the Adaptive Caching Assembly (ACA) volume, which was released after landing to provide the SHA with an unobstructed volume to extend into during operations. Surface features are then assessed via Rover imaging prior to SHA motion to prevent contact with potential obstacles below the Rover.
Extracted from this https://esmats.eu/amspapers/pastpapers/pdfs/2020/silverman.pdftitled: Mars 2020 Rover Adaptive Caching Assembly: Caching Martian Samples for Potential Earth Return
Thanks!
Posted by: ChrisC Mar 15 2021, 09:19 PM
FYI this event is discussed in the regular thread:
http://www.unmannedspaceflight.com/index.php?showtopic=8608&st=60
I think this thread here is supposed to be focused on imagery, e.g. technical discussion of processing, cameras, metadata etc.
ADMIN: Chris is correct. Let's please post mission event pictures such as the panel deployment in the real-time progress threads (http://www.unmannedspaceflight.com/index.php?showtopic=8608&st=80&start=80 being the current one) and reserve this thread for technical discussion of the imagery systems and methods.
Posted by: htspace Mar 16 2021, 12:02 PM
After I installed the required plugins,how to perform batch debayer in ImageJ and GIMP software?
Need an installation script, right? How to do it?
Posted by: Adam Hurcewicz Mar 16 2021, 12:39 PM
I use FitsWork to debayer images. It's great!
Posted by: htspace Mar 16 2021, 01:45 PM
Can it be processed in batches? How to do it?
|
Posted by: PDP8E Mar 16 2021, 11:39 PM
use the command-line interface to your tool (if it has one) and a batch file.
Posted by: htspace Mar 17 2021, 12:13 AM
I get it, it's great!
Posted by: htspace Mar 17 2021, 12:14 AM
Yeah,I get it, it's great!
Posted by: MarkL Mar 22 2021, 07:30 PM
Do you have any insight into the MET portion of the filename. When did MET start (ie. when was it zero?)
At the moment its around 0669527872.
I would like to rename some of the raw images in the order they were taken and where pairs were taken keep those together - I think they would be taken at about the same MET anyway so sorting by MET should work to keep stereo pairs together.
MET seems to have been wrong on some images, or at least, the MET is the time the image was uploaded by the spacecraft rather than the time it was taken by the camera. Especially the EDL images. Or have they fixed that now?
Thanks!
Posted by: fredk Mar 22 2021, 11:35 PM
The sclk (mission time) filename (and json) field appears to start on Jan 1st, 2000 - see https://naif.jpl.nasa.gov/pub/naif/MARS2020/kernels/sclk/M2020_168_SCLKSCET.00006.tsc And yeah, that field is still incorrect on at least some EDL camera images.
Posted by: mcaplinger Mar 23 2021, 02:58 AM
0 is 2000-001T11:58:55.816 ("epoch of J2000" in Coordinated Universal Time.)
This then drifts as a function of rover clock rate and is tracked by the NAIF file that Fred linked to, so you need to use the NAIF function scs2e or something like that to get a usable time. https://naif.jpl.nasa.gov/pub/naif/toolkit_docs/C/req/sclk.html
Posted by: PaulH51 Mar 23 2021, 11:05 AM
Hope this is the right thread for this question?
The SHERLOC imager is said to be a direct build to print version of the MAHLI imager on MSL. With MAHLI images the focus motor count is provided on the raw image server, using that count enables users to approximate the distance and scale of 'close-up' / 'in-focus' MAHLI images.
The SHERLOC images returned so far don't appear to have a motor count on the raw image server (that I can find)
Is the SHERLOC motor count provided on an image JSON feed somewhere? Any pointers would be appreciated, as I'd hope to check it's my use of the count using targets like the PIXL calibration target where its exact size is known. Then I can use it for scaling the geological targets in the future. TIA
Posted by: mcaplinger Mar 23 2021, 02:38 PM
Not yet, maybe someday. See post 89.
Posted by: PaulH51 Mar 23 2021, 08:19 PM
Many thanks
Posted by: phase4 Mar 26 2021, 05:17 PM
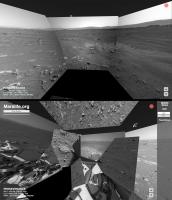
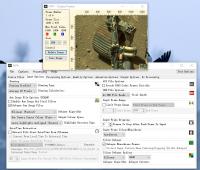
Hey all, you're welcome to try the Perseverance image viewer I've build for the Marslife website.
|
https://captainvideo.nl/marslife/index.html
Currently the website supports the left-eye images (no bayers yet) for Navcam, Mastcam-Z & Hazcam camera's
and should be in sync with the official Nasa raw image releases.
A traverse path will be included as soon as the mission kernels become available.
A new viewmode is added (toggle V key) to present panorama's as a circular (fisheye) projection.
Also new is that the visibility of the placeholder overlay should now be toggled with the X key.
Red/orange outline colors stand for hazcam, green means navcam images and blue represent Mastcam-Z images.
It's still in it's early stages so you can expect bugs and quirks. Have fun anyway!
Rob
Posted by: PaulH51 Mar 26 2021, 08:17 PM
Rob
Works very well for me on PC & mobile
Posted by: pbanholzer Mar 28 2021, 09:47 PM
I understand that MastCam Z has video capability at 4 fps for the full sensor area but subsample areas can be selected. What frame rate will its video of Ingenuity be - 30 fps ?
Thanks.
Posted by: mcaplinger Mar 28 2021, 10:28 PM
From https://mars.nasa.gov/msl/spacecraft/instruments/mastcam/for-scientists/
Posted by: pbanholzer Mar 29 2021, 01:51 AM
Thanks again. So that I am clear, the video on MastCam Z is the same as on Curiosity's Mastcam: 720p at 10 fps?
Posted by: mcaplinger Mar 29 2021, 03:31 AM
From https://link.springer.com/article/10.1007/s11214-020-00755-x
Posted by: mcaplinger Mar 29 2021, 03:52 AM
BTW, just a reminder: I'm not authorized to say anything about the inner workings of these missions. So I have to do this complicated dance where I quote stuff from papers, press kits, and web sites that anybody can see. It seems like the best source of current information at the moment, such as it is, is from twitter https://twitter.com/NASAPersevere #MarsHelicopter #Mars2020
Posted by: pbanholzer Mar 29 2021, 06:37 AM
Mike - Thanks yet again. I worked at Goddard for 25 years so I understand about restrictions on information sharing. And I appreciate your knowledge of the literature. Now that I see the article, I do remembering reading about the heritage from MC to MC-Z.
Posted by: Brian Swift Mar 30 2021, 05:31 AM
Understood, but Ill post my question list anyway
1. Is Watson using same decompanding tables as MAHLI? (https://pds-imaging.jpl.nasa.gov/data/mahli/MSLMHL_0014/CALIB)
2. Was there a commanding difference between these two Watson images of MCZ calibration targets?
https://mars.nasa.gov/mars2020/multimedia/raw-images/SI1_0026_0669252925_206ECM_N0030792SRLC07009_0000LUJ
https://mars.nasa.gov/mars2020/multimedia/raw-images/SI1_0026_0669252912_124ECM_N0030792SRLC07009_0000LUJ
The images were taken only 13 sec apart, but the dark areas are a little different.
3. The AluWhite98 target seems to be a bit blue deficient relative to the other grey scale targets. Based on "Radiometric Calibration Targets for the Mastcam-Z Camera on the Mars 2020 Rover Mission, Id expect it to have a flat response. However the vendor reflectance chart for AluWhite98 shows some response drop off below 500nm, but Im not sure its enough to account for the deficiency.
4. Is there a document for SHERLOC ACI comparable to Mars 2020 Perseverance SHERLOC WATSON Camera Pre-delivery Characterization and Calibration Report?
Posted by: mcaplinger Mar 30 2021, 02:05 PM
1. Why would it be different?
2. No idea. I could look it up, but then I couldn't tell you. Did you look at the metadata?
3. I had nothing to do with the calibration target.
4. Not that I know of, we had no responsibility for ACI calibration.
Posted by: fredk Mar 30 2021, 05:08 PM
Different exposures? The differences are all over the images, not just the dark areas, as you can see by dividing or subtracting one frame from the other.
Posted by: mcaplinger Mar 30 2021, 05:55 PM
This would hardly be remarkable, since most images are autoexposed. But the JSON metadata doesn't have any exposure time information that I can see.
Posted by: Andreas Plesch Mar 31 2021, 01:07 PM
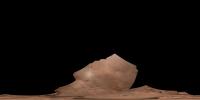
Mastcam-Z zoom
The zoom capability on the Mastcam-Z is quite remarkable. It took me a while to find what this recent image shows: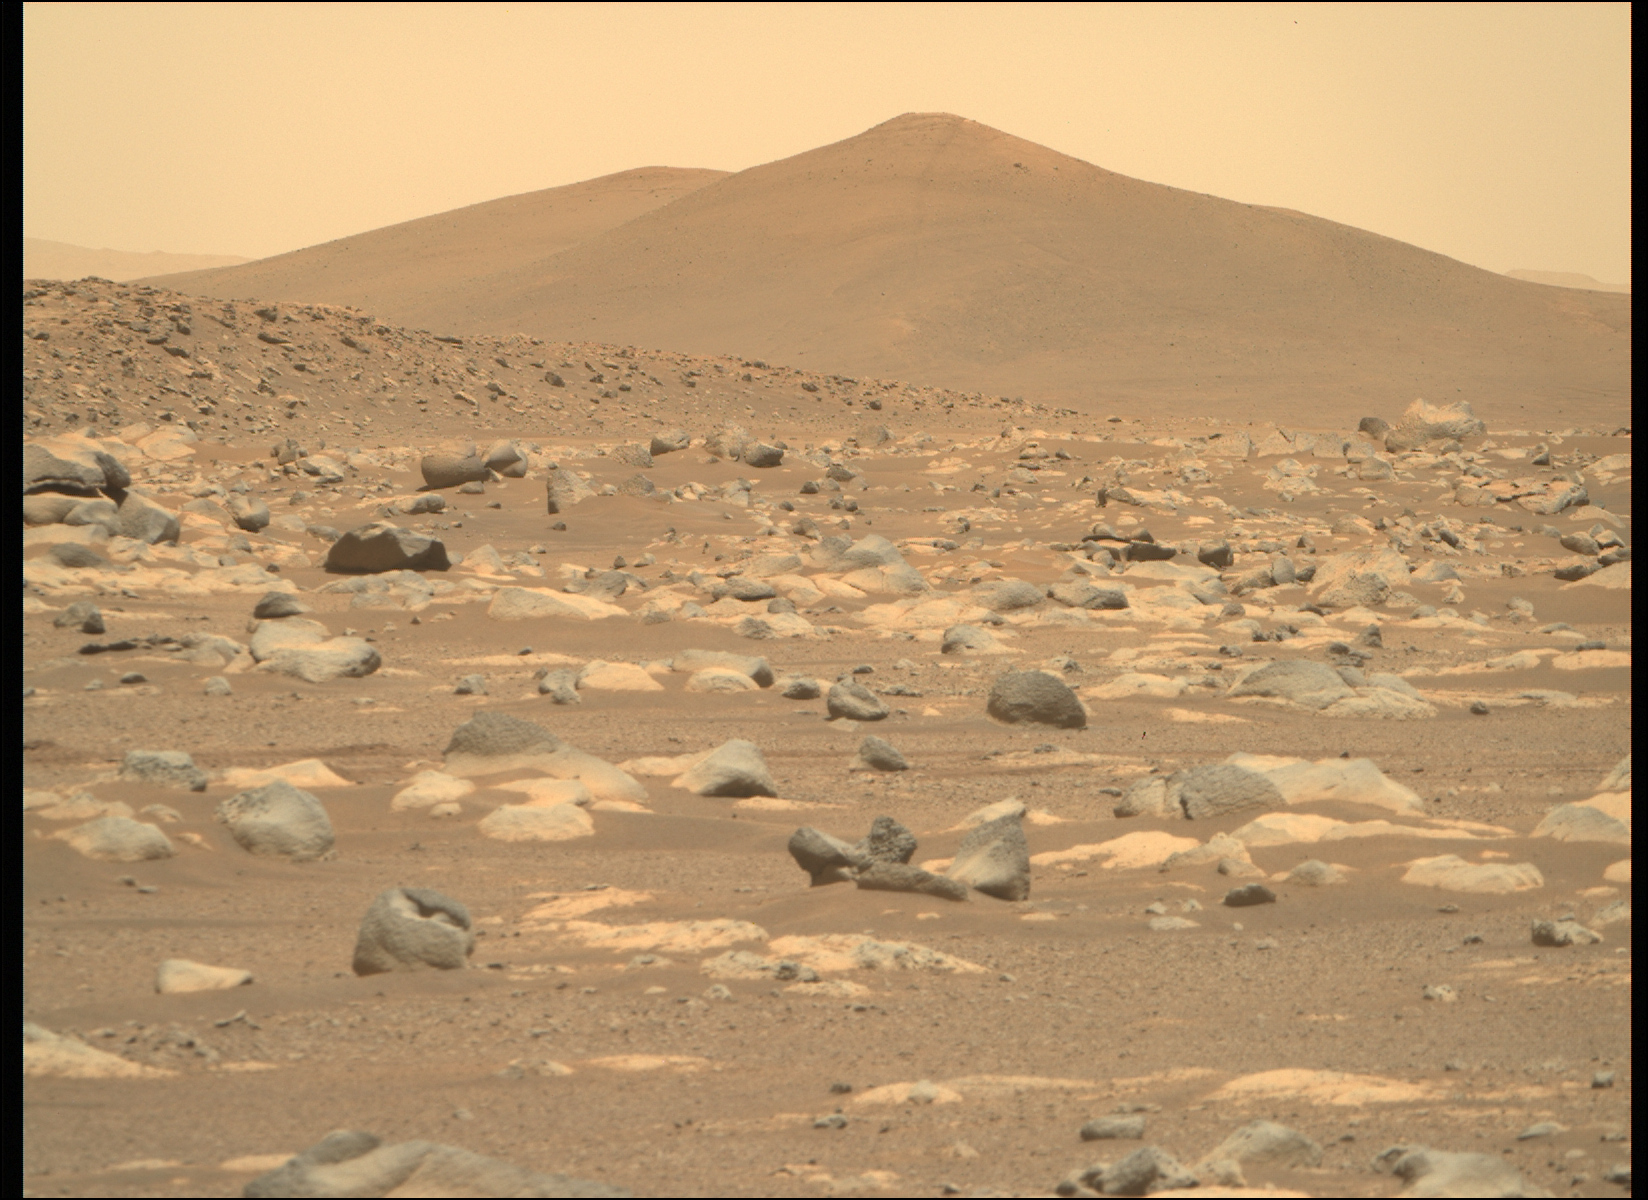
Here is the unzoomed version from the initial panorama:
Posted by: Brian Swift Mar 31 2021, 07:04 PM
Thanks for the response Mike.
Posted by: fredk Apr 5 2021, 02:25 PM
Thanks, somehow I missed the mention of IR filters in that paper. I had been thinking that maybe a lack of IR filter was causing the wonky engineering cam colours (though in hindsight that might've shifted colours to the red). I guess we're simply seeing the effect of raw colour, with the responses of the RBG filters quite different from those of the eye.
Posted by: phase4 Apr 5 2021, 04:02 PM
I assumed that next to auto-exposure the new color cams would also use auto-white balancing. But that's an uneducated guess.
Posted by: fredk Apr 6 2021, 04:50 PM
Normally cameras don't apply white balancing to the raw (Bayered) images - that's done later, typically when the raw is converted to a jpeg. So white balancing can't be the cause of the yellowy engineering cam inages.
Posted by: MarkL Apr 7 2021, 12:45 AM
How does the MET counter relate to real time on Earth please? Is there a zero point?
Thanks
Mark
Posted by: mcaplinger Apr 7 2021, 03:14 AM
Isn't this the same question that you asked and was answered in this thread back on post #102 and subsequent?
Posted by: ChrisC Apr 7 2021, 04:10 AM
Emily L did an epic writeup recently about the photo metadata that probably answers that question:
https://www.patreon.com/posts/orientation-to-48263650
(UMSF needs an "oh snap!" button
)
Posted by: MarkL Apr 7 2021, 01:17 PM
This then drifts as a function of rover clock rate and is tracked by the NAIF file that Fred linked to, so you need to use the NAIF function scs2e or something like that to get a usable time. https://naif.jpl.nasa.gov/pub/naif/toolkit_docs/C/req/sclk.html
Thanks mate. Sorry I thought I forgot to ask. Too lazy! Much appreciated.
Posted by: MarkL Apr 7 2021, 04:08 PM
I did a little playing around with sorting the raw images by different parameters (particularly by MET which is what interests me so I can browse images in sequence) on my Mac to get what I wanted and I will pass on a couple of Mac tips for accomplishing this. MacOS makes this process quite straightforward.
1. Obtain a regular expression (RegEx) filename change utility. I used Transnomino which worked very well.
2. Create aliases (ie. shortcuts) of the image files you want to sort (Command-a, Make Alias) and put them in a separate directory.
3. In the alias directory highlight all the aliases and rename them via the utility. Transnomino helpfully adds a context menu option so just right click the selected aliases and Rename with Transnomino.
4. Use the RegEx to rename as follows:
Find:
(\w)(\w\w)_(\d\d\d\d)_(\d{10})_(\d\d\d)(\w\w\w)_(\w)
Replace:
$7_$1_$4\.$5_$1$2_$3_$6_$7
This uses 7 RegEx capture groups (each delimited by parentheses) to rearrange the filename of the alias. It doesn't touch the original filename since the alias refers directly to the original file.
Example:
NLE_0045_0670932186_787ECM_N0031416NCAM00299_14_0LLJ01.png alias
is renamed to:
N_N_0670932186.787_NLE_0045_ECM_N0031416NCAM00299_14_0LLJ01.png alias
The sort order is, Image type (N/T), Camera subsystem, MET. This allows you to sort by name and keep all the thumbs separate from all the normal images. It sorts by MET within subsystems (Nav, EDL, Forward Hazard, Rear Hazard etc).
In the sol 45 and 46 images, there are a couple of cool "snake charmer" sequences of the arm and instrument head in motion in the thumbnails which I found easily after renaming the aliases as above. If you rename the way I suggest, the sequences are:
T_N_0670932316.774_NLF_0045_ECM_T0031416NCAM00298_01_600J01.png alias
T_N_0670932866.237_NLF_0045_ECM_T0031416NCAM00298_01_600J01.png alias
T_N_0671021417.992_NLF_0046_ECM_T0031416NCAM00298_01_600J01.png alias
T_N_0671024345.491_NLF_0046_ECM_T0031416NCAM00298_01_600J01.png alias
It is quite cool to watch the instrument head move around a fixed point in space. I suppose they are checking it out still.
Posted by: Ryan Kinnett Apr 7 2021, 09:23 PM
https://twitter.com/rover_18/status/1364309922167488512
I tried Firefox with 'DownloadThemAll' and it worked perfectly.
Meanwhile http://www.unmannedspaceflight.com/index.php?showuser=7220 has python code to also grab the data
https://twitter.com/kevinmgill/status/1364311336000258048
Hello UMSF!
I'm happy to learn my https://rkinnett.github.io/roverpics/ page is aiding some of the wonderful creations around here. That is precisely my intent with this and other things I'm working on. Please drop me a line if you have any ideas or suggestions to make that page more useful. One thing I hope to add in the near future is per-image local-level az/el, derived from metadata, to help us identify distant features in images. Longer term, I'm thinking about linking this to my https://rkinnett.github.io/rover3d/ page to render rover pose and camera view projection for any image.
Cheers
Posted by: phase4 Apr 7 2021, 09:58 PM
So that can't be it, thank you for the explanation.
Posted by: MarkL Apr 8 2021, 02:54 AM
Hi Ryan. I think lots of us use it daily. Its a terrific way to get everything at once. I have not done much with the json data or the URLs yet.
One suggestion - filter new images since last visit - otherwise I just download all of them if there have been some new ones added to a particular sol rather than manually look through them for new ones. Perhaps also a list of which sols have new images available or a log showing when new images have arrived by sol. Not sure the best way to implement that.
Really appreciate your site.
If anyone has done some python code to organize or selectively download that would be great.
Id also like to get peoples impressions of the various stitching software out there, particularly for Mac.
Posted by: Ryan Kinnett Apr 8 2021, 05:12 AM
Thanks, I'm very please to hear that.
That a great idea, but unfortunately it's beyond my infrastructural capability. What you're describing would require tracking, either via cookies or a user management system, plus a completely different query system. The page is quite dumb. It's really just a graphical wrapper for the JSON interface, completely contained in a single html file with no libraries or back-end server support or anything complicated like that. You could save the index.html file to your desktop and run it from there, if you wanted to.
Have you tried Kevin Gill's https://github.com/kmgill/cassini_processing/blob/master/fetch_m20_raw.py?
Posted by: MahFL Apr 9 2021, 09:57 AM
A new advanced filter option appeared on the raw page, "Movie Frames"...
Posted by: PaulH51 Apr 14 2021, 11:21 PM
The black margins on the Mastcam-Z frames are a bit of a pain to remove manually. I do this to permit stitching in MS-ICE without leaving shadows at some of the the seams.
Does anyone here know how I could use GIMP to process a batch at one session?
Grateful for any advice
Posted by: James Sorenson Apr 15 2021, 12:37 AM
Does anyone here know how I could use GIMP to process a batch at one session?
I don't know about GIMP because i don't use it, but you can batch do this easily with PIPP. In the Processing Options > cropping section. You can experiment with the offset and crop width fields. To preview, just click on the Test Options button.
Posted by: Greenish Apr 15 2021, 02:48 AM
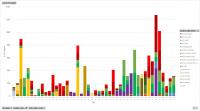
I just ran across this, and thought folks would find it very useful: full metadata in csv format for M2020 pics, updated several times daily. In both incremental files and one master one.
https://www.kaggle.com/sakethramanujam/mars2020imagecatalogue
Heck, you can even do stats with it...
|
And regarding cropping a bunch, I can always recommend ImageJ/FIJI. 1. File > Import > Image Sequence (or Stack From List) 2. Select rectangle. 3. Edit > Crop. Done. Optional 4. Record as macro for later use.
Posted by: Ryan Kinnett Apr 17 2021, 07:53 AM
Does anyone here know how I could use GIMP to process a batch at one session?
Grateful for any advice
Here ya go! Download https://drive.google.com/file/d/1cWleq722m7F6y3IEEGIKyt8QVobXjex3/view?usp=sharing, and save it here:
This script operates destructively on all images matching a filename pattern, saving the cropped images over the original image files.
To use this script, put all of the images you want to crop into a specific folder, then navigate in windows command prompt to that folder. Then call gimp from there, like so:
In this case it will crop all png's in the current working directory to 1604 x 1196 (offset 25px from the left and 4px down) and save over the original files.
I hope it's useful! I'm also looking into content-aware filling the black schmutz in the Watson images - at least the larger spot, hopefully also the smaller ones if I can figure out how to load a schmutz map reference image.
Unrelated, I added an interesting feature to https://rkinnett.github.io/roverpics. You can now hover over any thumbnail to see the metadata for that image. I also calculate local-level azimuth for each image and added that to the metadata. If you ever spot an interesting terrain feature and want to know which direction it is (relative to cardinal north) from the rover, this is a quick way to find out, just hover over the image and you'll find it toward the bottom.
|
Thanks to Thomas Appéré for reporting a couple of glitches earlier this week. The page should now return all full-frame and thumbnail still frames and movie frames.
Cheers
Posted by: htspace Apr 18 2021, 02:01 AM
This script operates destructively on all images matching a filename pattern, saving the cropped images over the original image files.
To use this script, put all of the images you want to crop into a specific folder, then navigate in windows command prompt to that folder. Then call gimp from there, like so:
In this case it will crop all png's in the current working directory to 1604 x 1196 (offset 25px from the left and 4px down) and save over the original files.
I hope it's useful! I'm also looking into content-aware filling the black schmutz in the Watson images - at least the larger spot, hopefully also the smaller ones if I can figure out how to load a schmutz map reference image.
Unrelated, I added an interesting feature to https://rkinnett.github.io/roverpics. You can now hover over any thumbnail to see the metadata for that image. I also calculate local-level azimuth for each image and added that to the metadata. If you ever spot an interesting terrain feature and want to know which direction it is (relative to cardinal north) from the rover, this is a quick way to find out, just hover over the image and you'll find it toward the bottom.
|
|
Thanks to Thomas Appéré for reporting a couple of glitches earlier this week. The page should now return all full-frame and thumbnail still frames and movie frames.
Cheers
Thank you for sharing, The https://rkinnett.github.io/roverpics/ is very good!
I don't know how to call gimp, can you share a screenshot? Thank you!
Posted by: djellison Apr 18 2021, 04:04 AM
Don't even need GIMP. Irfanview's batch conversion output format options have a crop section.
https://www.youtube.com/watch?v=Z_eEKD8AJz0
Posted by: Ryan Kinnett Apr 21 2021, 02:08 AM
I prefer ImageMagick and PIPP myself. I made the gimp script partly to get my feet wet with it before trying to leverage the Resynthesizer tool to remove the black smudge in Watson images.
Along the same vein (using a canon to kill a fly), I made a https://drive.google.com/file/d/1C9fdIbWbljMisLXcSL3d0_VstHfHKuGF/view?usp=sharing for Photoshop. It uses bilinear interpolation to demosaic any RGGB mosaic raw image, preserving its original dimensions. The method is based on http://therefractedlight.blogspot.com/2014/04/cook-your-own-raw-files-part-3-demosaic.html which is pretty up-front about being more of an existence proof than a practical solution. Indeed, it's awfully inefficient, throwing away 75% of its own calculations which are necessary to fit into the photoshop framework. A single full-frame navcam raw image takes about 5 seconds to process with this method. It's clearly not practical for batch processing, but may be useful for single-image operations.
Posted by: fredk Apr 21 2021, 05:30 PM
See http://www.unmannedspaceflight.com/index.php?showtopic=8153 and elsewhere in this forum for lots of suggestions for deBayering. It is so easy now that we have un-jpegged raws with M20!
Posted by: jvandriel May 3 2021, 10:03 PM
James,
I use BIC ( Batch Image Cropper).
Google for it.
It works great and very fast.
Jan van Driel
Posted by: Brian Swift May 14 2021, 12:24 AM
here is the datasheet from AMS
Note - Per (https://doi.org/10.1007/s11214-020-00765-9), engineering cameras use the CMV-20000 detector from AMS. The EDL (downlook and uplook) cameras are a mixture of On Semi P1300 and Sony IMX265 detectors. (See Table 4 on "Page 31 of 48")
Posted by: fredk May 18 2021, 12:07 AM
Left image colors are based on camera response and and illumination optimized from calibration target on top of rover, and includes chromatic adaption from modeled illuminant to D65 standard. In right image, only camera response is modeled and illumination is fixed at D65, so no chromatic adaption is applied.
This looks impressive, Brian. I'm curious about the general approach. You need to get from the sensor raw colour space into some standard space, using an IDT or "forward" matrix, before finally sRGB or whatever. How do you find that matrix: using the published CFA response curves for the IMX265 sensor, or by fitting the matrix elements to the expected standard-colour-space values for the calibration target patches?
And are you assuming blackbody illumination, at a temperature that you fit for?
Posted by: Brian Swift May 18 2021, 06:48 AM
And are you assuming blackbody illumination, at a temperature that you fit for?
Thanks Fred. I'm not using the CFA curves (yet). When I started working on this, I couldn't find the curves. Then when I was building up the references list, I discovered a graph of them in a different FLIR doc than what I had been using.
So, I'm fitting the matrix and blackbody temperature. The fit minimizes the RMS of CIE2000 color distance between raw RGB values transformed to XYZ color via matrix and XYZ color values for calibration target patches derived from target reflectance measurements and and blackbody illuminant.
I don't consider the modeling of the illuminant as a blackbody to be well justified. The calibration target isn't directly illuminated. I did some experiments with more flexible illuminant models, but they produced some extreme results that I suspect were due to over-fitting the limited number of calibration patches. (I'm not using the white and light grey patch because they are over-exposed (clipping) in the raw data.)
The above description applies to the left image in the video, the right image just fits the matrix assuming calibration patches are illuminated by D65.
I've uploaded a PDF of the notebook so anyone interested can view it without a Mathematica viewer. https://github.com/BrianSwift/image-processing
Posted by: fredk May 19 2021, 07:07 PM
Thanks for the details, Brian, and for the pdf.
I don't consider the modeling of the illuminant as a blackbody to be well justified. The calibration target isn't directly illuminated. I did some experiments with more flexible illuminant models, but they produced some extreme results that I suspect were due to over-fitting the limited number of calibration patches.
I have to wonder about a potential degeneracy between blackbody temperature and the matrix parameters. Ie, could you get a similarly good fit by shifting the temperature and compensating with different matrix elements, ie different CFA responses? Does your best-fit temperature sound reasonable? I guess that ambiguity would disappear if you could use the CFA curves to calculate the matrix directly.
Also, the sundial target emerges into the sun a bit later in the sequence - could it be better to use those frames with the D65 model?
I also worry about the small number of patches, so you're only sparsely sampling the gamut and may be quite a bit off on the colour of the ground, eg. Still, they look pretty good by eye. The main difference between your two models is with blue.
I've been wondering about something like this with nav/hazcam, but the stretching of the public images might make that hard (at least to the extent that the blackpoints are shifted).
Posted by: Andreas Plesch Jun 1 2021, 11:21 AM
In an attempt to try to understand the camera model parameters in the metadata json, and therefore then the CAHVORE camera model, I ended up putting together a camera model analyzer:
https://observablehq.com/@andreasplesch/the-cahvore-camera-model (updated for better table formatting)
It is based on
https://agupubs.onlinelibrary.wiley.com/doi/full/10.1029/2003JE002199
and I think equivalent to the CAHVORE to Photogrammetric conversion of https://github.com/bvnayak/CAHVOR_camera_model which is in python.
I tested the analyzer with the test data of the python code repo and get the same results which is a good sign.
My goal is to unproject the fisheye projection of the Ingenuity cameras, and https://www-mipl.jpl.nasa.gov/vicar/dev/html/vichelp/marscahv.html would seem to be right tool but with a steep learning curve. In any case, I have some understanding now that the "E" parameter is for fisheye distortion, adjusting the radial distance with a third degree polynomial.
Looking the json metadata, I noticed that after the 7 triples for the CAHVORE parameters, there are additional numbers like 2;0 or 3;0 . Do we know what these extra parameters are for ?
Any further hints or feedback much appreciated.
Posted by: Greenish Jun 2 2021, 01:53 AM
Andreas, this is really helpful - I have been poking at the same sources (when I have other real work to do...) and seem to be on the same track, if a bit behind - and I have been slogging in Octave and Excel, not making slick live calculation pages! Anyway, none of your results contradict what I've seen so far, including the RTE's ~2mm uncorrected focal length (with 5.9 mm sensor diag., corresponding to something like 14mm equivalent full-frame F.L., and FOV over 90 deg.) By the way, where did you find the JSON for the heli images? I've only been able to pull the Perseverence ones from the RSS feed.
I don't know that they're needed for "normal" CAHV[ORE] processing. In the https://pds-imaging.jpl.nasa.gov/data/msl/MSLNAV_0XXX/DOCUMENT/MSL_CAMERA_SIS_latest.PDF, they specify "MTYPE" and "MPARMS" related to the geometric camera model. I had thought it referred to 1=CAHV/2=CAHVOR/3-CAHVORE
Edit: I was half-right; at the end of the file https://pds-imaging.jpl.nasa.gov/data/mer/spirit/mer2no_0xxx/document/geometric_cm.txt (linked from bvnayak's code you point to above), it explains the last 2 parameters. The MPARM value is called called L in several sources.
* T: CAHVORE Type (MTYPE): MODEL_COMPONENT_8
To distinguish the various CAHVORE model types (e.g., CAHVORE-1,
CAHVORE-2, CAHVORE-3), a parameter "T" is specified. It's value
may be integers 1, 2, or 3 to coincide with CAHVORE-1,
CAHVORE-2, or CAHVORE-3, repectively.
* P: CAHVORE Parameter (MPARM): MODEL_COMPONENT_9
"P" is an additional parameter to CAHVORE that specifies the
Linearity of the camera model for the CAHVORE-3 case. It is an
arbitrary floating-point number. A value of 0.0 results in a
model equivalent to CAHVORE-2, while a value of 1.0 results in a
model equivalent to CAHVORE-1.
Posted by: Andreas Plesch Jun 2 2021, 05:13 AM
Thanks. Another mystery solved. I updated the https://observablehq.com/@andreasplesch/the-cahvore-camera-modelto report T and P with a description. I also added theta, the angle between the horizontal and the vertical axis which can be off of 90 degrees according to the PDS geometry_cm document.
Unfortunately, the id query parameters which is provided for the json_link in the raw images json does not seem to work for the HELI images.
But one can just use the network tab in the Chrome developer tools while filtering for the heli images and look for the json request which looks something like:
https://mars.nasa.gov/rss/api/?feed=raw_images&category=mars2020,ingenuity&feedtype=json&ver=1.2&num=100&page=0&&order=sol+desc&&search=|HELI_RTE&&&condition_2=91:sol:gte&
There are so many great online tools. I like Observable notebooks but of course Jupyter notebooks are really nice as well. I think there is an Octave kernel for Jupyter. Python can be pretty friendly.
I hope to try some Image processing next. Pixel remapping is quite possible with js, especially when using the GPU with webgl (which I hope to avoid first). See what happens when one recalculates r by subtracting the distortion delta factor given by the R polynomial, or something like that. Not sure about how to use E to unproject full fisheye.
Posted by: Andreas Plesch Jun 5 2021, 03:31 PM
Here are some notes I gathered studying and experimenting with the C A H V O R E model, using https://trs.jpl.nasa.gov/bitstream/handle/2014/37251/03-0869.pdf?sequence=1&isAllowed=y andhttps://agupubs.onlinelibrary.wiley.com/doi/full/10.1029/2003JE002199.
Each letter in CAHVORE represents a parameter of the camera model which allows for projecting a 3d point onto an image plane. The model is based on a conceptual description of the projection and its parameters are tuned to a specific camera in a careful, experimental calibration process. It is important to understand that this process is a least square fitting minimization of residuals tuning all 7 parameters simultaneously. This means, while each parameters has a meaning in the concept to derive the model, that the result of the calibration is not strictly required to coincide with a physical measurement. In practice, I believe the parameters mostly do follow an actual measure because they use careful starting guesses and because there are some constraints on the calibration.
C A H V characterizes a perspective view with a focal distance and an orientation where straight lines stay straight. O is needed when the optical axis is a bit off the camera axis.
R stands for rho and is the radial lens distortion parameter. E stands for epsilon and is the fisheye parameter. E is needed because R cannot capture distortion of very wide angle (>140 or so) lenses.
The model first applies E by considering a variable lens pupil location which depends on the incidence angle of the entering ray rather than a fixed pin hole. This has the effect of an apparent forward shift of the camera center C resulting in an effective center C' and can thus characterize wide angle lenses. Note that the description of how E is defined differs in Di and Li (2004) and Gennery (2002). Di and Li (2004) only briefly mention E and do not use it. Gennery (2002) is the basis for the NASA/JPL use of the model.
Then R is applied by using it to determine an apparent shift in the position of the imaged 3d point P to an effective location P'. This shift describes the lens distortion. Finally, P' is projected onto the 2d image plane using the other parameters.
There are three types of the mathematical model: the general model, the fisheye model, and the perspective model. I believe they are distinguished for historical reasons and because they allow for simplified computations. The general model can represent the other models by using an additional parameter (L or P).
Since the calibrations occurs for all parameters simultaneously it is not really possible to apply the model partially. For example, for fisheye lenses both parameters R and E have to be applied. In fact, the exact mathematics described in Gennery (2002) should be probably used even if there may be other ways to describe the concept mathematically since it is those equations which are used for the calibration, at least these are the only ones which are accessible. Following these the model can be used to project a 3d point onto a 2d image, and Gennery (2002) describes a sanctioned process to do the reverse. However, only the orientation of the entering 3d ray can be recovered from a 2d pixel. Unfortunately, this involves numerically solving an equation for each pixel.
The MARSCAHV VICAR utility attempts to remove distortion by transforming an image from the CAHVORE model to the CAHV model. Apparently, the utility is not available publicly. From its description, it computes the orientation of the entering ray for each pixel as described, assumes a 3d sphere (of radius 1m) as the 3d point location, and then projects that 3d point onto an 2d image using the CAHV parameters.
I may try to reproduce that approach. If it works, an interesting experiment for the Nav helicopter images may be to assume a horizontal plane (normal to the camera axis) at 10m distance rather than 1m sphere to intersect the computed ray with. And then simply look at the map view, eg. take the x and y and ignore the z for an image.
Similarly, for the color RTE images, assuming a plane at a 22 degree angle to the camera axis for intersecting the reconstructed rays and looking at the map view could be tried.
Posted by: Andreas Plesch Jun 7 2021, 07:40 PM
Let me share a quick experiment:
Since I have an old stereoscope,
|
I wanted to use it to view Greenish's stereo pair:
http://www.unmannedspaceflight.com/index.php?showtopic=8610&st=320&p=252728&#entry252728
From an original stereo photograph card I made a template and used it to scale and print Greenish's Ingenuity parallel stereo pair:
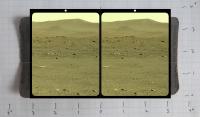
|
Perhaps that template could be useful. Here is a link to a shared Google doc slide ready to print at 100%: https://docs.google.com/presentation/d/17kiZBb2p8xEwzJzUqfe1ELUzbX6aPDJv-HfId-5Tzro/edit?usp=sharing
Clamping the printed and cropped paper between the original card in the card holder and behind the corner wires worked pretty well. The stereo view through the stereoscope is immediate and effortless. The main limitation is the dpi and quality of the print (the nominal 1200dpi was pretty good but could be better). It may be worth having images printed at the drugstore for that purpose if it is possible to control the exact size.
Posted by: Greenish Jun 8 2021, 02:40 AM
That's pretty classy, and entirely by chance that aspect ratio was pretty close. If I'd known I'd have been less slapdash with the upscale, crop & sharpen.
Posted by: tau Jun 11 2021, 12:37 PM
Another option is to save the image to a USB device and connect it to the TV. My TV only accepts the jpg format with the baseline option, all other formats were ignored. It is recommented to save jpg in high quality.
Drawback of this method: the vertical resolution is reduced to 540 lines per eye.
If the picture looks strange (banding), check the overscan of the TV and set it to "off". If the 3D TV screen has a resolution other than HD, the method should be adjusted accordingly.
*old, because I'm afraid that 3D TVs are no longer produced
Attachments:
1) A stereo image from sol 108 ready for use
2) An anaglyph to show that it works
3) The stereo mask file to do it yourself
1
. 2
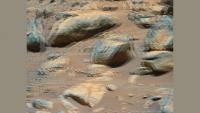
. 3
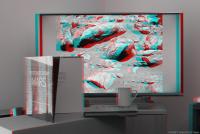

Posted by: fredk Aug 1 2021, 05:47 PM
I'm not sure what we're seeing with these new navcams, eg:
https://mars.nasa.gov/mars2020-raw-images/pub/ods/surface/sol/00159/ids/edr/browse/ncam/NLF_0159_0681069026_161EBY_N0060000SAPP00606_00_0LLJ02.png
That appears to be the sun at centre, with diameter about right for a full-res navcam frame. Maybe some new version of the bleed-off subtraction mode? But I don't see how you could get an unsaturated solar disc image without a solar filter.
Posted by: mcaplinger Aug 1 2021, 06:59 PM
google for "cmos black sun".
Posted by: Bill Harris Aug 1 2021, 10:04 PM
The digital version of the old film "solarized" image.
Posted by: Brian Swift Aug 1 2021, 10:46 PM
That appears to be the sun at centre, with diameter about right for a full-res navcam frame. Maybe some new version of the bleed-off subtraction mode? But I don't see how you could get an unsaturated solar disc image without a solar filter.
Interesting bit to me, the little blob in the lower right of some of the images. I wonder if they were trying to capture an eclipse/transit. If it appeared in all the image, I'd just assume it was a lens flare.
https://mars.nasa.gov/mars2020/multimedia/raw-images/NLE_0159_0681052830_347ECM_N0060000SAPP00606_00_0LLJ
Posted by: fredk Aug 2 2021, 11:11 PM
Thanks for the tip. The black sun effect does seem to explain the large dark area inside the magenta ring. But I don't see how you can get what looks like an image of the solar disc at the centre of the dark area (it has about the right diameter to be the sun). If the surrounding pixels were saturated enough (due to scattering in the atmosphere or optics) for the reference levels to also be saturated, leading to near-black on subtraction, then surely the solar disc should also be saturated and also look black. Why wouldn't the black sun effect also darken the solar disc?
Maki etal describe the black sun effect as a problem for centroiding, and say they use a technique to bleed off charge from the reference so subtraction from the pixel value no longer gives black - I guess this is what's previously been done, but apparently not with these new images.
The only way I can think of to resolve the solar disc without an ND filter is through optical reflections - maybe that's what we're seeing, though it's not clear why that wouldn't simply further saturate those pixels and so darken the output values.
Posted by: James Sorenson Aug 3 2021, 07:01 AM
I have no idea if this function is onboard, but what about an onboard merge of a very short exposure and a longer exposure?
The shortest possible exposure for the ECAM's is 411 microseconds and the longest possible exposure is 3.3 seconds.
Posted by: fredk Aug 3 2021, 02:15 PM
I was wondering about that too, but I'd be surprized if an unfiltered short exposure would show the disc, considering the dust in the air and scattering in the optics. Try that with your camera on Earth and you end up with an overexposed glow around the sun. Maybe with a good enough dynamic range sensor.
Posted by: erentar Aug 20 2021, 08:57 PM
Is there automation available to rectify and project (at least mastcam) images?
Posted by: Greenish Aug 20 2021, 09:00 PM
Mars 2020 Mission Release 1 is live in PDS...time to start digging in to the documentation & calibrated goodies!
Gonna start with some light reading: https://pds-geosciences.wustl.edu/m2020/urn-nasa-pds-mars2020_mission/document_camera/Mars2020_Camera_SIS.pdf
The NASA Planetary Data System announces the first release of data from the
Mars 2020 Perseverance Rover mission to Mars. This release contains raw,
calibrated, and derived data products covering the first 90 sols of the
mission, February 18 to May 20, 2021. The data are archived at various PDS
Nodes. Links to all the archives can be found at
https://pds-geosciences.wustl.edu/missions/mars2020/
Data from the following science investigations are included in this release.
Mastcam-Z – Mast-mounted Zoom Camera System
Engineering Hazard and Navigation Cameras
Helicopter Cameras
EDLCam – Entry, Descent, and Landing System Cameras
MEDA – Mars Environmental Dynamics Analyzer
MOXIE – Mars Oxygen ISRU Experiment
PIXL – Planetary Instrument for X-ray Lithochemistry
RIMFAX – Radar Imager for Mars Subsurface Exploration
SHERLOC – Scanning Habitable Environments with Raman and Luminescence for Organics and Chemicals
SuperCam – LIBS, Raman, Time-Resolved Fluorescence, VIS/IR spectrometers, Remote Micro-Imager and microphone
SPICE – Observation geometry and ancillary data
Future releases covering sols during which sampling events occurred will
include ‘sample dossiers’ – collections of science and engineering data
relevant to each returnable sample or blank. No sampling events occurred
during the first 90 sols of the mission.
To subscribe to future announcements of Mars2020 data releases:
https://pds.nasa.gov/tools/subscription_service/top.cfm
Edit: looks like there's now a http://www.unmannedspaceflight.com/index.php?showtopic=8649&hl=. I do lean towards continuing in this thread the conversation about the technical aspects of imagery now that the answers to many of our speculations are published...
Posted by: tau Jun 19 2022, 04:00 PM
I use Photoshop to convert the raw png images to uncompressed bmp format before computation, and after creating the principal components image to add the credit line,
sometimes for some minor optimizations (e.g. slight brightness and sharpness adjustment), and to save the image as compressed jpg format for upload to UMSF.
The main part is done with self-developed algorithms and source code in C++ and Visual C++.
The principal components algorithm I translated and adapted from a Basic language algorithm I found in a book from the year 1988.
The other important part is the scaling, translation, and rotation of the numerical results and their projection into the RGB color space.
This part of the code is reworked with each new raw image series to get a satisfactory result.
The resulting image does not always look good (I do not upload these to UMSF).
It should be noted that the resulting principal component coefficients depend on the overall image content.
Any change in the multispectral values in one part of the image will result in an overall change in the colors in the entire image.
In addition, the flatfield inhomogeneities of the multispectral filters (especially the infrared filters of the Mastcam Z right eye) have a strong disturbing effect.
The resulting colors are somewhat dependent on chance, and it is not guaranteed that different minerals will appear in different colors.
Edit
Meanwhile, I use multispectral sky images from sol 604 for a rough flatfield correction.
A visual explanation of the image processing you can find in post #170.
Posted by: mcaplinger Nov 10 2022, 10:51 PM
We have had some inquiries over the years about color calibration for the Mars2020 cameras. For WATSON, the best I can offer is the attached image from the calibration dataset (see https://www.researchgate.net/publication/345959204_Mars_2020_Perseverance_SHERLOC_WATSON_Camera_Pre-delivery_Characterization_and_Calibration_Report ) This image was taken with 100 msec exposure time, 8-bit linear divide by 8 encoding, and is Bayer-interpolated but otherwise straight out of the camera. It was illuminated by a commercial halogen worklamp (Britek Halo Flood Twin 1200S) with two 500 watt bulbs with a stated color temperature of 3150K. The light source was not calibrated and the geometry was not recorded.
The target is a commercial "Macbeth ColorChecker" ( https://en.wikipedia.org/wiki/ColorChecker ) made by X-Rite and purchased sometime around 2010, I'm guessing. These charts have gone though a variety of manufacturers (they're now made by Calibrite) and I don't know how their colors may have varied; we made no attempt to measure this one.
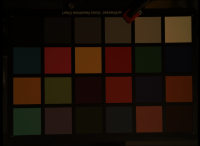
|
Posted by: PaulH51 Nov 19 2022, 07:27 AM
Thanks for that information (from me and others)
Were you involved in testing the other cameras such as the NavCams pre launch?
If so, is there any publicly available information that you could share (such as released calibration reports / calibration targets used for any of the other M20 cameras)
Posted by: mcaplinger Nov 20 2022, 04:45 PM
I was involved in the data taking for Mastcam-Z but responsibility for calibration rests with a working group of the science team. There is an open literature paper on that: https://link.springer.com/article/10.1007/s11214-021-00795-x
I didn't have anything to do with Navcam.
There's supposed to be enough info in the data product SIS to answer any question one might have.
Posted by: PaulH51 Nov 21 2022, 03:03 AM
I didn't have anything to do with Navcam.
There's supposed to be enough info in the data product SIS to answer any question one might have.
Many thanks
Posted by: scalbers Dec 23 2022, 10:29 PM
Here's what we have so far with a mosaic from the PDS for Sol 539 using the .png images on the web browser index. Individual contrast stretching was needed and the color balance is different between the lower and upper tier of NavCam images. The "RAD" images were used among the choices. The images are more uniform, since for example the vignetting was removed upstream.
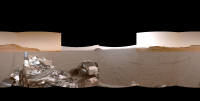
|
A somewhat improved matching between lower and upper tiers is now in place for Sol 539 within the http://stevealbers.net/allsky/sites/perseverance/navcam_l/small/perseverance_cyl_n.html. Here is a https://stevealbers.net/allsky/sites/perseverance/navcam_l/large/composite_sol539.png of this frame.
Posted by: tau Feb 13 2024, 02:08 PM
If you have not already done so, you should read this post first.
Thorough information about PCA (principal components analysis) you can find https://en.wikipedia.org/wiki/Principal_component_analysis on Wikipedia.
Raw material for my image processing is a set of six multispectral images from Mastcam-Z left eye (ZL1...ZL6) or right eye (ZR1...ZR6).
Sometimes I use RGB images (ZL0 or ZR0) when no multispectral images are available.
I use the pixel values of the six multispectral images (or of the three RGB channels in a RGB image) as variables to calculate the first three principal components.
Sky is excluded (masked) from calculation of the principal components, but resulting coefficients are applied to the sky, too.
The image below is a visual explanation of numerical processing steps based on PCA results.
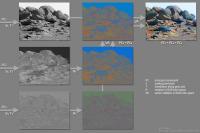
|
A very short summary: It is "painting by numbers".
Posted by: kymani76 Feb 14 2024, 11:24 AM
Tau, thank you for all your efforts to explain the procedure.
I can get the three primary components easily, as the following image shows.
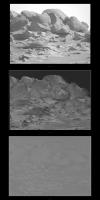
|
What I still struggle to understand is how the rotation in RGB color space (steps r2 and r3) and the resulting blend (pc2+pc3) are accomplished.
I can get somethng resembling your final product by performing some band gymnastics,
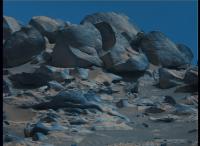
|
but I'm obviously still doing something wrong.
I would really any pointers you can give, thank you in advance.
Posted by: tau Feb 18 2024, 07:19 PM
Here is a schematic sketch of what is meant by the rotation in the RGB color space from the gray axis to a perpendicular plane.
The color axes of PC2 and PC3 are also perpendicular to each other.
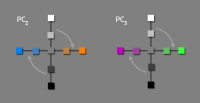
|
Usually, only the resulting image PC1+PC2+PC3 in my previous post is created.
All other partial images are just illustrations of intermediate numerical calculation steps.
The calculated principal components pc1, pc2, pc3 are centered around 0 (coordinate origin).
Scaling and translation:
PC1 = a1*pc1 + b1, where b1 is about 128 (center of the RGB cubus with values 0...255)
PC2 = a2*pc2 + b2, where b2>0 for a more rust-colored Mars
PC3 = a3*pc3 + b3, where b3≈0
Vector addition with rotated PC2 and PC3 in RGB space:
R = PC1 + 0.707*PC2 - 0.408*PC3
G = PC1 + 0.816*PC3
B = PC1 - 0.707*PC2 - 0.408*PC3
If any of the values of R,G,B is less than 0 or greater than 255, find the point where the perpendicular line from (R,G,B) to the gray axis meets the cubus surface.
If the resulting image has unusual colors (e.g. yellow basalts, greenish dust in ZL0 images), replace a2 and/or a3 with their negative values.
Posted by: kymani76 Feb 20 2024, 07:53 AM
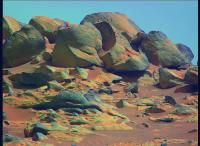
|
Tau, big thanks, it appears it had worked.
I've noticed that a lot depends on how you scale your bands. There was a lot of trial & error, before I succeeded. Also some wild color permutations.
I still have a lot of details to iron out (like flattening the atmosphere), but I finally get the idea.
It is a very elegant analysis tool.
Posted by: serpens Feb 20 2024, 10:05 PM
I really enjoy Tau's false colour renditions and now yours kymani. They take me back to the early days of Spirit and Opportunity where it was, and indeed still is, such a useful tool particularly in the identification of hematite. In false color the vistas of hematite concretions were at times stunning and it provided a pseudo scratch test of fines from Opportunity's grinds. Thank you for your efforts with tools more sophisticated than I was used to.
Posted by: kymani76 Feb 22 2024, 07:39 PM
Thank you very much The software has really come a long way since MER rovers, but those were more romantic times in exploration of Mars.
I was also intrigued by tau's processing, so I feel over the moon now for learning the procedure.
So the credit is all his. But I have several ideas how to apply this newfound knowledge to some datasets. Will be posting first result in short time.
Powered by Invision Power Board (http://www.invisionboard.com)
© Invision Power Services (http://www.invisionpower.com)