Google Mars HiRISE base images for Opportunity |

  |
Google Mars HiRISE base images for Opportunity |
 Sep 30 2010, 01:33 AM Sep 30 2010, 01:33 AM
Post
#16
|
|
 Senior Member  Group: Members Posts: 1887 Joined: 20-November 04 From: Iowa Member No.: 110 |
QUOTE (elakdawalla @ Sep 28 2010, 04:33 PM)  The first step is to get the images. I can provide those, thanks to James Canvin, who processed the small piece of PSP_005423_1780 that covers the area around Santa Maria plus the entirety of PSP_010341_1775 which covers the rest of the way to Endeavour plus the entire western rim into 8192x8192 JPEG format subimages, each of which overlaps by 10% with the next. Are subimages of the path between Oppy's current location and Santa Maria available? They work much better for me than using the overlays SFJCody provided for GoogleMars which slows to a crawl when the high-res overlays are enabled. |
 |
 
|
|
Sep 30 2010, 07:37 AM
Post
#17
|
|
 Senior Member Group: Moderator Posts: 2262 Joined: 9-February 04 From: Melbourne - Oz Member No.: 16 |
I still have them on my disk, in fact they were still on my web server until last week when I deleted them to make way for the new ones, doh! When I get the chance I'll dig them out.
James -------------------- |
|
|
|
|
Sep 30 2010, 09:02 AM
Post
#18
|
|
 Member Group: Members Posts: 404 Joined: 5-January 10 Member No.: 5161 |
QUOTE (elakdawalla @ Sep 29 2010, 02:12 PM) The region file generators that make images for Google Maps take a large original image, like our 8192 by 8192, and chop it and/or downsample it into different versions that get displayed at different zoom levels. When you are zoomed way out, Google Mars might display the photo in a single tile whose source file is only 256 pixels square. When you zoom in some, it'll display tiles from it that were chopped into, say, 1024 by 1024 chunks, then downsampled to 256 pixels square. When you zoom all the way in, you'll see the screen tiled with 256 by 256 images at the original resolution. This vastly improves performance and is what allows you to sweep around and zoom in and out so quickly. It's a technique that GIS applications have done for a long time. I get it now, somewhat. I downloaded MapTiler on my Mac. It worked great, chopped up the large file with Santa Maria crater into the tiles-pyramid, but I can't figure out what coordinates to use in the "Georeference" box in MapTiler. It places the top image of the pyramid over the whole Earth, completely smothers it, when using the default coordinates. Anyone know the coordinates to use that would place the tiles near Santa Maria crater on Mars? If I could get the tiles to land near Santa Maria, I could then fine-tune their position, I'm assuming. Maybe it has to be done by tweaking the code in the KML file. |
|
|
|
|
Sep 30 2010, 12:43 PM
Post
#19
|
|||
|
Senior Member Group: Moderator Posts: 4279 Joined: 19-April 05 From: .br at .es Member No.: 253 |
Wow, downloaded and tested MapTiler and I think that's *the* tool we need.
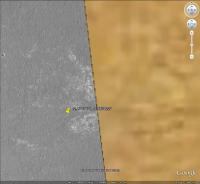
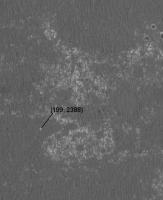
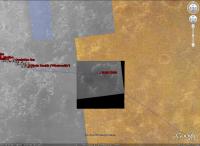
Regarding your question about coordinates: it uses a similar definition of bounding box as in KML. In this case you should input the north, south, east, and west coordinates separated by spaces. Just for testing I used the lat/long coordinates of a KML file I had here which corresponds more or less to the Meridiani landing site: -1.899331338 -2.44643146 -5.298233309 -5.552521575. You can do the same. The result is the picture of Santa Maria all over the landing site but, more important, it zooms in and out smoothly.  Now, about the real coordinates... I would do the following ( 1) Look for a feature near the right edge of SFJCody's map extension, annotate its lat / long coordinates, search for the same feature in the picture with Santa Maria and annotate its (x, y) coordinates.
2) Calculate the angular size of the picture and of a single pixel. It has 8192 x 8192 pixels so it covers 2048 x 2048 meters. Given the mars circumference size (TBD) the picture covers X degrees and a single pixel covers Y degrees. R = 3396.2km (equatorial), 3376.2km (polar) X = 2.048 / (2*PI*R) * 360deg. Y = X / 8192 3) Calculate the lat / long coordinates of all four borders using the results of 1) and 2). north -2.160015615 south -2.194771186 west -5.45866131 east -5.424110413 Now, let's try it... |
||
|
|
|
||
|
Sep 30 2010, 04:12 PM
Post
#20
|
||||
|
Senior Member Group: Moderator Posts: 4279 Joined: 19-April 05 From: .br at .es Member No.: 253 |
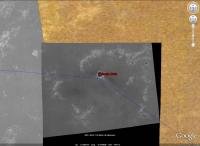
Bingo!

Thanks Walfy for finding the right tool! Map Tiler Emily, I think the biggest problem to have the extended maps is solved but I still see an open point which is the transparency of the black areas outside the map-projected picture. The original 8k x 8k images should be available in PNG format with the transparency already set. This post has been edited by Tesheiner: Sep 30 2010, 04:37 PM |
|||
|
|
|
|||
|
Sep 30 2010, 05:12 PM
Post
#21
|
|
|
Member Group: Members Posts: 404 Joined: 5-January 10 Member No.: 5161 |
Nice progress! I had a feeling you would propel this forward. I was able to set the black part of the images to transparency by first opening the image in Photoshop, then going to "Save for web & devices." In there you can choose the transparency to the black when you set it to save as a GIF. Not sure if it's the best way, but SFJCody's images were done similarly because they have the same very small transparency artifacts along their edges when you zoom way in.
To match the lighting of the new images with the old, maybe you could open the image of SFJCody's in photoshop, the one nearest Santa Maria, then increase the canvas size of the image large enough to place the new and slightly darker image with Santa Maria in it. Once they are in there side-by-side, adjust the curves settings on the Santa Maria image until it matches SFJCody's image. Then crop out SFJCody's image, then you have a color-matched Santa Maria image. But personally, I don't think it's necessary to change the brightness levels of all the images. If you're going to do it for the first one, then you're going to have to do it for all of them! It's not a big deal for me if the end result has 2 large image overlays of different brightness side-by-side. It will save a lot of moil and toil to skip the step of matching the brightness levels. Those are my two bits. OK, back to my job. Otherwise, I'd be tinkering with all this... maybe tonight. |
|
|
|
|
Sep 30 2010, 05:23 PM
Post
#22
|
|
|
Senior Member Group: Moderator Posts: 4279 Joined: 19-April 05 From: .br at .es Member No.: 253 |
QUOTE (walfy @ Sep 30 2010, 07:12 PM) Nice progress! I had a feeling you would propel this forward. I was able to set the black part of the images to transparency by first opening the image in Photoshop, then going to "Save for web & devices." In there you can choose the transparency to the black when you set it to save as a GIF. Not sure if it's the best way, but SFJCody's images were done similarly because they have the same very small transparency artifacts along their edges when you zoom way in. I have Serif Photoplus instead of Photoshop but AFAIK they have similar capabilities. GIF is probably not the best option because if you set black = transparency all dark areas *inside* the real image are also made transparent. Another option is to edit the picture, set/fill all the contour as transparent and save as PNG. Simple but ... it's too much for my computer; the image is too big. 
|
|
|
|
|
Sep 30 2010, 06:49 PM
Post
#23
|
|
|
Member Group: Members Posts: 404 Joined: 5-January 10 Member No.: 5161 |
QUOTE (Tesheiner @ Sep 30 2010, 09:23 AM) ...GIF is probably not the best option because if you set black = transparency all dark areas *inside* the real image are also made transparent. Another option is to edit the picture, set/fill all the contour as transparent and save as PNG. Simple but ... it's too much for my computer; the image is too big. It's not a problem, as there are no pixels in the actual image of the surface area that are as black as the background pixels outside the image. I tested this using the "Magic Wand" selection tool in Photoshop, which you can set to select only pixels of the same color of an image. It only chose those pure black pixels outside in the background, nothing on Mars' surface area. One drawback of GIF image format is that it reduces the number of pixel types to just 256. The GIF still look identical to the non-GIF image, at least to my eye, but the thought of the color gamut reducing to just 256 colors sounds bad to me! Your PNG suggestion sounds great, if I have time tonight I'll try it . My Mac can handle the large files. |
|
|
|
|
Sep 30 2010, 07:18 PM
Post
#24
|
|
 Senior Member Group: Members Posts: 4256 Joined: 17-January 05 Member No.: 152 |
Presumably these are grayscale images originally, so that means 8 bits per pixel, or 256 shades of grey. (Even if they had 12 or more bits/pixel originally, you won't be able to take advantage of those on GE.) So you won't loose any information with a gif (gifs are lossless). Even if the images you're starting with are colour 24 bits/pixel, or 256^3 colours, all those millions of extra colours are completely superfluous. Depending on what format you chose for the new images, you may actually save some on the filesize by converting the original image to 8 b/p greyscale first.
For the sake of those downloading on slower connections, it may be worth checking which format would give the smallest final filesize. Jpegs would be much smaller than gif or png, but you won't get transparency with the jpegs. Is the transparency really necessary? Does it just mean getting those black edge regions like in Tesheiner's pics above? Can you just crop away all of the black regions, at the expense of loosing a small part of the new map? Or just live with the black regions? |
|
|
|
|
Sep 30 2010, 08:04 PM
Post
#25
|
|
|
Senior Member Group: Moderator Posts: 4279 Joined: 19-April 05 From: .br at .es Member No.: 253 |
QUOTE (walfy @ Sep 30 2010, 08:49 PM) It's not a problem, as there are no pixels in the actual image of the surface area that are as black as the background pixels outside the image. Good to know that because I saw an option on Map Tiler to choose a transparent color. In that case there's no need to have a GIF or PNG image, just select black as transparent and voila! QUOTE (fredk @ Sep 30 2010, 09:18 PM) For the sake of those downloading on slower connections, it may be worth checking which format would give the smallest final filesize. Jpegs would be much smaller than gif or png, but you won't get transparency with the jpegs. That's correct but I think there's a misunderstanding here. The image files I'm talking about are those 8k x 8k which are the *source* for the tool. It then chops the image and the result is a quite big number of very small 256x256 images in JPEG and (that's what I read) PNG files with their corresponding region files. Therefore, once we finally get these map extensions working, the "end users" should not be concerned about filesize or type but just download the resulting KML and JPEG files. |
|
|
|
|
Sep 30 2010, 09:04 PM
Post
#26
|
|
|
Senior Member Group: Members Posts: 4256 Joined: 17-January 05 Member No.: 152 |
My appologies if I'm missing something here! When I look at the files in the folder for the previous map extension, "MER-B Map extension v2.0" (which Emily linked to in her first post above), it contains close to 5000 individual image files. Almost all of them are png files (there are 6 jpegs). The big majority of those png files don't include any of the black regions near the edges, that you'd want to be transparent. So it seems to me that we could reduce the filesize and download times for the next extension by a large factor if these files were jpegs instead of pngs. (I see close to a factor of 4 reduction in filesize going from png to 80% quality jpeg.)
Presumably we could eliminate the need for pngs altogether if we cropped away the black as I mentioned above (or lived with it). Again, sorry if there's some obvious reason those pngs couldn't be substituted with jpegs... Is it that people want a lossless format to avoid the compression artifacts of jpegs? |
|
|
|
|
Sep 30 2010, 09:35 PM
Post
#27
|
|
|
Senior Member Group: Moderator Posts: 4279 Joined: 19-April 05 From: .br at .es Member No.: 253 |
Oh, now I see our misunderstanding. You are talking about the previous map extension and that one was not made using Map Tiler.
The tool I'm talking about actually is quite optimized. Given a PGN input file it creates a big bunch of tiny JPEG files but only PNGs on those areas where some pixels are transparent. I did a little test with a 4k x 4k PGN file and the tool cuts it in 213 JPEGs and 54 PNGs spread on 36 folders. Not bad. Another point would be to redo the previous map extension using Map Tiler. That would be great in terms of optimization but if it's not registered to the very same lat/long coordinates the route map would become completely displaced on top of the background map. |
|
|
|
|
Sep 30 2010, 09:54 PM
Post
#28
|
|
 Administrator Group: Admin Posts: 5172 Joined: 4-August 05 From: Pasadena, CA, USA, Earth Member No.: 454 |
QUOTE (BrianL @ Sep 29 2010, 04:00 AM) Why can't Google do this work? Has anyone asked them? Google might not but Ross Beyer and his group at NASA Ames, who originally worked with Google to make Google Mars, is willing! See his post here!!! (Meantime, Tesheiner has contacted me about a shorter-term solution that should work for Santa Maria, based on the use of MapTiler that you all figured out in this discussion, hopefully we'll sort that tomorrow) -------------------- My website - My Patreon - @elakdawalla on Twitter - Please support unmannedspaceflight.com by donating here.
|
|
|
|
|
Sep 30 2010, 10:28 PM
Post
#29
|
|
 Member Group: Members Posts: 813 Joined: 8-February 04 From: Arabia Terra Member No.: 12 |
Lots of activity in this thread. I guess my map is finally going to be supplanted with something better!
|
|
|
|
|
Oct 1 2010, 12:37 AM
Post
#30
|
|
|
Member Group: Members Posts: 404 Joined: 5-January 10 Member No.: 5161 |
QUOTE (elakdawalla @ Sep 30 2010, 01:54 PM) ...Ross Beyer and his group at NASA Ames, who originally worked with Google to make Google Mars, is willing! See his post here!!! Great news! If anyone should do it, some folks at NASA! |
|
|
|
|

|
Lo-Fi Version | Time is now: 26th September 2024 - 03:51 PM |
|
RULES AND GUIDELINES Please read the Forum Rules and Guidelines before posting. IMAGE COPYRIGHT |
OPINIONS AND MODERATION Opinions expressed on UnmannedSpaceflight.com are those of the individual posters and do not necessarily reflect the opinions of UnmannedSpaceflight.com or The Planetary Society. The all-volunteer UnmannedSpaceflight.com moderation team is wholly independent of The Planetary Society. The Planetary Society has no influence over decisions made by the UnmannedSpaceflight.com moderators. |
SUPPORT THE FORUM Unmannedspaceflight.com is funded by the Planetary Society. Please consider supporting our work and many other projects by donating to the Society or becoming a member. |
|