Voyager and Galileo Images of Ganymede, The Ganymede images and mosaics thread |

  |
Voyager and Galileo Images of Ganymede, The Ganymede images and mosaics thread |
 Oct 22 2010, 07:06 AM Oct 22 2010, 07:06 AM
Post
#91
|
|
 Junior Member  Group: Members Posts: 74 Joined: 9-October 10 From: Victoria, BC Member No.: 5483 |
QUOTE (ngunn @ Oct 21 2010, 03:35 PM)  Titan has veiled wonders and Io suppurates, but to my eye from a distance Ganymede is just the most beautiful moon in the solar system. Thanks to all for the magnificent images. Yeah, I quite like how it looks too  . .
|
 |
 
|
|
Nov 23 2010, 05:59 AM
Post
#92
|
|
|
Senior Member Group: Members Posts: 1276 Joined: 25-November 04 Member No.: 114 |
EDG Have you done other moons?
Europa maybe? |
|
|
|
|
May 23 2016, 09:19 PM
Post
#93
|
||
 IMG to PNG GOD Group: Moderator Posts: 2250 Joined: 19-February 04 From: Near fire and ice Member No.: 38 |
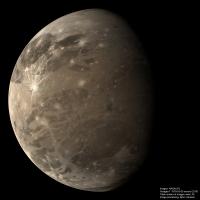
Here is a new global mosaic of Ganymede from Voyager 1 images:
There are versions of this mosaic earlier in this thread that aren't as carefully processed and also they are not completely global. This is the biggest global mosaic of Ganymede I've seen, a 17 frame mosaic. The source images were obtained by Voyager 1 on March 5, 1979 over a period of about 2 hours. During these 2 hours Voyager 1's distance from Ganymede dropped from 305,000 to 180,000 km. As usual I reprojected the original images to simple cylindrical projection, did all of the color and mosaicking work there and then rendered the resulting map with 3D software using a typical viewing geometry. Most of the 17 cylindrical maps that I created and then mosaicked are in GBV or OBV color. From this I created synthetic R, G and B color, resulting in approximately true color (the color difference between the equatorial and polar areas should probably be more pronounced though). Somewhat unexpectedly, when making the R, G and B color it didn't seem to make any difference if the source images were OBV or GBV. In a few small areas only one or two colors were available. I colorized these areas by taking the color from nearby areas. A significant problem when making this mosaic is that some of the source images are smeared. This happened because the intense radiation in Jupiter's magnetosphere affected Voyager 1's computers and clock. As a result some of the images were taken when the instrument scan platform was moving. It's difficult to make a full color global mosaic without using some of these smeared images. Following very useful information from machi it turned out that these images can be successfully deconvolved, making it possible to use them. Discussion on this can be found here: http://www.unmannedspaceflight.com/index.php?showtopic=8091 This is very useful because in addition to the Ganymede images some of Voyager 1's images of Io and Callisto are smeared as well. |
|
|
|
|
|
|
May 23 2016, 09:50 PM
Post
#94
|
|
|
Member Group: Members Posts: 910 Joined: 4-September 06 From: Boston Member No.: 1102 |
Bjorn that is incredibly good. Thank you for your amazing work!
-------------------- |
|
|
|
|
May 25 2016, 04:48 AM
Post
#95
|
|
|
Member Group: Members Posts: 306 Joined: 4-October 14 Member No.: 7273 |
That's spectacular work, Bjorn! Well worth the time invested in it!
I've started assembling some of the various Voyager 2 mosaics of Ganymede. Since this was a relatively close flyby and I'm not skilled in reprojection techniques, I'm just working on small submosaics that I can hand-assemble without too much difficulty. 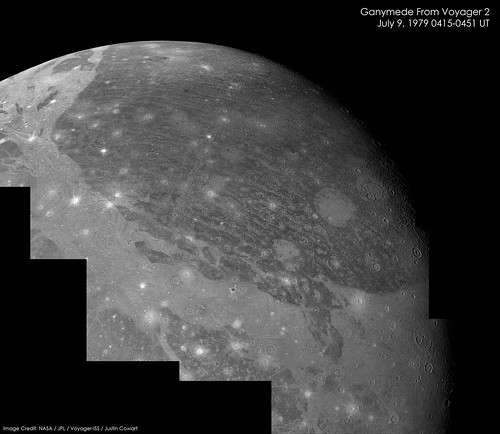 Full-res here 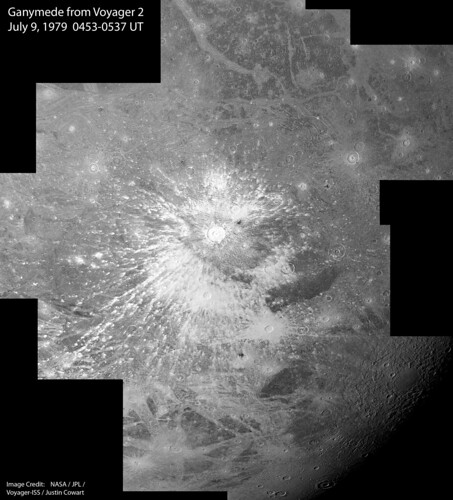 Full-res here I love this moon's landscapes. These images almost make me feel like I'm flying over it in person. |
|
|
|
|
May 25 2016, 10:03 PM
Post
#96
|
|
|
Junior Member Group: Members Posts: 74 Joined: 9-October 10 From: Victoria, BC Member No.: 5483 |
Od's tonsils, Bjorn, that is amazing!
QUOTE (Bjorn Jonsson @ May 23 2016, 02:19 PM) Here is a new global mosaic of Ganymede from Voyager 1 images: |
|
|
|
|
May 26 2016, 02:37 AM
Post
#97
|
|
|
Member Group: Members Posts: 306 Joined: 4-October 14 Member No.: 7273 |
Voyager 2 got a great mosaic of the ~600 km wide Gilgamesh Crater, which was sitting near the sunset terminator around the time of the flyby. With normal image processing it's pretty easy to see the ~300 km inner basin, as well as the scarp surrounding hummocky terrain that marks the edge of the main crater at a diameter of 590 km. To the south of the crater, there is a hint of some smoother terrain, but it's hard to interpret.
 Full-size here When I was processing this, I accidentally pasted in another copy of this photo in a difference blending mode. As it turns out, a slight offset highlights the surface roughness pretty well, and the smoother terrain really pops out: 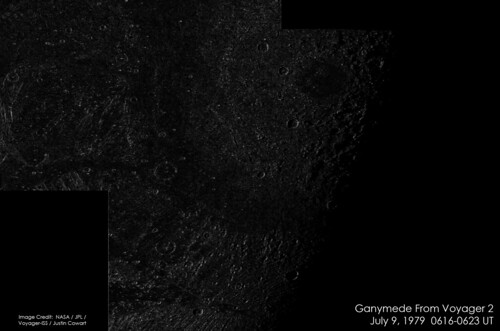 Full-size here Reading Paul Schenk's paper on Gilgamesh, this zone is interpreted as a continuous ejecta sheet, which extends out about 1,100 km from the crater's center. |
|
|
|
|
May 26 2016, 06:50 PM
Post
#98
|
||
 Senior Member Group: Members Posts: 2530 Joined: 20-April 05 Member No.: 321 |
This is all fantastic. Ganymede is truly one of the more beautiful worlds. As I've gotten into astrophotography over the last year, I've learned quite a bit about deconvolution; it may be more accurate to say that I've used deconvolution. I have found myself saying, "This is where the magic happens" as I watch blurry images suddenly become wonderful through processes I can only partially explain.
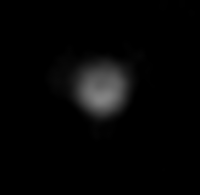
This goes a bit off the title subject, but I obtained the following image of Ganymede using a NexStar 6se and deconvolution, with the single aim of seeing if I could resolve surface features, and it worked better than I expected. I imaged Ganymede when Galileo Regio was centrally aligned, and I certainly succeeded in resolving it. This image is with a green filter: The color image I got from RGB was not so good, so I'll just offer the green version alone. I'm not sure I know of anyone else getting surface details with a telescope of this size.
Attached thumbnail(s)
|
|
|
|
|
|
|
May 26 2016, 07:03 PM
Post
#99
|
|
 Senior Member Group: Members Posts: 1624 Joined: 5-March 05 From: Boulder, CO Member No.: 184 |
Bjorn's global view has an intriguing crystalline look to it. I would guess that a global cylindrical map around 8K in size might look nice with these new mosaics.
-------------------- Steve [ my home page and planetary maps page ]
|
|
|
|
|
May 26 2016, 10:21 PM
Post
#100
|
|
|
IMG to PNG GOD Group: Moderator Posts: 2250 Joined: 19-February 04 From: Near fire and ice Member No.: 38 |
QUOTE (scalbers @ May 26 2016, 07:03 PM) I would guess that a global cylindrical map around 8K in size might look nice with these new mosaics. I'm working on a 20000 x 10000 pixel simple cylindrical map of Ganymede which corresponds to a resolution of 830 m/pixel. This oversamples much of the available coverage - there's significant coverage from Voyager 2 and Galileo at comparable resolution or slightly better though. QUOTE (JRehling @ May 26 2016, 06:50 PM) This goes a bit off the title subject, but I obtained the following image of Ganymede using a NexStar 6se and deconvolution, with the single aim of seeing if I could resolve surface features, and it worked better than I expected. I imaged Ganymede when Galileo Regio was centrally aligned, and I certainly succeeded in resolving it. This image is with a green filter: The color image I got from RGB was not so good, so I'll just offer the green version alone. I'm not sure I know of anyone else getting surface details with a telescope of this size. This looks awesome. It would be interesting to see what Jupiter looked like, the seeing must have been very good. |
|
|
|
|
May 27 2016, 01:43 PM
Post
#101
|
|
|
Junior Member Group: Members Posts: 64 Joined: 17-December 12 From: Portugal Member No.: 6792 |
QUOTE (JRehling @ May 26 2016, 07:50 PM) ... I'm not sure I know of anyone else getting surface details with a telescope of this size. That darker detail, so well centered on the disk, seems a bit like a processing artifact. Or your secondary mirror ;-) Extreme processing on images so small (compared to the theoretical resolution) can be tricky. The limb's contrast with the dark background can be enough to create a "doughnut" or ring effect. But if you can get more images and do a rotation movie, I'd be convinced ;-) -------------------- www.astrosurf.com/nunes
|
|
|
|
|
May 27 2016, 05:37 PM
Post
#102
|
|||
|
Senior Member Group: Members Posts: 2530 Joined: 20-April 05 Member No.: 321 |
Here's what Jupiter looked like the same night. That was indeed the best result I ever got for Jupiter.
I'm also attaching a demonstration of the power of digital refinement. These are from the red channel. Panel #1: A particularly bad single frame. Panel #2: A particularly good single frame. Panel #3: The result of stacking >800 frames. Panel #4: The result of wavelet processing (performed by the program Lynkeos) on the image in Panel #3. I did some reading on how others used wavelets and then played with the parameters on my own to arrive at my personal favorite settings; they depend on the target and the night, but I have a favored starting point to get me going.
Attached thumbnail(s)
|
||
|
|
|
||
|
May 27 2016, 05:42 PM
Post
#103
|
||
|
Senior Member Group: Members Posts: 2530 Joined: 20-April 05 Member No.: 321 |
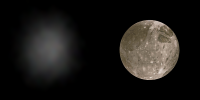
QUOTE (4throck @ May 27 2016, 06:43 AM) That darker detail, so well centered on the disk, seems a bit like a processing artifact. Or your secondary mirror ;-) Healthy skepticism, but I'm quite sure that it's real. I timed the image for when Galileo Regio was perfectly centered, so that is to be expected, and it was not centered in the vertical direction at all – very clearly in the north. This was also absent from previous efforts in imaging Ganymede with different central meridians. Here was an image of Ganymede taken about a day earlier, and a comparison image generated from maps. Galileo Regio is over where it should be – faint, but definitely not simply an artifact appearing dead center. I've tried and failed to get surface details on Io. I have probably gotten details on Mercury, but they're smudgy. Ganymede is an interesting challenge, but I don't think many astrophotographers even think of it.
Attached thumbnail(s)
|
|
|
|
|
|
|
May 27 2016, 08:29 PM
Post
#104
|
|
|
Member Group: Members Posts: 306 Joined: 4-October 14 Member No.: 7273 |
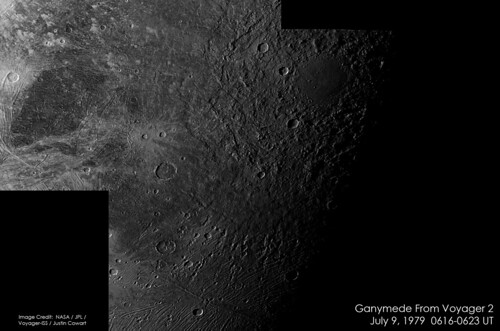
I've finished going through the Voyager 2 narrow-angle data set. The main prize is this 87-frame clear filter mosaic.
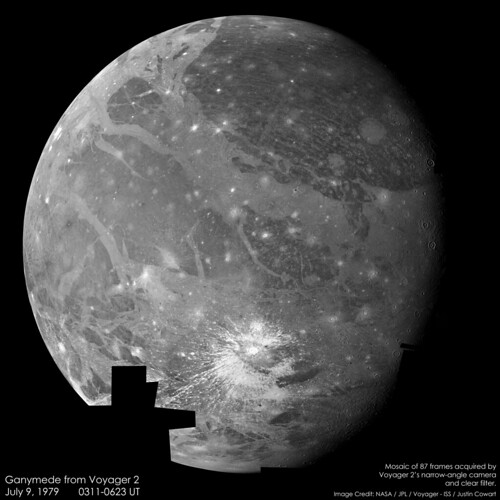 I really want to recommend checking out the full-resolution version of this, because it's like getting to see the New Horizons MVIC image of Pluto for the first time all over again! It looks like the imaging team broke down imaging into multiple smaller mosaics with a little bit of overlap. At the rate that Voyager was approaching the moon, I don't think taking the entire mosaic in a single go would have been possible with the huge change in viewing geometry over the three hours it took to acquire all of the imaging data. I started by assembling all of the submosaics, then warping them so that they aligned with one another. This process didn't require too much warping, although it was getting more difficult by the later mosaics. The image resolution is stopped down to the resolution of the first submosaic on Ganymede's limb, and I need to check the ephemerides to calculate what that resolution was. I've also uploaded the submosaics to my flickr page so you can view them all at full resolution - the later mosaics appear to have 2-3x the image resolution. There are a couple other images that didn't fit neatly into this mosaic. There was a UVIS drift sequence, for which ISS rode along to take support imaging. I've tracked down the locations of these frames and written a short description of the terrain in the FOV. 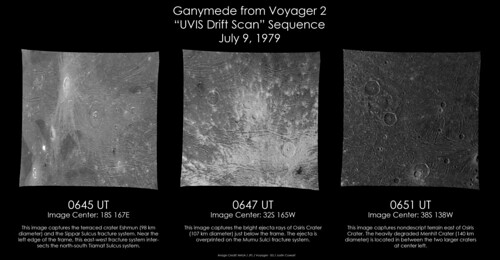 Finally, as Voyager 2 began to recede from Ganymede it looked back and took an 11-frame mosaic of the south pole, which is on the terminator about halfway up the image. 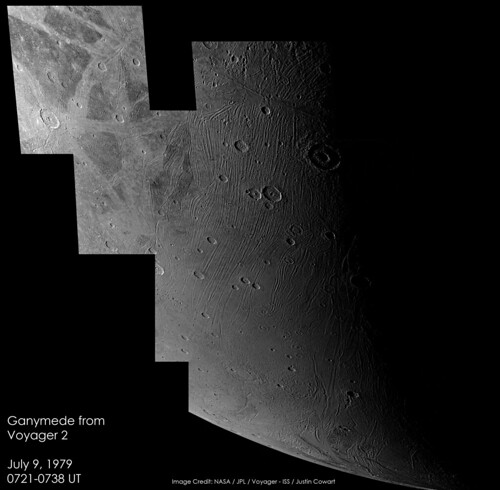 I really need to figure out how to do better geometric control on these images, because it'd be great to try my hand at colorizing these |
|
|
|
|
May 27 2016, 10:09 PM
Post
#105
|
|
|
Senior Member Group: Members Posts: 2530 Joined: 20-April 05 Member No.: 321 |
WOW! That blew up to a much larger size than I expected.
|
|
|
|
|

|
Lo-Fi Version | Time is now: 19th April 2024 - 01:01 PM |
|
RULES AND GUIDELINES Please read the Forum Rules and Guidelines before posting. IMAGE COPYRIGHT |
OPINIONS AND MODERATION Opinions expressed on UnmannedSpaceflight.com are those of the individual posters and do not necessarily reflect the opinions of UnmannedSpaceflight.com or The Planetary Society. The all-volunteer UnmannedSpaceflight.com moderation team is wholly independent of The Planetary Society. The Planetary Society has no influence over decisions made by the UnmannedSpaceflight.com moderators. |
SUPPORT THE FORUM Unmannedspaceflight.com is funded by the Planetary Society. Please consider supporting our work and many other projects by donating to the Society or becoming a member. |
|