1/4 Scale Rover Project |

  |
1/4 Scale Rover Project |
 Feb 4 2006, 09:10 PM Feb 4 2006, 09:10 PM
Post
#46
|
|
|
Junior Member  Group: Members Posts: 63 Joined: 20-April 05 Member No.: 312 |
Bill
I've found some good links to High Def photos of rover asembly process here on Wikipedia - also got some good technical descriptions http://en.wikipedia.org/wiki/Mars_Exploration_Rover Regards Brianc |
 |
 
|
|
Feb 4 2006, 09:18 PM
Post
#47
|
|
|
Junior Member Group: Members Posts: 63 Joined: 20-April 05 Member No.: 312 |
|
|
|
|
|
Feb 4 2006, 09:40 PM
Post
#48
|
|
 Dublin Correspondent Group: Admin Posts: 1799 Joined: 28-March 05 From: Celbridge, Ireland Member No.: 220 |
Nice finds brianc
this shot clearly shows the panel motor\hinge assembly both on the fully open position on the rear panel and closed on the side wing. Bill - I'm very impressed with your attention to detail. |
|
|
|
|
Feb 5 2006, 01:28 PM
Post
#49
|
|
|
Senior Member Group: Members Posts: 2998 Joined: 30-October 04 Member No.: 105 |
Between Doug, Brian and Helvick, I have a lot of "assembly" images now. Especially at the KSC image archive there are many images of the underside of the Rovers.
http://mediaarchive.ksc.nasa.gov/index.cfm and use ROVER as the keyword. Thanks! --Bill -------------------- |
|
|
|
|
Feb 5 2006, 01:53 PM
Post
#50
|
||
|
Junior Member Group: Members Posts: 63 Joined: 20-April 05 Member No.: 312 |
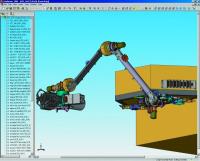
IDD - detailed schematic
Attached thumbnail(s)
|
|
|
|
|
|
|
Feb 6 2006, 07:48 AM
Post
#51
|
|
|
Junior Member Group: Members Posts: 72 Joined: 22-December 05 Member No.: 616 |
All the best with Your work Bill, looking forward to first assembly of Your MER

|
|
|
|
|
Feb 6 2006, 04:21 PM
Post
#52
|
|
 Senior Member Group: Members Posts: 1281 Joined: 18-December 04 From: San Diego, CA Member No.: 124 |
Are you going to wear a bunny suit while building it in your garage?

-------------------- Lyford Rome
"Zis is not nuts, zis is super-nuts!" Mathematician Richard Courant on viewing an Orion test |
|
|
|
|
Feb 6 2006, 05:33 PM
Post
#53
|
|
|
Senior Member Group: Members Posts: 2998 Joined: 30-October 04 Member No.: 105 |
No, but I have 1/4 scale Teletubbies to stand around and pretend to build it...
The images I now have show that there is an incredible amount of fine detail on the Rover body. Now I need to decide how I'm going to model this detail. The IDD is going to be difficult to do since it is delicate at this scale and I want it to be articulated. Thanks for the IDD schematic. I had assumed that the Rover, lander and cruise stage were built at a JPL facility and shipped to Kennedy, but evidently they were assembled a KSC. I'm in Mars Nirvana. First I got these Rover photos, and across the hall we have the most incredible Homeplate images. Could life get much better? --Bill -------------------- |
|
|
|
|
Feb 6 2006, 09:51 PM
Post
#54
|
|
 Senior Member Group: Members Posts: 2488 Joined: 17-April 05 From: Glasgow, Scotland, UK Member No.: 239 |
QUOTE (Bill Harris @ Feb 6 2006, 06:33 PM) No, but I have 1/4 scale Teletubbies to stand around and pretend to build it... The images I now have show that there is an incredible amount of fine detail on the Rover body. Now I need to decide how I'm going to model this detail. The IDD is going to be difficult to do since it is delicate at this scale and I want it to be articulated. Thanks for the IDD schematic. I had assumed that the Rover, lander and cruise stage were built at a JPL facility and shipped to Kennedy, but evidently they were assembled a KSC. I'm in Mars Nirvana. First I got these Rover photos, and across the hall we have the most incredible Homeplate images. Could life get much better? --Bill  Eh-oh! Aaaawww! Drugs? We don' need no' steenkeen' drugs! Bob Shaw -------------------- Remember: Time Flies like the wind - but Fruit Flies like bananas!
|
|
|
|
| Guest_PhilCo126_* |
Feb 7 2006, 10:05 AM
Post
#55
|
|
Guests |
Looking forward to see the first glimses of assembly & check-out
|
|
|
|
| Guest_PhilCo126_* |
Feb 7 2006, 10:06 AM
Post
#56
|
|
Guests |
Looking forward to see the first glimses of assembly & check-out
|
|
|
|
|
Feb 7 2006, 01:58 PM
Post
#57
|
|
|
Senior Member Group: Members Posts: 2998 Joined: 30-October 04 Member No.: 105 |
I'll keep photo-documenting the project and will post the highlights as it progresses. Getting the main structure assembled is going to be quite a job, but detailing it will be monumental. It may take a while, but I'll persevere.
--Bill -------------------- |
|
|
|
|
Feb 8 2006, 06:24 PM
Post
#58
|
|
|
Senior Member Group: Members Posts: 2998 Joined: 30-October 04 Member No.: 105 |
A minor update for those detailing their desktop MER models: for the chassis wiring, you can use "wire wrap wire with Kynar insulation" which comes in 26-30 gauge and various insulation colors. Google for more info.
For example, 30 gauge has a wire diameter of 0.010" and an insulation OD of 0.020", which is nominal for the solar panel surface wires on my 1/4 scale. The 26 gauge has a wire diameter of 0.016" and a OD of 0.026" or so. The KSC assembly close-ups are making me re-do my solar panels. Instead of being made from pieces of 0.20" plywood, in order to properly detail them, they need to be three-part sandwich with a recess around the outside edge. The revised solar panels will be a core of 1/8" (0.125") plywood with two 1/32" (0.031") ply outer surfaces. The existing ~1/4" ply pieces will serve as a template for the new pieces, and can be cannibalized for other parts, so they aren't being wasted. --Bill -------------------- |
|
|
|
|
Feb 8 2006, 07:34 PM
Post
#59
|
|
|
Senior Member Group: Members Posts: 2488 Joined: 17-April 05 From: Glasgow, Scotland, UK Member No.: 239 |
QUOTE (Bill Harris @ Feb 8 2006, 07:24 PM) The existing ~1/4" ply pieces will serve as a template for the new pieces, and can be cannibalized for other parts, so they aren't being wasted. --Bill Don't use them for spare wood, keep them for the off-road/sand-pit RC version! Bob Shaw -------------------- Remember: Time Flies like the wind - but Fruit Flies like bananas!
|
|
|
|
| Guest_PhilCo126_* |
Feb 9 2006, 07:11 AM
Post
#60
|
|
Guests |
Ever thought to make ' paper plans ' of the pieces You have cut out in plywood ?
So other people might be tempted to have a go at it ? 
|
|
|
|
|

|
Lo-Fi Version | Time is now: 28th April 2024 - 12:31 AM |
|
RULES AND GUIDELINES Please read the Forum Rules and Guidelines before posting. IMAGE COPYRIGHT |
OPINIONS AND MODERATION Opinions expressed on UnmannedSpaceflight.com are those of the individual posters and do not necessarily reflect the opinions of UnmannedSpaceflight.com or The Planetary Society. The all-volunteer UnmannedSpaceflight.com moderation team is wholly independent of The Planetary Society. The Planetary Society has no influence over decisions made by the UnmannedSpaceflight.com moderators. |
SUPPORT THE FORUM Unmannedspaceflight.com is funded by the Planetary Society. Please consider supporting our work and many other projects by donating to the Society or becoming a member. |
|