Vignetting, discussion about methods of resolution |

  |
Vignetting, discussion about methods of resolution |
 May 5 2006, 11:46 AM May 5 2006, 11:46 AM
Post
#61
|
||
|
Member  Group: Members Posts: 156 Joined: 18-March 05 From: Germany Member No.: 211 |
After a long, long time I am currently developing a new version of my anti vignetting tool, version 3. Again, it is based on IDL and can be used with RSI's Virtual Machine. See earlier this thread.
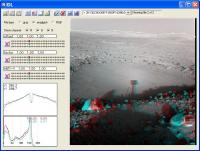
It is not complete, yet. The "save file" buttons are not fully functional up to now (you can't save). But, I want to give you a preview of what to expect during the next weeks. You can already play around and test it and tell me about any bugs that you find. The program is now faster due to a much improved and simpler de-vignetting routine. Also, you can do more adjustments than in the previous versions. Other improvements: - You can open as many files as you like and change between them during processing (pull-down-menu). - A '+' or '-' before each file name indicates the processing state (with or without de-vignetting). - After processing simply choose "save all" and the program will automatically save all the files in folders designated by you. - "Save all" will open a window with a list of all files and their current state of processing. It is planned to enable you to set output-folders for each file or copy a certain output-folder-name to a selection of files. After hitting "save", all currently processes images will be saved one after another. This could take some time as the program does not keep the whole file in its memory but just a smaller version. So it will read each file again, do the de-vignetting and save it to the destination folder. - Like in the previous versions you can choose either jpeg or 16-bit-tiff output (or both). Do you need any other file types (png)? - You can draw an area in the image window which will be used for the de-vignetting (by clicking with the left mouse button, set up to 64 points). Clicking close to an already present line will insert a new point. These points can be relocated by holding the left mouse button and moving the mouse. You can delete them by double-clicking (except the one in the lower left corner). - The selcted area can be copied from one image to another. - The de-vignetting of anaglyphs also removes the green/blue - red gradient wich often causes dark borders between image even though they vignetting has been removed. - You can also adjust the brightness of the image (shift the whole color range or with a multiplicative factor) and the amount of vignetting. - Clicking and holding with the right mouse button will show the unprocessed image if you have already processed it. This click will also select a line (x direction) the brightness values of which will be shown in the left hand window when changing the brightness and de-vignetting settings. That way you can optimally adjust the a-vig values. - The histogram of the image is also shown after each change. Even though the image is shown with a pixel value cut-off of 255 then actual histogram is shown in the histogram window. Saving the file as 16-bit-Tiff will retain even those pixels which are brighter than 255. - Moving the mouse cursor over a button will show you its function (help button is still missing). - you can choose the type of the image (gray-scale, anaglyph, RGB) manually, though it is determined automatically when loading it. Changing the type can have the benefit that you can move the sliders for the de-vignetting and brightnes adjustment either independently or together. before saving you should set it back to the actual type. Things I also want to implement is output of the de-vignetting or vignetting mask. There are certainly things that I forgot to mention. Simply try it out or ask me. So this is the time now to tell me your wishes or worries or both  The program is located here: http://www.muk.uni-hannover.de/~theusner/mars/anti_vig_n.sav Like in the previous versions, you must not, under all circumstances, change its name  Have fun playing around with it! Michael
|
|
 |
 
|
|
|
Jun 9 2006, 10:16 PM
Post
#62
|
|
 Member Group: Members Posts: 133 Joined: 3-June 06 From: the jungle of Nool Member No.: 799 |
Hi Michael,
I have been interested in your anti-vignetting program for some time -- but have resisted the HUGE ( 118 MB ) download of IDL6.3 VM. Well, I just downloaded the VM and your new version -- but before I run the VM install I want to understand the implications. How does the IDL VM interact with the O/S -- specifically Windows 2000? Requirements? I am running a Pentium 4 @ 1.5 GHz with 768 MB of memory. I am a little short of disk space on C ( down to my last few GB ) but have about a 100GB free on D. Looking forward to producing some "professional looking" panoramas utilizing your tool. color by horticolor: more real than real. |
|
|
|
|
Jun 11 2006, 07:58 PM
Post
#63
|
|
|
Member Group: Members Posts: 133 Joined: 3-June 06 From: the jungle of Nool Member No.: 799 |
Doesn't look like Michael is monitoring this thread anymore.
I tried antivig 2.0.2 -- worked great! Here is my first antivig panorama:  tried the new version -- looks like some interesting features -- but the saves -- don't. Anyway, I will use the tool for future pans -- including the McMurdo pan... Thanks Michael -- wherever you are. |
|
|
|
|
Jun 12 2006, 05:12 PM
Post
#64
|
|
|
Member Group: Members Posts: 156 Joined: 18-March 05 From: Germany Member No.: 211 |
QUOTE (hortonheardawho @ Jun 11 2006, 07:58 PM)  Doesn't look like Michael is monitoring this thread anymore. I tried antivig 2.0.2 -- worked great! Here is my first antivig panorama: tried the new version -- looks like some interesting features -- but the saves -- don't. Anyway, I will use the tool for future pans -- including the McMurdo pan... Thanks Michael -- wherever you are. Hello hortonheardawho, I'm just very busy at the moment with other things  Unfortunately, I can't tell you in what way VM interacts with Windows 2000. My admin at work installed it on my computer. That's as much as I know about it. Thanks that you like the program, your pan looks nice I hope I will find some time to complete the new version during the next weeks. I had hoped I'd have more time for that now, but things changed and I can't tell you now when all the missing features of version 3 will get implemented. I hope I manage that this summer.Michael |
|
|
|
| Guest_DonPMitchell_* |
Jun 12 2006, 06:07 PM
Post
#65
|
|
Guests |
Very cool work, Michael.
I know in a mathematically ideal camera, vignetting is cosine**4. But I think the geometry of real lenses is a lot more complex. Here is a paper I wrote with some friends on modeling lens effects: Camera Models Where does cosine to the 4th power come from? You get one cosine from the foreshortening of the lens, one from foreshortening of the element of area on the film, and two more from the 1/r**2 distance effect between the lens and locations on the film. For stitching panoramas, I've used a lot of different software (Autostitcher, Panorama Factory, etc), including just doing it by hand in Photoshop. The best tool I've found, by a long shot, is the stitcher in Microsoft Digital Image Suite 2006. It's the only function I used that program for, I barely know what else it does. This is software developed by the computer vision researcher, Rick Szeliski. Szeliski's algorithm is very general, and combines images with arbitrary projective transformations. Panning, tilting, zooming, even moving the camera location (modulo visibility changes then). Nothing else seems to handle all of these variables. |
|
|
|
|
Jun 13 2006, 02:47 AM
Post
#66
|
|
 Member Group: Members Posts: 408 Joined: 3-August 05 Member No.: 453 |
QUOTE (DonPMitchell @ Jun 12 2006, 02:07 PM) Here is a paper I wrote with some friends on modeling lens effects: Camera Models I had a sudden flashback to the earliest days of the WWW when I saw your paper...Craig Kolb, of Rayshade fame was one of your co-authors I see! I used to be a minor contributor to that great tool, and spent more than just a few hours creating scene files etc., the results of which are still out there on the web and at home and at work :-) This must be one of the oldest unmodified web sites around...? Airbag |
|
|
|
|
Jun 13 2006, 12:53 PM
Post
#67
|
|
 Dublin Correspondent Group: Admin Posts: 1799 Joined: 28-March 05 From: Celbridge, Ireland Member No.: 220 |
QUOTE (Airbag @ Jun 13 2006, 03:47 AM) This must be one of the oldest unmodified web sites around...? Coming up on 9 years: Last update: Friday, 11-Jul-1997 09:31:43 PDT. He. I had a page that was last active in 1996 go dark finally early last year - 9 years witout a change. The hosting company had changed hands four or five times without killing it but some audit finally cleared it out in the end. |
|
|
|
|
Jun 14 2006, 05:06 PM
Post
#68
|
|
|
Member Group: Members Posts: 156 Joined: 18-March 05 From: Germany Member No.: 211 |
QUOTE (DonPMitchell @ Jun 12 2006, 06:07 PM) Very cool work, Michael. Thanks DonPMitchell! That's a very interesting publication that you wrote. When I started this project a couple of months ago, I only had a document which described the MER imaging systems (can't find it anymore now...). It included the response function (as a plot) of the sensor+optics when imaging a surface of uniform brightness. It looked pretty much like a + b r**2 (b negative) to me and I tried it out. It worked very well and I found that there where only minor/negligible deviations. So obviously for the MER lense systems (pancam and navcam) the shape of cosine**4(theta) can very well be fitted by a function of the form f® = a + b r**2. Some time I will try out the formula that you gave in your paper. The good thing is that the MER imaging systems have a known, fixed f-stop. The sensor size and focal length are know, too. So, from the pixel location you could fairly easily compute theta and obtain E(x') or reverse. Though, there are some difficulties. The histograms of the recent images are always clipped and streched by unknown amounts by some automatic processes. So in the end you'd have something like E(x') = a + b[L...]. a and b would have to be determined by fitting, am I right? Michael |
|
|
|
| Guest_DonPMitchell_* |
Jun 14 2006, 05:42 PM
Post
#69
|
|
Guests |
If they measured the camera response, then that is better than theoretical models. The cosine**4 model is exactly correct if the lens is a thin disk. But a real camera lens is compound, a cylinder packed with simple lenses. So in addition to the ideal cos**4 effect, there are complex geometrical effects. I would trust the formula they published for MER.
|
|
|
|
|
Jun 29 2006, 07:43 PM
Post
#70
|
|
|
Junior Member Group: Members Posts: 37 Joined: 20-November 05 Member No.: 561 |
Is this anti-vignetting program specifically for MER photos? I had no idea.
You see, I have an old two-CD-ROM program called "Voyage to the Outer Planets" that includes "Voyager's Greatest Hits," a sample of original IMG files from the Grand Tour. They're the original 800 x 800 complete with reseau marks, and the vignetting is AWFUL. All the images get lighter, not darker, as you get near the edge. It makes homemade stitching look terrible. (Apparently you're supposed to correct them against something called "flatfield" images, but there's nothing like that on the CD. How do you do that?) I tried the old version on a borrowed XP machine with some Jupiter pictures. It seemed to work OK, except for the extreme corners. Would I really need a corrected version for Voyager images? Or should all the images be temporarily made into negatives, so the edges do go darker instead of lighter? Thanks. |
|
|
|
|
Jul 3 2006, 06:03 PM
Post
#71
|
|
|
Member Group: Members Posts: 156 Joined: 18-March 05 From: Germany Member No.: 211 |
QUOTE (jrdahlman @ Jun 29 2006, 07:43 PM) Is this anti-vignetting program specifically for MER photos? I had no idea. [...] I tried the old version on a borrowed XP machine with some Jupiter pictures. It seemed to work OK, except for the extreme corners. Would I really need a corrected version for Voyager images? Or should all the images be temporarily made into negatives, so the edges do go darker instead of lighter? Thanks. Well, first I wrote the program specifically for MER images. So, the vignetting that the program is designed to remove is that of the MER cameras, which have vignetting very close to r^2. So you can use it for all images that have vignetting of that kind. I know the "extreme corner problem", too, which I encountered with images that I had taken with a digital camera. It results from vignetting of higher orders I suppose. So, unfortunately, I suspect, the anti-vignetting program will not be able to eliminate it. Can you post one of the images here so that I can have a go? Michael |
|
|
|
|
Jul 4 2006, 09:51 AM
Post
#72
|
|
|
Senior Member Group: Members Posts: 1870 Joined: 20-February 05 Member No.: 174 |
The Voyager (mariners, viking) cameras have other problems beside vignetting that sort-of look like vignetting. The detectors were vidicon TUBES... cyindrical electron tubes with a window at one end and a photocathode light-sensative target just behind the window. In general, image quality was good in the central portions of the target and various artifacts increased toward the edges .... the edges of the CIRCULAR target. The corners of the view were closest to those edges.
I suspect that the artifacts are a combination of manufacturing irregularities of the target increasing toward the outer edge and imperfections in the readout electron beam scanning, focussing, intensity, and other quality measures near the edge of the scannable area. At any rate, there is more artifact structure and contrast in the dark exposure images and the flatfield bright exposure images in the corners of these vidicon images than in the central portions. These can include reverse-vignetting-like corner brightening and whatever. |
|
|
|
|
Jul 5 2006, 04:47 PM
Post
#73
|
|||
|
Junior Member Group: Members Posts: 37 Joined: 20-November 05 Member No.: 561 |
Sorry for the delay. My website requires me to upload files one at a time.
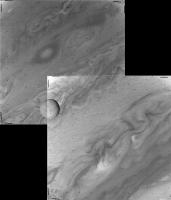
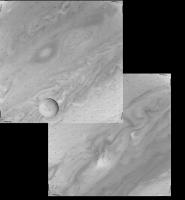
(Warning: lots of links follow.) I was trying to hand-stitch two Voyager Jupiter images: C1631753 and C1631755. Here's what it looks like if you just use the uncorrected images:
Ugly. Here are the two of them from my "Voyager's Greatest Hits" CD-ROM, in various versions: C1631753: the NASA "IMQ" file converted with IMG2PNG jpegged C1631755: the NASA "IMQ" file converted with IMG2PNG jpegged I fed the jpgs into your original anti-vignetting program, and it came up with this: C1631753_AV.jpg C1631755_AV.jpg Not understanding the controls, I also tried them with "pixel protect" set to 0%, whatever that does: c1631753_av0pct.jpg c1631755_av0pct.jpg If you want to see Voyager's vignetting on a blank image, the closest I have is C2683716. (It's actually a look at the moon 1985u1, so there's a dim disc near the middle you can ignore.) C2683716: the NASA "IMQ" file converted with IMG2PNG jpegged The program didn't know what to do with it: C2683716_AV.jpg Anyway, a mosiac is improved but not perfect:
(Darn it, I can line up the moon or the clouds but not both. Voyager couldn't have moved that fast in 2 minutes! Maybe one needs to be tilted. voy755753clouds.jpg Wish I had an auto-stitch program that would run on my machines.) |
||
|
|
|
||
|
Jul 6 2006, 12:37 PM
Post
#74
|
|
|
Member Group: Members Posts: 156 Joined: 18-March 05 From: Germany Member No.: 211 |
QUOTE (jrdahlman @ Jul 5 2006, 04:47 PM) Sorry for the delay. My website requires me to upload files one at a time. (Warning: lots of links follow.) Thanks for the images! I will have a look at them tonight (>19 UTC). Michael |
|
|
|
|
Jul 6 2006, 01:01 PM
Post
#75
|
|
 Senior Member Group: Members Posts: 3648 Joined: 1-October 05 From: Croatia Member No.: 523 |
QUOTE (jrdahlman @ Jul 5 2006, 05:47 PM) (Darn it, I can line up the moon or the clouds but not both. Voyager couldn't have moved that fast in 2 minutes! Maybe one needs to be tilted. Oh, yes, it could have moved that fast! In fact, it's probably not Voyager's perspective that changed that much as much as Europa progressed onward in its orbit + the clouds themselves are racing too, remember Jupiter is the fastest rotating planet. Europa orbits at a few kilometers per second and that's more than enough to change its position drastically in 2 minutes. -------------------- |
|
|
|
|

|
Lo-Fi Version | Time is now: 27th April 2024 - 05:43 AM |
|
RULES AND GUIDELINES Please read the Forum Rules and Guidelines before posting. IMAGE COPYRIGHT |
OPINIONS AND MODERATION Opinions expressed on UnmannedSpaceflight.com are those of the individual posters and do not necessarily reflect the opinions of UnmannedSpaceflight.com or The Planetary Society. The all-volunteer UnmannedSpaceflight.com moderation team is wholly independent of The Planetary Society. The Planetary Society has no influence over decisions made by the UnmannedSpaceflight.com moderators. |
SUPPORT THE FORUM Unmannedspaceflight.com is funded by the Planetary Society. Please consider supporting our work and many other projects by donating to the Society or becoming a member. |
|