Printable Version of Topic
Click here to view this topic in its original format
Unmanned Spaceflight.com _ Tech, General and Imagery _ Image Enhancement for Mineral Identification
Posted by: CosmicRocker Oct 18 2011, 06:55 AM
I'm not sure that those filter combinations will be more helpful than the one I posted. We need something that specifically targets the infrared fingerprint of hematite, like http://marsrovers.jpl.nasa.gov/gallery/press/opportunity/20040209a/Snout_R1divR2_R1_R5divR7-B016R1_br.jpg. I'm waiting for a good R5 so I can make one of those.
Posted by: Bill Harris Oct 18 2011, 02:15 PM
I think you've discussed this processing before, but fiddle if I can't find it. From the filename, I presume (assume?) that the processing steps are (R1/R2)(R1)(R5/R7) for the ( R )(G)( B ) values, and that R1/R2 is the value of R1 divided by the value of R2. My image processor doesn't divide and I can't recall what Boolean division is.
Image from Sol 014, BTW.
That spot is fairly bland (compared to recent locales) when looking at L257 and R721 images.
--Bill
Posted by: PDP8E Oct 19 2011, 04:38 AM
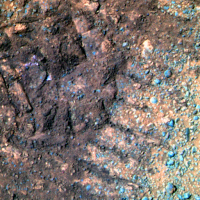
here is my shot at the recent (2748) scuff marks
<noise reduction, minor sharping, intensified colors a little>
|
Posted by: CosmicRocker Oct 19 2011, 06:00 AM
The enhanced color images you guys have made definitely help us better see the spherical clasts in this soil. I wonder if we'll get any MIs.
.........................................
Bill: You are right about that file name. It gives the recipe for the R, G, and B channels of the composite image. At first I didn't know how to divide two images, but a friend who is an image processing expert showed me how to do it. I use Photoshop, but I am sure other software has similar abilities. If there is interest in the topic, we can start a thread in "Image Processing Techniques." I'll try to summarize the process here.
For example, to divide R1 by R2, I would create an image with two layers...R1 on top and R2 below. I leave R2's blending mode as a "normal," but set the R1 blending mode to "screen." Next, I insert an adjustment layer between R1 and R2 and set it to "invert." Finally, I merge all the layers together into one flat image that will be R1/R2. The terminology I am using is from my old version of Photoshop. Your software may call these modes and layers by other names.
Posted by: Bill Harris Oct 19 2011, 10:34 PM
I'll see how those steps translate to Paintshop Pro.
My observation is that the L257 and R721 may be useful in separatring the various members of te iron (III) oxide-hydroxide family. Hematite tends towards blue while limonite tends towards yellow. Of course, without a spectrophotometer with the MER filters and a set of reference samples, this is just a casual observation.
--Bill
Posted by: JohnVV Oct 21 2011, 02:42 AM
I would not use paint shop
Nip2 would be perfect
http://www.vips.ecs.soton.ac.uk/index.php?title=VIPS
open the images in column A
do the math functions in column B
then turn B into a menu item ( point & click)
after the first you can repeat by opining the images in the correct order then choose this from the menu
simple
Nip / vips has all the math functions built in
in vip's you can do it all from the terminal without the gui overhead
simple bash script would do .
Posted by: djellison Oct 21 2011, 02:57 AM

....
in vip's you can do it all from the terminal without the gui overhead
simple bash script would do .
And for those without a background in command line syntax and so on, what you describe lies a great big steep chasm of learning away from being possible.
For that vast majority of people, Paintshop Pro, Gimp or Photoshop is far, far more appropriate.
For those with the skills, what you describe may be ultimately faster - but for most, it's folly to suggest.
Posted by: JohnVV Oct 21 2011, 03:00 AM
nip2 IS the gui front end to the vip imaging library
Posted by: CosmicRocker Oct 23 2011, 03:52 AM
But, this is a technical thread, is it not? I'm eager to hear about more efficient alternatives to the labor intensive Photoshop method, especially if we're talking freeware. I understand that command line applications are not for everyone, but I've used such things in the past, even as mainframe batch jobs. It's not my preferred method in this day and age, but I wouldn't be afraid to try it if it saved me time.
I was intrigued by JohnVV's recommendation of an application that has a spreadsheet interface for image processing. I love spreadsheets, and I downloaded vips and nip2 tonight. I haven't been able to try them yet. 
Getting back to the image at hand, the R5 without dropouts came down today. Using the Photoshop method, here is what I came up with.
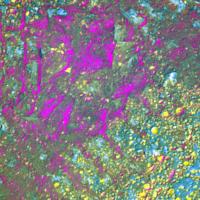
|
I wasn't expecting most of the larger rock fragments to have a hematite signature. The spherical ones and most of the others appear yellow in this IR false color image. I've studied hundreds of Opportunity images created according to this specific algorithm as we've roved across Meridiani Planum. In spite of the fact that they were made from uncalibrated, raw jpegs, the hematite concretions always appear in shades of yellow or occasionally orange. Ignore the purple, as that is how shadows appear in these images.
So, I have to wonder what this might mean regarding the geology and geomorphology of Cape York. Do abundant hematite fragments and spherules mean that the cape was once covered by the younger sulfate sediments with their embedded hematite concetions? Or, might these pieces of hematite have been tossed onto Cape York by meteorite impact processes?
Posted by: JohnVV Oct 23 2011, 04:18 AM
nip dose take some getting used to
I have been using it for many years , so at first it will seam a bit " odd"
you might want to have a look at the blog
http://libvips.blogspot.com/
an example of joining images is the Aug 9 joining of the bluemarble earth map
also nip was originally designed to work on 23 layer spectral images of paintings
the hires images were tiles that needing joining
so this DOSE make registered panoramas using "tie points"
an tutorial example
http://www.vips.ecs.soton.ac.uk/supported/current/doc/html/nipguide/nipguidese2.html
Powered by Invision Power Board (http://www.invisionboard.com)
© Invision Power Services (http://www.invisionpower.com)