Printable Version of Topic
Click here to view this topic in its original format
Unmanned Spaceflight.com _ Cometary and Asteroid Missions _ foldable map of Itokawa
Posted by: chuckclark Jan 23 2010, 03:39 AM
Not that I mean to compare Itokawa to a sausage, just to show you behind the scenes of making the map, along with the map itself, here, rather than continue to clog up the Hayabusa Return to Earth thread.
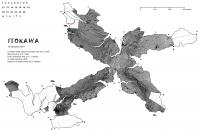
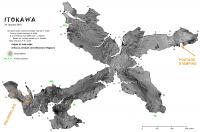
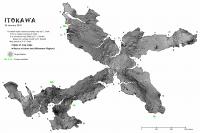
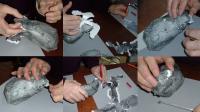
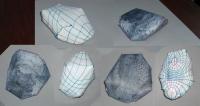
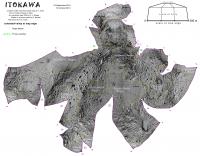
Here is the map itself, so far along as the pasting in of the mosaic has gone.
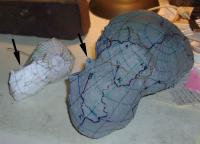
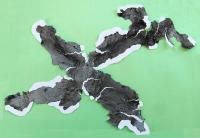
And here is are two shots of the folded up map, compared with the computer-made model. Note the arrow to one of the "ears." The first try of the map failed to capture the ear, so I replotted the boundary, as seen in the Tracing image.
All photos credit: Sara Adkins Studio
|
|
Posted by: chuckclark Jan 23 2010, 03:42 AM
Okay, ran out of file space on that post. Here are the Tracing and the Ear Failure images.
The tracing is taken full-size on acetate directly off the plastic model. The folded map is reduced half size.
|
|
Posted by: chuckclark Jan 23 2010, 03:45 AM
And here is a shot of the work lab where this all happens. Yes, that's a Japanese-made Mutoh magtop cover on the vertical drafting board. I'll post the map with the full mosaic tomorrow. Then, the race begins to put it together!
|
|
Posted by: Phil Stooke Jan 23 2010, 03:54 AM
Now that's what I call a workshop, Chuck! My office at UWO looks similar - I have to meet students elsewhere so we have somewhere to sit.
Phil
Posted by: chuckclark Jan 24 2010, 07:39 PM
Phil,
I'll have to expand the mosaic. Just off-panorama to the right is a mid-century dentist's chair for clients to sit while I draw their house plans, a reminder for them that the process of designing a home is not so much like shopping on Fifth Avenue as it is like getting a root canal.
Posted by: chuckclark Jan 24 2010, 07:56 PM
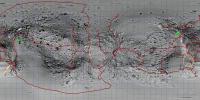
Well, so much for one more day. The mosaic has a glitch!
One of the small pleasures of pasting in the postage-stamp-sized pieces of the mosaic is watching the squirrely parts unscramble. This is fairly straightforward at the poles, and full of surprises at an asteroid's extreme contours. These have all resolved themselves with the notable exception of the "sea otter's" right neck, the orange circle. How I have it -- and i broke it down into 3.3 degree graticles -- can't be how it ought to look, yet I can't seem to find my mistake(s).
The problem might be in my hand-drawn graticles on the model, but I don't see how I'm far enough off to correct the squirreling. Suggestions welcome.
I've also got a mundane glitch at the orange arrow -- one of the postage-stamps pooched out the back of the active layer when I wasn't looking. Then, before I caught the goof, I merged the layer with the main mosaic. It's in one of the extreme contour areas, so I may have to rebuild the whole 10x10 degree "square."
This thing is gonna be wonderful when I can get a true-color mosaic . . . anybody out there working on that?
|
|
Posted by: Phil Stooke Jan 24 2010, 09:47 PM
Very interesting, Chuck, and there is a good reason for this. The cylindrical projection map assumes there is a unique location on the surface for any latitude-longitude coordinate pair. But at the location you are having trouble with, this breaks down for Itokawa - the surface is so irregular that a radius from the center of mass cuts the surface more than once. It's a well known cartographic problem for mapping irregular shapes, and it occurs on other bodies too. Your method independently discovers it. In this area of my map the image is messed up, but in a future version it could be fudged a bit better.
Phil
Posted by: stevesliva Jan 24 2010, 11:54 PM
Just wait until we find that Mobius-shaped asteroid. You guys will be soooo screwed.
Posted by: chuckclark Jan 24 2010, 11:59 PM

Phil
Oh. Well, so there ya go.
Although I don't think the constant-scale natural boundary method discovered it so much as it failed to correct it. If anything can be said for the CSNB method in regard to this sort of problem, I venture to say, is that CSNB -- because it works inward from the edge, capturing true shapes -- is not susceptible to the problem.
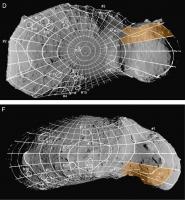
And nevertheless, I still need unscrambled info to fit into these three graticles, shown in orange on this page from the Icarus Itokawa article.
Can you go into the Gaskell shape model and spin it around until you get a nice, straight-on-as-you-can pic of each "square"? That'll be better than what I've got so far.
|
Posted by: Phil Stooke Jan 25 2010, 12:21 AM
I'll see what I can find tomorrow.
"Just wait until we find that Mobius-shaped asteroid. You guys will be soooo screwed. "
No - just a cylindrical projection with a twist!
Phil
Posted by: chuckclark Jan 25 2010, 01:15 AM
"No - just a cylindrical projection with a twist!"
Tee hee.
Steveliva, I'm afraid you've already gotten your wish -- it's these lumpy asteroids that are giving the standard cylindrical projections fits. Just look at the discombobulation that Itokawa's overhanging "cheekbone" causes.
Posted by: Phil Stooke Jan 25 2010, 02:13 PM
This is primarily for Chuck, but I'll post it here as others may be interested in the images.
Chuck - check out this site:
http://hayabusa.sci.isas.jaxa.jp/shape.pl
It contains the rendered images I used for mapping. I superimposed the lat-long grid from a published paper on the shape, and used that as control to reproject the various views to cylindrical, then combined them.
This page includes some images I did not use, and they might work for you. I don't have a model I can rotate to any view. I see two images in particular (view 4, view 6) that look obliquely into the weird areas you need to fix up. This is the only suggestion I have right now.
Phil
Posted by: chuckclark Jan 25 2010, 02:25 PM
"I'll see what I can find tomorrow."
Phil,
[EDIT, after Phil's last post] Oh. Nevermind. Maybe something will turn up in Houston.
Can you produce the squares in something approximating the "high contrast" look of the cylindrical map?
Can you produce the squares both with and without graticle lines? That way I can get a nice clean cut from the "without" square, and still use the "with" square to lock in the registration.
And, if you've time for another request, can you use the Gaskell shape model to check my latitudes on Itokawa's chin? See the pic; the magenta lines are my guesses for the 23.333 and 26.667 latitudes. It's pretty tricky, because of the chin's extreme elongation, to locate where these latitudes emerge at the surface. Can you plot these for the areas I show?
Some of my concern here (see the constant-scale natural boundary map) may be from pixel resolution. I had to stretch (enlarge) these squares by a factor of 5 from the cylindrical map. (At the poles, of course, the cylindrical map was way more pixels than I needed.) For most of the rest of the asteroid, the cylindrical map held about as many pixels as the corresponding area on the CSNB map.
But under the chin, especially, higher resolution would make for a crisper image than what we've got so far.
I've got to get hold of software that'll let me open and work with these digital shape models. Any suggestions?

|
Posted by: chuckclark Jan 25 2010, 08:11 PM
Okay. that wasn't so difficult.
I took this image that Phil steered me to, marked by eye the graticles, and then cut the white-outlined postage stamp (didn't bother to follow the goofy longitude line) and pasted it into the constant-scale natural boundary map.
Then it took some heavy fiddling to warp and match it with the rest of the map; not perfect, but it'll do until we get more accurate base material to work with. I don't have Phil's touch on the Photoshop's LEVELS adjustment, so I may have it too washed out; until someone gets it put together we won't know how it matches at the map boundary.
Also gonna be a learning experience to see how the repaired right "ear" goes together; fingers are crossed.
I used the clone stamp the clean up the postage stamping (at the other end of the map); didn't seem worth it to do anything fussier until we see how the mosaic matches up with itself when the thing is put together.
I've posted a larger image of the map over at http://rightbasicbuilding.com/asteroid-maps/itokawa-cut-n-fold/
|
|
Posted by: chuckclark Feb 1 2010, 07:30 PM
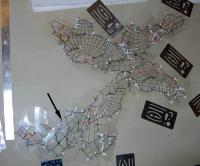
Here are the tabs I'm gonna try this time -- I neglected to keep track of the tabs I used to fold up the grid-only map.
The general rule I use when deciding whether to cut on the map-edge or leave a tab attached is to begin at any random "spot," i.e., the triple junctions (solid circles marked by letters) and the hinge points (open circles marked by numbers), and then switch (from cutting map-edge to leaving a tab) when I arrive at the next "spot."
This give a nice interweaving of tabs when assembling, and it seems to work out automatically, so you don't have to strain to think too far ahead about which edge will eventually match with which edge. This alternating tab-or-edge scissoring method means that there are basically only two possible tab layouts -- this always surprises me, but perhaps it is not news to mathematicians? One may be preferable over the other when it comes to assembling the tricky parts, the neck and the two, right-side "ears." Or the tab-and-edge rule may be better not followed in these areas; we don't know yet.
When cutting edges and tabs, check yourself where it's easy to do, though; it took me an hour or so to cut this out, and if I had missed a spot-changeover, then during assembly things would be all fouled up -- tabs matching tabs and no tabs matching no tabs -- not a fun outcome.
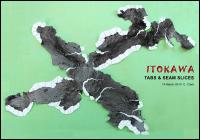
Seam slices -- to use Emily's vividly descriptive phrase -- are NOT shown. I'll use this cutout to keep track of minimum required slices and re-post it.
I can do that because I'm learning the hard way not to print (11x17 size, by the way, in case you lost track) the image on standard color-copy paper. It's too shiny for Scotch tape to stick well; I have to print and cut out another.
Be patient, that's gonna take me a few days because my good printer (Canon i9900) is on the blitz -- color is all screwed up and I'm at a loss how to fix it. I pinched pennies on my last ink cartridge order, going for the less-expensive Canon-compatible inks. I now have a mix of Canon and generic in it, which may be the source of my problem; or maybe the photo inks are fugitive, and -- I temporarily had the printer set up where it got afternoon sun -- the inks got bleached? Then again, maybe I have to haul it into the shop. Anybody have any experience with this?
By the way, since many of the hinge points (the numbered points) swing very narrow arcs, I had to place the numbers far up-stream of the points themselves. Other option was to shrink the font to ultra-teeny and put it in the open circles, but then unreadable. Why do you need them? The cylindrical map is marked correspondingly, so the numbers (and letters) help with orientation if you find yourself working back and forth from the conventional projection and the constant-scale natural boundary projection.
And, one final tip, when cutting into those narrow-arc hinge points: forget the alternating tab-and-edge rule; cut whichever side is easiest. I hold scissors in my right hand, so I cut the left side (working toward the hinge point) of the boundary. I see what I'm cutting rather than cutting blind.
Photo credit: Sara Adkins Studio / C. Clark
|
Posted by: chuckclark Feb 8 2010, 05:18 PM
Phil,
Can you remake the hi-contrast Itokawa cylindrical map with, let's say, twice the resolution of the existing?
I'm finding myself less than pleased with the results on the constant-scale natural boundary map in those areas where I have had to resample-up, sometimes by a factor of 5 in the x direction (under the chin).
Most of the rest of the surface is nearly 1:1, and of course at polar districts I'm reducing your cylindrical pixels a great deal.
I won't need latitudes and longitudes.
By the way, your touch on setting the high contrast is just right (mid-tones, darks and lights all hold up in both Photoshop warping and in printing); my one attempt went blotchy.
Thanks. Hope that's a doable request so near to LPSC.
Posted by: Phil Stooke Feb 8 2010, 05:46 PM
Hi Chuck - I just emailed it to you.
Phil
Posted by: chuckclark Feb 11 2010, 02:28 AM
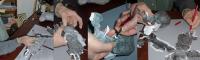
Okay. Three-fourths of the way put together. Here is a montage of typical activities when assembling.
Far left: I'm using the Scotch tape method, little pieces.
Left: applying tape.
Right: adding seam slices at an "ear," the same one I had to fiddle with earlier, after the test fold-up. I'm optimistic the ear is going to go together alright.
Far right: marking the tabs template with the extra ear seam slices.
I'll update the tabs template after I get all through with the assembly.
More later.
photo credit: Sara Adkins Studio / C. Clark
|
Posted by: nprev Feb 11 2010, 07:15 AM
I am always amazed & deeply impressed by people who have the talent and dedication to accomplish things like this.
You go, Chuck. 
Posted by: chuckclark Feb 11 2010, 03:49 PM
You go, Chuck.
Thank you, nprev. nice to be appreciated.
My little project is self-supported -- it's grown (and mightily so, I might add) out of an apprentice problem I'd been given a long time ago, when I chose architect as my job.
We all have our motivations; this, to quote out of context my mentor who gave me this problem, "is my best bid for immortality." (added emphasis.) In the meantime, we all need to live and eat.
Let me know if you happen across a well-heeled space enthusiast seeking to inspire the public with a low-risk hi-reward cartographic innovation -- constant-scale natural boundary mapping, an orphan idea if there ever was.
While those blockbuster Hi-risk high-reward projects hog the limelight, I'm puttering along in my basement lab, using renaissance-era tools and techniques to fiddle with space-age discoveries. Well, okay, and eighteenth century innovation, the spring-loaded scissors.
I justify this project because architects are required by law to continue education -- and what better educates than a better look at the planet -- but that excuse gets slimmer as CSNB enters its third decade of focused activity. Doesn't help, that each new subject takes me farther from Earth.
Hmmm . . . Have you noticed that the new Enceladus http://www.lpi.usra.edu/meetings/lpsc2010/pdf/2715.pdf looks to be promising raw material for a CSNB map . . .
And, not to digress overly, but I speculate that a spin-off application of CSNB to molecular mapping might be useful for addressing real world problems here on Earth. Not to mention that molecules are unchanged throughout the universe and time, so a way to map them into peculiar but eternal shapes, comparable (overlayable) as we architects compare floor plans ought to useful for basic science, shouldn't it? And then, you have the fun of cutting them out and folding them up . . . I'm just sayin'.
It's upstream on this post, but I'll mention it here again, thanks to JAXA for contributing the model used to make this CSNB Itokawa map.
Here is the folding sequence so far, maybe the better part of an hour counting extra time to keep track of seam slices:
photo credit Sara Adkins Studio / C. Clark
I'll post some group photos of the model, the test fold-up, the current current fold-up; then back to taping . . .
|
|
Posted by: chuckclark Feb 11 2010, 06:12 PM
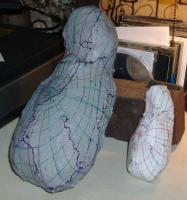
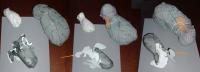
Here's the group photo.
On the plastic model, the orange region marks the district that gave me the most trouble in the basic layout. In the simple, "unpeeled banana" layout (where each branch of the map is nearly the same length and breadth) I could not eliminate district overlaps. The ad hoc solution was to append the "orange" district onto the end of another section of the "peel" (orange arrows). That's why the map has unbalanced branches. It also makes the folding a little trickier because you've got to connect this district out of sequence from a simple, end-to-end assembly.
The orange district also contains the area discussed above, where I could not unscramble the cylindrically projected map.
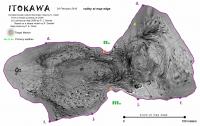
The white line around the throat of the plastic model identifies Itokawa's primary valley line; it will become the boundary for a map which organizes and presents Itokawa's surface as two hill districts. (The current map presents the surface as basins, or, to use Maxwell's 1875 term, "dales.")
Another failure of accuracy: note the big rock at 12:00 o'clock on the top right plastic model. I had thought that my map would be able to capture this bulge on the assembled form, but it doesn't. I ought to have caught that earlier -- as I did with the ear -- I could have fixed it. Good thing nobody's paying for this map.
Same photo credit: Sara Adkins Studio / C.Clark
|
Posted by: chuckclark Feb 16 2010, 02:07 PM
Here's the last taping and folding sequence. The middle panels are marking the template for more seam slices at the ears (top) and at the nose (bottom). I'll reissue the main map with tabs and seam slices.
Note the small tool -- a length of piano wire with a loop at the end, a substitute for too-large fingers -- I'm using to apply back pressure for the tape to stick.
And here's the final model sequence. It's not a stunning success:
along the lower spine in particular, as well near several hinge-points, there are gaps; these, I think, are artifacts of the hyper-detailed model. This well-detailed surface is a wonderful part of the JAXA model, but the many rocks peppering the surface made it difficult to trace boundaries precisely. I'd have done better with a special-purpose model that smoothed out this scale of relief.
the big "hindquarter" rock (mentioned above) is not expressed;
extensive use of tape is overpowering the thin paper's ability to hold its shape, especially around the neck. This happened with Ida, too, so perhaps a couple of internal ribs are needed for Itokawa, too. Then again, Itokawa is perhaps an elementary representative of a class of objects (objects with concave curves, let's say, which would include Kleopatra) that may be foldable only in theory or in computer simulations. More complex members of this class would be things with holes, such as crania http://rightbasicbuilding.com/question-of-crania/ (Very difficult to fold these things up.)
On the plus side, my fix of the unexpressed ear worked -- happy to learn how to go back in and refine the map edge -- although it's tiny size was almost too small to tape.
Overall, the starting map-size of 11x17 is too small for the taping method. I'll have to try Emily's cardstock-and-glue approach.
So, let's throw this tour wide-open -- anyone out there giving it a try? Post your folding results here!
Same photo credits: Sara Adkins Studio / C.Clark
|
|
Posted by: chuckclark Feb 16 2010, 02:09 PM
And to wrap up the tour -- everybody say cheese -- here's the group photo:
Odd how the test map holds its shape better than the final.
I'll have some slightly larger maps (12x18 super-tabloid) at LPSC
Gotta run. I need to make the valley-bound Itokawa map -- the map bounded by the white line on the plastic model -- in time for Thursday's poster session . . .
Same photo credit: Sara Adkins Studio / C.Clark

|
Posted by: chuckclark Feb 21 2010, 06:54 PM
And here's a beta version of conference handout.
Not sure if I'll be able, on the model, to sketch the boundary systems that'll make the two maps.
The Valley map isn't far enough along to paste in yet.
Oh, and I used the wrong cylindrical map; the orange "troublespot" (see above) shouldn't be marked.
Plus, this image will get some adjustments to the model levels for best printing results.

|
Posted by: chuckclark Feb 22 2010, 03:30 PM
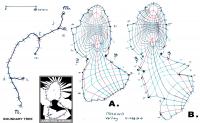
So, on to the valley-bound map. This map organizes Itokawa's surface into districts of hills. (the earlier one organized the surface into districts of basins.)
Unlike Eros, Ida, Phobos and Deimos, Itokawa has a more complex valley-tree. E, I, P, & D. all resolved their valley lines as single lines, no branches. But Itokawa's valley system is difficult to prune to a single line.
So, a poll, unfair perhaps, because the maps are incomplete, but of A or B, which do you prefer for a general purpose map?
A is more compact. The branches marked 10, 11, & 17 have been pruned away.
B gives more articulation to the various hill districts of the head.
Both A & B have considerable size distortion on the body section, but far less than in a standard cylindrical map. (It'd be interesting to quantify and compare precisely how much the two systems differ -- constant-scale natural boundary vs simple cylindrical. Hmm. Wonder how to do that . . .)
|
Posted by: chuckclark Feb 24 2010, 08:51 PM
And this is how the Valley "A" map looks.
That's the body on the left, and the head on the right.
See above for the model photo with the bright white line -- that's the edge of this map (less the pruned branches).
|
Posted by: Phil Stooke Feb 24 2010, 11:59 PM
Nic, Chuck! See you in Houston.
Phil
Posted by: chuckclark Feb 25 2010, 03:18 AM
Oh, forgot to say, I didn't try to unscramble the trouble spot, so the valley-bound map is a straight cut-and-paste off of Phil's cylindrical map.
And, now that I think to comment on it, this valley-bound map will fold up into something that will look like an apple turnover, if the earlier valley-bound maps (of Phobos, Deimos, Eros and Ida) are any guide. I won't start putting one together until sometime tomorrow.
Posted by: chuckclark Feb 25 2010, 11:07 PM
Well, several misalignments in the graticles at the folding seams, and one loss of constant scale at the edge -- my pen must have slipped or some other by-hand error. A seam slice into the map between points f & j on the body side was needed to match things up.
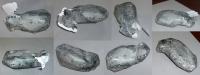
This shows both valley-bound versions A and B folded up. "A" has the image on it, "B" is the gridded object.
Note that the objects do not look like the asteroid. That's because the boundary tree is very short and not well spread across the object. Still folds up, though. Odd, no?
http://rightbasicbuilding.com/asteroid-maps/lpsc-handouts/itokawa/ for the polished image of the handout for next week's LPSC 41.
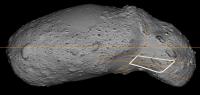
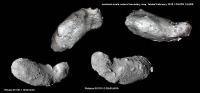
Here also is a comparison of the ridge-bound map with some JAXA shots of the asteroid; [EDIT] that's the paper model on the top, the photos of the actual asteroid on the bottom.
|
|
Posted by: chuckclark Mar 14 2010, 10:26 PM
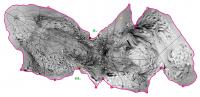
Here's the ridge-bound constant-scale natural boundary map of Itokawa marked with tabs and seam slices. The areas where the slices are very close together are the two "ears" on the otter's right-hand side.
If you are daring enough to try cutting and folding this map, don't use this a print of this image itself -- it is only a snapshot of a print of the map; it is not flat on a table. (Dumb of me not to produce this the accurate way, in the Photoshop file itself.) Scroll up and download the map; use this image as a guide for where to put tabs and seam slices.
Here also is the less-compact version of the valley-bound map pictured above in outline.
Oh, as far as Enceladus geology goes, I spent some time at the conference transferring the latest geology info onto a grapefruit, and onto a minneola, which I cut and peeled into a map. That old saw about how making a map is like unpeeling an orange is not so good -- oranges don't peel very easily; neither do grapefruits. It's more like unpeeling a minneola:
http://rightbasicbuilding.com/enceladus-first-globe-ever/
|
|
Posted by: chuckclark Oct 16 2010, 04:45 PM
Here's a more interrupted valley-bound map, this one with placenames and regio boundaries.
It is still not interrupted enough that, when folded, it makes a good facsimile of Itokawa, but it'll be a lot better than the two other constant-scale valley-bound maps.
I haven't yet folded this one, so I'm guessing that the body will be fairly good; the head won't be there at all, the effect a bit like a turtle with its head drawn in.
Dashed lines on Sagamihara and MUSES-C regios are totally unofficial.
|
Powered by Invision Power Board (http://www.invisionboard.com)
© Invision Power Services (http://www.invisionpower.com)